User’s Manual CentriVap® micro IR Vacuum Centrifugal Concentrators Models 77010 Series To receive important product updates, complete your product registration card online at register.labconco.com Labconco Corporation 8811 Prospect Avenue Kansas City, MO 64132-2696 800-821-5525, 816-333-8811 FAX 816-363-0130 E-MAIL labconco@labconco.com HOME PAGE www.labconco.com Please read the User’s Manual before operating equipment.
Copyright © 2011 Labconco Corporation. All rights reserved. The information contained in this manual and the accompanying products are copyrighted and all rights reserved by Labconco Corporation. Labconco Corporation reserves the right to make periodic design changes without obligation to notify any person or entity of such change. Warranty Labconco provides a warranty on all parts and factory workmanship.
TABLE OF CONTENTS CHAPTER 1: INTRODUCTION Safety Symbols 1 2 CHAPTER 2: PREREQUISITES Electrical Requirements Location and Exhaust Requirements Space Requirements 5 5 6 6 CHAPTER 3: GETTING STARTED Unpacking Your CentriVap micro IR CentriVap micro IR Components Setting Up Your CentriVap micro IR Emergency Access Into the Chamber Electrical Connection Rotor Installation Installing a CentriZap IR Strobe Light Chemical Resistance of CentriVap micro IR Components Solvent Safety Precautions 7 7 8 8 8 9 9 9
CHAPTER 6: ACCESSORIES FOR YOUR CENTRIVAP MICRO IR 19 CHAPTER 7: TROUBLESHOOTING 20 APPENDIX A: CENTRIVAP MICRO IR COMPONENTS 22 APPENDIX B: CENTRIVAP MICRO IR DIMENSIONS 23 APPENDIX C: CENTRIVAP MICRO IR SPECIFICATIONS Electrical Specifications Environmental Conditions Evaporation Rates 24 24 24 25 DECLARATION OF CONFORMITY 26
Chapter 1: Introduction Congratulations on your purchase of a Labconco CentriVap micro IR Vacuum Concentrator. The CentriVap micro IR Concentrator uses centrifugal force with heat and vacuum to rapidly evaporate and condense solvents from biological and analytical samples. Centrifugation eliminates bumping and foaming as vacuum is applied and also concentrates the solute in the bottom of the vial. This allows recovery of solutes from sample volumes as small as a few microliters.
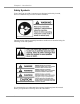
Chapter 1: Introduction Safety Symbols Your CentriVap micro IR Concentrator was designed with safety in mind, however conditions may exist that could be hazardous. Throughout this manual potentially hazardous conditions are identified using the following words and symbols. It is important that you understand the warnings listed throughout this manual before you operate the CentriVap micro IR Concentrator.
Chapter 1: Introduction Warning: Precautions for installation Connect to proper supply voltage. Verify that the supply voltage matches the voltage and hertz written on serial tag. Failure to do so could damage the unit or affect performance. Do not operate in environment with relative humidity exceeding 80% for temperatures up to 88°F (31°C), decreasing linearly to 50% relative humidity at 104°F (40°C). Doing so could cause electric leakage or corrosion.
Chapter 1: Introduction Do not use flammable sprays near the product. Doing so could cause fire. Protect the control panel from spills by wiping off any water or solvent with a clean dry cloth. Failure to do so could cause an unsafe condition or create a fire hazard. Do not clean the product with excessive quantities of water, thinner, benzene or petroleum-based products. Failure to do so could cause an unsafe condition or create a fire hazard.
Chapter 2: Prerequisites Before you install your CentriVap micro IR, you need to prepare your site for installation. Carefully examine the location where you intend to install your CentriVap. You must be certain that the area is level and of solid construction. In addition, an exhaust means must be provided. An electrical source must also be located near the installation site. Carefully read this chapter to learn: • The electrical supply requirements. • The exhaust requirements. • Space requirements.
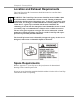
Chapter 2: Prerequisites Location and Exhaust Requirements The CentriVap micro IR Concentrator should be located on a surface that is stable, flat and level. WARNING: The CentriVap Concentrator should be located within a fume hood if hazardous or flammable solvents are used. Heating of materials could lead to the liberation of hazardous gases. In all cases, regardless of the solvent used, it is strongly recommended that the vacuum pump is vented in a fume hood.
Chapter 3: Getting Started Now that the site for your CentriVap micro IR is properly prepared, you are ready to unpack, inspect, install, and test the unit. Read this chapter to learn how to: • Unpack and move your CentriVap micro IR. • Set up your CentriVap micro IR. • Connect the electrical supply source to your CentriVap micro IR. • Properly exhaust your CentriVap micro IR. • Safely use solvents with your CentriVap micro IR.
Chapter 3: Getting Started CentriVap micro IR Components As previously mentioned, the CentriVap micro IR System is available in 115V or 230V. Locate the model of CentriVap you received in the following table. Verify that the components listed are present and undamaged.
Chapter 3: Getting Started CAUTION: Never attempt to defeat the latch or open the lid while the CentriVap micro IR is running. Personal injury can result from moving parts and chemicals. Electrical Connection Plug the power cord into the receptacle on the back of the CentriVap micro IR Concentrator and plug the other end into a suitable power receptacle. Rotor Installation The CentriVap micro IR Concentrator comes with a 1.5ml rotor installed.
Chapter 3: Getting Started Chemical Resistance of CentriVap micro IR Components Your CentriVap micro IR Vacuum Concentrator is designed to be chemical resistant to compounds that are commonly used in the concentration processes. However, by necessity, the CentriVap is comprised of a number of different materials, some of which may be attacked and degraded by certain chemicals. The degree of degradation is obviously dependent on the concentration and duration of exposure.
Chapter 3: Getting Started Solvent Safety Precautions CAUTION: The CentriVap micro IR is not classified as “explosion proof.” It has been designed with safety as a primary consideration and should be used in a prudent manner using “good laboratory practices.” It has been designed for use with compounds as described in the United States National Electrical Code Class I, Group D. The heater may be programmed to run as hot as 65°C, however, the heater elements may be hotter.
Chapter 4: Using Your CentriVap micro IR After your CentriVap micro IR has been installed as detailed in Chapter 3: Getting Started, you are ready to begin using your CentriVap. Read this chapter to learn how to: • Set operating parameters. • Operate the controls. • Properly select and position glassware inside your CentriVap micro IR. • Understand the display. • Interrupt a cycle after it has begun. NOTE: Do not store or stack supplies or equipment on top of the CentriVap micro IR.
Chapter 4: Using Your CentriVap micro IR Temperature Setting Guidelines The evaporation rate achieved by the CentriVap micro IR is dependent upon a variety of factors. These include the nature of the solvent, the temperature set point, the temperature mode and the pressure in the vacuum system. The Centrivap micro IR was designed to quickly evaporate small samples at elevated temperatures. The temperature can be set from 35°C to 65°C.
Chapter 4: Using Your CentriVap micro IR 1 65.0 2 3 4 5 6 7 8 9 10 1. Display – Shows set point parameters and actual measured conditions. 2. Start/Stop Button – Used to start or stop a run and reset the timer. 3. Time Button – Used to display time remaining. 4. Set Button – Use to program temperature and time. 5. Increase Button – Use to increase temperature and time in set up mode. 6. Decrease Button – Use to decrease temperature and time in set up mode. 7.
Chapter 4: Using Your CentriVap micro IR The time set point range is 00:00 (on) to 99:59 (99 hrs 59 min.) Preheat: To preheat the chamber, program the desired temperature and time. Make sure the chamber door is closed. Select the desired heat mode. IR/HEAT is recommended for preheating. Turn the Run Mode Selector to Standby. The heaters will raise the chamber temperature to the programmed set point. The actual chamber temperature will be displayed.
Chapter 4: Using Your CentriVap micro IR 9. Select “OFF” or “STANDBY” to terminate operation if the CentriVap micro IR rotor and to release the vacuum. Selecting “OFF” will turn the system off and reset the timer. Selecting “STANDBY” will turn the vacuum pump and rotor off and pause the timer. 10. When the evaporation is complete, allow the rotor to stop moving, lift the lid and remove the samples. Use caution as the lid and rotor could be hot.
Chapter 5: Maintaining Your CentriVap micro IR Under normal operation, the CentriVap micro IR requires little maintenance. The following maintenance schedule is recommended. Before servicing disconnect electrical power. Special precautions must be observed if materials used in the CentriVap micro IR Concentrator are known to be hazardous, toxic, radioactive or contaminated with pathogenic micro organisms. Before servicing, the CentriVap micro IR Concentrator must be suitably decontaminated.
Chapter 5: Maintaining Your CentriVap micro IR 7. Check the continuity of the protective earth ground between the ground terminal on the power inlet and a bare metal housing panel. Contact Labconco if there is no continuity. 8. Repair any defects to the surface where the unit is installed. Monthly: 1. The rubber and silicone components on the CentriVap may eventually deteriorate and require replacement. The effective life of those parts depends upon both their usage and the surrounding environment.
Chapter 6: Accessories for Your CentriVap micro IR The following accessories are available for the CentriVap micro IR Concentrator. PART # 7548400 7548500 7548600 7548700 7548800 7548300 DESCRIPTION Rotor, .5 ml x 24 Holds (24) 0.5 ml microcentrifuge tubes Rotor, 1.5 ml x 24 Holds (24) 1.
Chapter 7: Troubleshooting Refer to the following if your CentriVap micro IR fails to operate properly. If the suggested corrective actions do not solve your problem, contact Labconco for additional assistance. CAUTION: Disconnect power before corrective action is taken. PROBLEM CAUSE CORRECTIVE ACTION Unit will not operate Unit not connected to electrical power Connect unit to proper electrical receptacle. Circuit breaker blown Correct electrical problem and reset circuit breaker.
Chapter 7: Troubleshooting PROBLEM CAUSE CORRECTIVE ACTION Evaporation rate is reduced (continued) Obstruction in hose Remove obstruction or replace hose. Lack of adequate vacuum See below. Temp set point too low Increase temperature set point. Liquid in glass trap Empty trap. Leaks in lines or connectors or gasket Locate and repair. Foreign material on lid gasket Clean gasket and lid.
Appendix A: CentriVap micro IR Components The following pages list components that are available for your CentriVap micro IR. The parts shown are the most common replacement parts. If other parts are required, contact Product Service. Quantity 1 1 1 1 1 1 1 1 1 1 1” 1 22 Part No.
Appendix B: CentriVap micro IR Dimensions Product Service 1-800-522-7658 23
Appendix C: CentriVap micro IR Specifications This Appendix contains technical information about the CentriVap including specifications, environmental operating conditions, wiring diagrams and evaporation rates. Electrical Specifications • Nominal amperage for 115V CentriVap (model 7701020) (including vacuum pump): 5A • Nominal amperage for 230V CentriVap (models 7701030,-35,-37) (including vacuum pump): 3A • Frequency (all models): 50/60 Hz.
Appendix C: CentriVap micro IR Specifications Evaporation Rates Solvent Tube Size (ml) 1.5 1.5 1.5 1.5 1.5 1.5 Number of Samples 24 24 24 24 24 24 Sample Size (ml) 1 1 1 1 1 1 Temp (C) 35 35 50 65 65 65 Time to Dry (min.) 104 110 59 36 32 33 Heat Mode IR IR/Heat Heat Heat IR IR/Heat Water 1.5 1.5 1.5 1.5 1.5 1.5 24 24 24 24 24 24 1 1 1 1 1 1 50 50 60 60 60 65 240 330 225 145 180 129 IR IR/Heat Heat IR IR/Heat IR Isopropanol 1.5 1.5 1.5 1.5 1.
26 Product Service 1-800-522-7658