Rev. 1.2.0 Item no.
1. Important safety instructions 1. Important safety instructions Before using the device, be sure to carefully read the Safety Instructions. Keep this document with the device at all times. 1. 2. 3. 4. 5. 6. 7. 8. 9. 10. 11. 12. 13. 14. 15. 16. 17. 18. 19. 20. 21. 22. 2 Read these instructions. Keep these instructions Heed all warnings. Follow all instructions. Do not use this apparatus near water. Clean only with a dry cloth. Do not block any ventilation openings.
. Warnings To completely disconnect this equipment from the AC mains, disconnect the power supply cord plug from the AC receptacle. The mains plug of the power supply cord shall remain readily operable. Français: Pour démonter complètement l’équipement de l’alimentation générale, démonter le câble d’alimentation de son réceptacle. La prise d’alimentation restera aisément fonctionnelle. To reduce risk of fire or electric shock, do not expose this apparatus to rain or moisture.
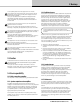
. Table of Contents 4. Table of Contents 1. Important safety instructions 2 2. Approvals 2 3. Warnings 2 3.1. Explanation of warning symbols 2 3.2. Warnings 2 3.3. Caution 3 3.4. User responsibility 3 3.4.1. Mains connection grounding 3 3.4.2. Speaker output hazard on amplifiers 3 3.4.3. Radio interference 3 3.4.4. Speaker damage 3 3.4.5. Maintenance 3 5. Introduction 6 5.1. Welcome 6 5.2. D Series: Two versions available 6 6. Feature summary 6.1.
4. Table of Contents 9. Operating voltage 10 9.1. Low voltage country considerations 10 10. Grounding 11 11. Product overview 12 11.1. Front panel 12 11.1.1. Additional front panel operations and indications 14 11.2. Rear panel 15 12. Signal flow and processing 16 13. Quick Start Tutorial 17 13.1. Network setup 17 13.1.1. Network connections/topology 17 13.1.2. Network configuration 17 13.2. Software installation and firmware update 18 13.2.1.
5. Introduction 5. Introduction 5.1. Welcome Thank you for choosing the Lab.gruppen D Series for your sound reinforcement needs. We are confident that you will be pleased with the performance, unique features, configuration flexibility, reliability, and long-term durability offered by this product. For fast installation and use of this product, your welcome package includes this printed copy of the D Series Quick Start Guide.
6. Feature summary 6.
7. Installation 7. Installation 7.1. Unpacking Carefully open the shipping carton and check for any damage to the device or the supplied accessories. Every Lab.gruppen product is tested and inspected before leaving the factory and should arrive in perfect condition. If any damage is discovered, please notify the shipping company immediately. Only the consignee may initiate a claim with the carrier or their insurers for damage incurred during shipping.
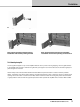
7. Installation Rear support bracket with mounting hardware Rear support bracket mounted for fixed installation and bracket pointing forward Rear support bracket mounted for removable installation and bracket pointing towards back 7.2.2. Mounting front grille The front grille is shipped on top of the amplifier inside the box to protect it during shipping. The front grille adheres to the amplifier with magnets.
8. Cooling and fan operation 8. Cooling and fan operation D Series devices use a forced-air cooling system with airflow from front to rear, allowing high continuous power levels without thermal problems. To facilitate maximum air flow, ensure that no objects such as rack doors or lids are placed at the front or rear of the rack. Never attempt to reverse the airflow.
10. Grounding Connecting the amplifier in three phase delta configuration In three-phase configuration where the phases are 120 degrees apart, one can connect three balanced loads in a delta configuration. The connection is made between the phases instead of between the neutral and a phase.
11. Product overview 11. Product overview 11.1. Front panel 1 The front panel is consists of an outer front with air intake and a centered user interface. The user interface has LEDs for monitoring and six recessed touch buttons for control.
11. Product overview Table 1 LED/category chart NOTE: See Faults and warnings (pages 23-25) for a detailed description of status, faults and warnings associated with each LED. OFF Green Amber Red Frame N/A Frame OK Frame warning Frame fault Temp N/A Temp OK Temp warning Temp fault PSU N/A PSU OK Power supply/ Mains warning Power supply/ Mains fault Power No mains power Fixed:ON Blinking: Turning ON Button pressed.
11. Product overview 11.1.1. Additional front panel operations and indications Frame reset A factory reset and soft reset can be performed from the front panel. A factory reset will restore all settings to original defaults, including network settings, frame presets and current settings. A soft reset reverts only the current settings to default. Network settings and frame presets are not changed with a soft reset. 1. Place the frame in standby mode. 2. Press and hold elect and channel 3 mute button.
11. Product overview 11.2. Rear panel 1 2 3 4 5 1 Amplifier Outputs - The amplifier output connectors are sturdy terminal block connectors. See Technical Specifications (pages 26-27) for connector rating. Channels are located from left to right.
12. Signal flow and processing 12. Signal flow and processing The table below is the signal flow diagram for D Series Lake versions.
13. Quick Start Tutorial 13. Quick Start Tutorial This section will describe how to get started with associated software and set up a basic system for operation. 13.1. Network setup 13.1.1. Network connections/topology Each frame has two network ports; a primary and a secondary. See the below diagram for a typical network topology using the primary ports. By default, the secondary ports are configured in Dual redundancy mode to support a second redundant network.
13. Quick Start Tutorial 13.2. Software installation and firmware update 13.2.1. Lake Controller software suite 1. The Lake controller software suite includes the Lake controller and accompanying utilities: Lake LoadLibrary, Dante discovery services and CAFÉ. Download the Lake Controller installation from www.labgruppen.com. 2. Execute the installer and follow the on-screen instructions. This is a typical software installation where the default settings are acceptable for the vast majority of users. 13.2.
13. Quick Start Tutorial 13.3. System setup This tutorial provides a step-by-step guide for configuration of a typical professional loudspeaker system and provides an overview of the basic features and operation of the frame. This tutorial describes how to configure 4-channel frame for use with a generic 3-way loudspeaker system (with separate HF, MF and LF drivers), plus a separate subwoofer.
13. Quick Start Tutorial Bridge Bridge 1 2 3 4 14. The B module is already a CL1way as default and can be used to drive the sub. 15. Tap Store/Recall EXIT to return to the Modules Menu. 16. Ensuring Module A (or any other module that you want to control) is selected (yellow border), tap I/O Config. 17. The right side of the I/O CONFIG screen displays a block diagram for the Modules.
13. Quick Start Tutorial Levels Control - Drag sliders and tap mute buttons for module input and output channels. Parametric EQ control – Select filter on the top squares and adjust filter properties by dragging the controls. Sliders at the bottom control center frequency and Q (bandwidth). Gain is controlled in the main window area. Additional filters can be added by tapping the top filter objects and placing new filters on the main area.
13. Quick Start Tutorial 21. Repeat step 16 and 20 for the B module. On the Output EQ/Crossover, tap the Aux Output Functions button on the menu bar and then tap LPF Enable button. Drag the Low pass filter control object on the frequency slider just above the menu bar to an appropriate crossover frequency for the sub, e.g. 100 Hz. Output EQ control - Add LPF/HPF and EQ filters and drag to adjust. 22. Use the control options mentioned in 17 to tune your loudspeakers.
14. Faults and warnings 14.
14. Faults and warnings Category/Type Name On screen text Description Action Increase mains distribution stiffness or reduce output power to avoid limiting PSU Warning Under Voltage Limit UVL ACTIVE The Under Voltage limiter is active as the mains supply is approaching the lower end of the device´s operational voltage.
14.
15. Technical Specifications 15. Technical Specifications D 200:4L D 120:4L D 80:4L Lake / Dante 4 20000 W 12000 W 8000 W Max. Output Power (all ch.’s driven) 1) 2 ohms 2.67 ohms 4 ohms 8 ohms 16 ohms Hi-Z 70 V Hi-Z 100 V 4400 W 5000 W 4400 W 2300 W 1150 W 3300 W 4700 W 3000 W 3000 W 3000 W 1900 W 950 W 3000 W 3000 W 2000 W 2000 W 2000 W 1500 W 750 W 2000 W 2000 W Max output power single channel (all models) 1) 2 ohms 2.
15.
16. Warranty and support 16. Warranty and support 16.1. General This product is manufactured by Lab.gruppen, and it is warranted to be free from any defects caused by components or factory workmanship, under normal use and service, for a period of six (6) years from date of purchase from an authorized Lab.gruppen dealer. If the product fails to perform as specified during the warranty period, Lab.
16. Warranty and support 16.2.2. Factory service In the event a Lab.gruppen product requires factory service, you may contact Lab.gruppen’s service department for return instructions and a Return Authorization number. Please note for product return: 1. Use the original packing. 2. Include a copy of the sales receipt, your name, return address, phone and fax number, email address and description of the defect. 3. Mark the Return Authorization number on the outside of the packing.
Notes Notes 30 D SERIES Lake Quick Start Guide rev 1.2.
Notes Notes D SERIES Lake Quick Start Guide rev 1.2.
Lab.gruppen adopts a policy of continuous improvement and product specification is subject to change. RPM, R.SMPS, PFC, CDM, BEL, UVL, CAFÉ, ESP, ISVPL, Iso-Float, Raised Cosine, MESA EQ, LimiterMax and LoadLibrary are trademarks of Lab.gruppen AB. All other trademarks remain the property of their respective owners. Copyright © 2015 Lab.gruppen AB. All rights reserved. Item no. QSG-DSERIES-LAKE labgruppen.