
Lake Controller Operation Manual
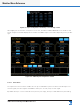
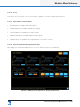


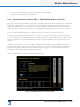
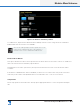
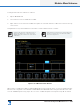
Table Of Contents
- 1. Welcome
- 2. Software Installation
- 3. Network & Firewall Overview
- 4. Lake Controller Tutorial
- 5. Home Menu Reference
- 6. EQ/Levels Menu Reference
- 7. System Store Recall Menu Reference
- 8. Modules Menu Reference
- 10. Groups Menu Reference
- 11. Solo/Mute Menu Reference
- 12. Icon Control Menu Reference
- 13. User Preferences Menu Reference
- 14. Pages Menu Reference
- 15. Network Menu Reference
- 16. Communication and Synchronization
- 17. Faults and Warnings
- 18. Analyzer Plug-in
- 19. Designer Mode Menu Reference
- 20. Lake-enabled Amplifier Reference
- 21. LM Series Reference and Operation
- 22. MY8-LAKE Reference and Operation
- 23. Keyboard Shortcuts
- 24. External Control Interfaces
- 25. Command Line Options
- 26. Firmware Update
- 27. Preset Manager
- 28. IP Address Reference
- 29. Corporate Information

Lake Controller Operation Manual Rev 1.5.9
Modules Menu Reference
135
To assign Dante Receive channels to a device:
1. Tap the RECEIVE tab
2. Select a device from the DEVICES scrollbar
3. Tap a channel on the Channels scrollbar then place the selected channel in a Receiver location at the top
of the screen.
This parameter is synchronized between the Lake Controller and the Dante Controller.
Channels that cannot be subscribed to due to
sample rate differences or other reasons are
displayed greyed out after those which can be
subscribed.
When Dante is locked for the receiving channel, an
asterisk * is shown next to the Receiver number
as shown in Figure 8-13.
Figure 8-13: LM Series Dante Receive
When Dante is enabled, the INPUT CONFIGURATION screen provides an option to view the assigned Dante
Receivers as congured on the DANTE CONFIGURATION > RECEIVE tab. To assign a Dante Receive chan-
nel to an available Input Priority, tap on an icon on the scrollbar and place in an Input Priority tab. A channel