
Lake Controller Operation Manual
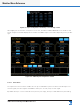
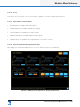


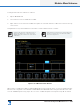
Table Of Contents
- 1. Welcome
- 2. Software Installation
- 3. Network & Firewall Overview
- 4. Lake Controller Tutorial
- 5. Home Menu Reference
- 6. EQ/Levels Menu Reference
- 7. System Store Recall Menu Reference
- 8. Modules Menu Reference
- 10. Groups Menu Reference
- 11. Solo/Mute Menu Reference
- 12. Icon Control Menu Reference
- 13. User Preferences Menu Reference
- 14. Pages Menu Reference
- 15. Network Menu Reference
- 16. Communication and Synchronization
- 17. Faults and Warnings
- 18. Analyzer Plug-in
- 19. Designer Mode Menu Reference
- 20. Lake-enabled Amplifier Reference
- 21. LM Series Reference and Operation
- 22. MY8-LAKE Reference and Operation
- 23. Keyboard Shortcuts
- 24. External Control Interfaces
- 25. Command Line Options
- 26. Firmware Update
- 27. Preset Manager
- 28. IP Address Reference
- 29. Corporate Information

132
Lake Controller Operation Manual Rev 1.5.9
Modules Menu Reference
To change the nominal current, tap the blue edit value and enter a value between 1.0 A and 32.0 A (5.0 A
and 32.0 A for PLM 20000Q). The actual value is displayed in brackets to the right of the desired editable
value, and varies depending on the minimum and maximum capability of the amplier model.
To change the currently selected breaker type, tap the required breaker on the scrolling bar at the bottom of
the screen then tap again in the Breaker Type box at the top of the screen.
Model Current (Amps) Fuse Options Available
D 200:4L 5-32 Conservative, Fast, Universal
D 120:4L 5-25 Conservative, Fast, Universal
D 80:4L 5-15 Conservative, Fast, Universal
D 40:4L 2-15 Conservative, Fast, Universal
D 20:4L 1-7 Universal
D 10:4L 1-7 Universal
PLM+ 5K44 2-15 Conservative, Fast, Universal
PLM+ 12K44 5-25 Conservative, Fast, Universal
PLM+ 20K44 5-32 Conservative, Fast, Universal
PLM 20000Q 5-32 Conservative, Fast, Universal
Table 8-2: Nominal current range and fuse options by product
8.2.5 Dante Configuration (not applicable for MY8-LAKE)
The Dante Conguration summary on the I/O CONFIG screen reports either the Global Dante Clock Sample
Rate, or advises that Dante is disabled; it additionally lists the assigned receiver subscriptions and associated
sample rate and status.
Further information on Dante settings can be accessed by tapping the zoom button or the associated text. A
screen similar to that shown in Figure 8-12 will be displayed.
To congure the device for Dante dual redundant operation, navigate to the TECHNICAL DATA screen via
the I/O CONFIG menu and enable the Dual Redundancy option. This change will require a power cycle of
the device; please refer to section 8.2.10.5.
8.2 . 5.1 Device Tab
Tapping the zoom button labeled DANTE CONFIGURATION displays the Dante Conguration > Device tab,
with Dante disabled by default: