
DeviceControl Operation Manual
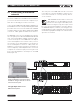
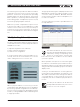
Table Of Contents
- FRONT PAGE
- 1 CONTENTS
- 2 DEVICECONTROL INTRODUCTION
- 3 INSTALLING THE DEVICECONTROL APPLICATION
- 4 CONNECTING YOUR PC TO NOMADLINK
- 5 QUICK GUIDE FOR BASIC FUNCTIONS
- 5.1 Uploading Subnet(s)
- 5.2 Toolbars overview
- 5.3 Start Here
- 5.3.1 Basic operations
- 5.3.2 Lock mode
- 5.3.3 Creating Channel Groups
- 5.3.4 Creating Power Groups
- 5.3.5 Naming (or renaming) Devices, Channels and Groups
- 5.3.6 Saving the configuration file
- 5.3.7 Opening a saved system configuration file
- 5.3.8 Reconnecting to a subnet
- 5.3.9 Establishing Secure Connections
- 5.3.10 Synchronization
- 5.3.11 Normal operation with devices matched and synchronized
- 6 REFERENCE SECTION

8 DeviceControl Operation Manual
4 connectinG Your Pc to noMADlinK
4.5 TCP/IP setup
To establish direct (peer-to-peer) communication
between the DeviceControl host PC and the NLB
60E, you first must set the TCP/IP address in your
computer.
The NLB 60E has following default address:
IP: 192.168.1.166
Subnet mask: 255.255.255.0
Gateway: 0.0.0.0
The PC must be set manually to a compatible ad-
dress, for example:
IP: 192.168.1.100
Subnet mask: 255.255.255.0
Gateway: 0.0.0.0
To establish a connection, use the following proce-
dure:
XP Home - Open the Start menu in the lower left 1.
corner. Select “Connect to” and then “Show all
connections”
XP Professional - Open the Start menu in
the lower left corner. Select “Settings”,
“Control Panel” and then (if in Classic view)
“Network Connections”. If the Control Panel
is in Category view choose “Network and
Internet Connections” and then “Network
Connections.”
Select “Local Area Connection”. Select 2.
“Properties” from the File menu or by right-
clicking on the selected icon. In the pop-up
window, select (highlight) “Internet Protocol
(TCP/IP)”. Click on the “Properties” button to
view TCP/IP Properties (Figure 4.2).
Select “Use the following IP address” and enter 3.
a desired address. (Figure 4.3).
Click in Subnet Mask. Keep the default 4.
255.255.255.0 value.
Leave Default Gateway open. Do not enter any 5.
values.
Click on OK. The address is now set. You can 6.
verify that your settings are correct by double-
clicking on “Local Area Connection” and
selecting the Support tab.
The PC is now ready to connect to the NLB 7.
60E. Refer to instructions in Section 5 .
Figure 4.3
Figure 4.2