
DeviceControl Operation Manual
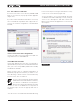
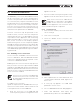
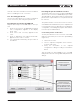
Table Of Contents
- FRONT PAGE
- 1 CONTENTS
- 2 DEVICECONTROL INTRODUCTION
- 3 INSTALLING THE DEVICECONTROL APPLICATION
- 4 CONNECTING YOUR PC TO NOMADLINK
- 5 QUICK GUIDE FOR BASIC FUNCTIONS
- 5.1 Uploading Subnet(s)
- 5.2 Toolbars overview
- 5.3 Start Here
- 5.3.1 Basic operations
- 5.3.2 Lock mode
- 5.3.3 Creating Channel Groups
- 5.3.4 Creating Power Groups
- 5.3.5 Naming (or renaming) Devices, Channels and Groups
- 5.3.6 Saving the configuration file
- 5.3.7 Opening a saved system configuration file
- 5.3.8 Reconnecting to a subnet
- 5.3.9 Establishing Secure Connections
- 5.3.10 Synchronization
- 5.3.11 Normal operation with devices matched and synchronized
- 6 REFERENCE SECTION

DeviceControl Operation Manual 19
Figure 6.2
Fill in “New Password” and “Confirm 8.
Password” with the same password set in
step 4. These passwords must be identical to
establish connection between DeviceControl
and NLB 60Es.
Verify that all NLB 60Es are selected. 9.
Press Set.10.
Press OK in the Settings dialog. The secure 11.
connection is enabled.
6.1.3 Adding additional subnets to a secure
connection
Additional subnets may be added to an existing
secure connection as follows:
Enable the secure connection physically in the 1.
additional NLB 60E as described in 6.1.1.
Start DeviceControl2.
Choose “Create a new configuration” in the 3.
Quick Start menu.
From the main window, select Settings from 4.
the File menu.
Click on the Security tab.5.
Click on “Change authentication password” for 6.
NLB 60E
The “Change NLB 60E Password” dialog pops 7.
up.
Leave “Old Password” field empty. (No a.
password has yet been set in the newly
added NLB 60Es).
“New Password” and “Confirm Password” b.
are filled in with the same password set
in step 8 in 6.1.2 above. These passwords
need to be the same to establish connection
between DeviceControl and the NLB 60Es.
Verify that all added subnets are visible. c.
Press “Deselect All” and select the new
(added) subnets only.
Press “Set”.d.
8. Press “OK” in the Settings dialog. Secure
connection is now enabled in the additional
NLB 60Es.
You can verify that a secure connection has
been enabled by checking the NLB 60E
information log via the front panel menu
and display. Refer to the NLB 60E Operation
Manual for more information.
6.1.4 Disabling secure connections
Use this procedure if you no longer wish to have a
secure connection to the NomadLink network.
Disabling secure connection in the NLB 60E
The following steps must be repeated for each NLB
60E in the system.
Press the Select key on the NLB 60E front 1.
panel until the Configuration menu appears in
the display. Press “OK”.
Press Select until Security menu appears. Press 2.
“OK”.
Press “OK” for “Secure Conn.”.3.
Press on Adjust/Set until “Disable” appears. 4.
Press “OK” to confirm.
The previously set password in the NLB
60E is reset (deleted) when the secure
connection is disabled. A new password
must b e set i n t h e NL B 6 0E w he n re - en abling
a secure connection.
Disabling secure connection in DeviceControl
Start DeviceControl1.
Choose “Create a new configuration” in the 2.
Quick Start menu.
Select “File” and then “Settings…” from the 3.
menu bar.
Click on the Security tab.4.
Uncheck the “Enable Secure Connection” box.5.
Type password in the “Disable secure 6.
connection” dialog.
Upon completing step 6 above, the pass-
word is reset (deleted). A new password
reference section 6