
DeviceControl Operation Manual
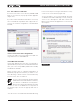
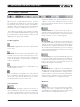
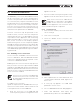
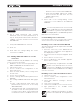
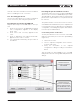
Table Of Contents
- FRONT PAGE
- 1 CONTENTS
- 2 DEVICECONTROL INTRODUCTION
- 3 INSTALLING THE DEVICECONTROL APPLICATION
- 4 CONNECTING YOUR PC TO NOMADLINK
- 5 QUICK GUIDE FOR BASIC FUNCTIONS
- 5.1 Uploading Subnet(s)
- 5.2 Toolbars overview
- 5.3 Start Here
- 5.3.1 Basic operations
- 5.3.2 Lock mode
- 5.3.3 Creating Channel Groups
- 5.3.4 Creating Power Groups
- 5.3.5 Naming (or renaming) Devices, Channels and Groups
- 5.3.6 Saving the configuration file
- 5.3.7 Opening a saved system configuration file
- 5.3.8 Reconnecting to a subnet
- 5.3.9 Establishing Secure Connections
- 5.3.10 Synchronization
- 5.3.11 Normal operation with devices matched and synchronized
- 6 REFERENCE SECTION

18 DeviceControl Operation Manual
6.1 Secure Connections
The NLB 60E(s), connected to a NomadLink network,
can be connected to only one PC running Device-
Control. If the preferred or authorized computer is
not connected, any computer with DeviceControl
installed may access the NomadLink network as
long as secure connection functionality is inactive.
A secure connection restricts network access to a
DeviceControl installation with a password setting
that matches the password in the NLB 60E.
A secure connection may be preferred in two
situations. First, a secure connection will prevent
unauthorized access to the NomadLink network:
only a DeviceControl application with a matching
password will be able to connect to the network.
Also, secure connections can simplify operation
and monitoring of two or more completely separate
NomadLink systems operating over the same LAN.
Several host computers can use the same network,
with each DeviceControl application accessing only
those NLB 60Es programmed with respective match-
ing passwords.
6.1.1 Enabling secure connections
Secure connection is available in DeviceControl ver-
sion 2.0.0 and above, and with NLB 60E firmware
version 2.0.0 and above. Both are required. Secure
connection is disabled as default.
Enabling a secure connection is a two-step process.
First, the secure connection option must be enabled
manually on each NBL 60E using the front panel key-
pad. Then a password must be set in DeviceControl
for both the host computer and all NLB 60Es with
secure connection enabled.
Once a secure connection is established in
DeviceControl, the secure connection will
be retained automatically with future soft-
ware upgrades.
To enable secure connection,
repeat the steps below for all NLB 60Es in the sys-
tem. DeviceControl must be offline to allow access
to front panel functions of the NLB 60E.
Press the Select key on the NLB 60E and 1.
continue pressing until the Configuration menu
appears. Press OK.
Press Select and continue pressing until Security 2.
appears. Press OK. Press OK for Secure Conn.
After secure connection is enabled in the
NLB 60Es, it is important to immediately
enable secure connection in the Device-
Control application. The connection is not
secure until both steps are completed.
6.1.2 Set password
From the main window, select File menu and 1.
choose Settings.
Click on the Security tab.2.
Check the “Enable Secure Connection” (box 3.
Figure 6.1).
Figure 6.1
Fill in a password in the “New Password” and 4.
“Confirm New Password” fields (Figure 6.2).
Press “Set”.
A new pop up appears “Set NLB 60Es 5.
password?” Click on “Yes”.
The “Set NLB 60E Password” dialog appears.6.
Leave “Old Password” field empty. (No 7.
password has yet been set in the NLB 60E).
6 reference section