
DeviceControl Operation Manual
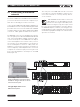

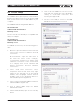
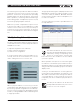
Table Of Contents
- FRONT PAGE
- 1 CONTENTS
- 2 DEVICECONTROL INTRODUCTION
- 3 INSTALLING THE DEVICECONTROL APPLICATION
- 4 CONNECTING YOUR PC TO NOMADLINK
- 5 QUICK GUIDE FOR BASIC FUNCTIONS
- 5.1 Uploading Subnet(s)
- 5.2 Toolbars overview
- 5.3 Start Here
- 5.3.1 Basic operations
- 5.3.2 Lock mode
- 5.3.3 Creating Channel Groups
- 5.3.4 Creating Power Groups
- 5.3.5 Naming (or renaming) Devices, Channels and Groups
- 5.3.6 Saving the configuration file
- 5.3.7 Opening a saved system configuration file
- 5.3.8 Reconnecting to a subnet
- 5.3.9 Establishing Secure Connections
- 5.3.10 Synchronization
- 5.3.11 Normal operation with devices matched and synchronized
- 6 REFERENCE SECTION

10 DeviceControl Operation Manual
The following section provides the basic information
required to use DeviceControl in most common ap-
plications. Instructions are provided for uploading
amplifier data from physical subnets, performing
basic operations, monitoring faults and warnings,
and creating groups of amplifiers (for power on/off)
as well as grouping amplifier channels.
Make sure you have completed the steps in Section
4, and you are ready to run the application; Double
click the DeviceControl shortcut on your Desktop or
select DeviceControl in the Start menu. On opening,
DeviceControl displays the Quick Start menu (Figure
5.1).
5.1 Uploading Subnet(s)
The Quick Start window (Figure 5.1) allows selection
of three different DeviceControl startup alternatives.
Available choices are:
1) Upload configuration from subnet(s)
2) Open a saved configuration
3) Create a new configuration
If you are working offline (no physical subnet is con-
nected), select the second or third choice to access
offline editing functions. See Section 6.3.
Figure 5.1
When a physical subnet is connected, you can au-
tomatically acquire data directly from the amplifiers
by selecting “Upload configuration from subnet(s)”.
DeviceControl interrogates the NomadLink network
interface, locating available subnets and listing them
in a pop-up window.
The pop up window (Figure 5.2) displays the detected
NLB 60Es along with their subnet numbers, secure
connection status, IP Address, NLB 60E firmware
version and the number of devices (amplifiers) con-
nected to the subnet.
Select the subnet(s) you want to upload and click on
the Upload button.
Figure 5.2
All detected subnets are selected in the
pop-up to be uploaded by default. Unselect
subnets by clicking corresponding check-
boxes. Or, you may use the “Deselect All”
button and check the checkboxes for the subnets
you wish to upload.
When Upload is clicked, DeviceControl interrogates
the subnets. In the default synchronization mode, it
uploads information from the subnets and automati-
cally generates lists and default groups for the various
display views.
Clicking on the Refresh button re-interrogates the
network after initial uploading. Use Refresh to up-
date subnet information when changes are made to
connected subnets, or when network connection is
temporarily lost due to inadvertent physical discon-
nection
As many as 60 subnets can be detected
and uploaded simultaneously into Device-
Control on one host computer.
5 QuicK GuiDe for BAsic functions