
User Guide


84
Service Manual NeoTherm 80 - NeoTherm 285
Appendix 1 - Error Codes (continued)
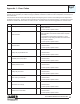
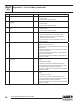
Code Description L or H Procedure
53 AC input phases reversed L 1. Check the module and display connections.
2. Check the module power supply and make sure that
both frequency and voltage meet the specications.
3. On 24 VAC applications, assure that J4 terminal 10
and J8 terminal 2 are connected together.
59 Internal fault: Mux pin shorted L Internal fault.
1. Reset module.
2. If fault repeats, replace module.
61 Anti short cycle H Will not be a lockout fault. Hold only.
See Section A9.
62 Fan speed not proved H Will not be a lockout fault. Hold only.
It is normal to see this during startup only.
63 LCI (Limit Control Input) off
Problem with safety interlock chain
H 1. See Section A8 . Check wiring and correct any
faults. Check Interlocks connected to the LCI to assure
proper function.
2. Reset and sequence the module; monitor the LCI
status.
3. If code persists, replace the module
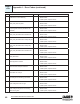
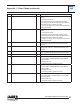
64 PII (Pre-Ignition Interlock) off H or L 1. Check wiring and correct any faults.
2. Check preignition interlock switches to assure proper
functioning.
3. Check the valve operation.
4. Reset and sequence the module; monitor the PII
status.
5. If code persists, replace the module.
67 ILK (Interlock) off H or L 1. Check wiring and correct any possible shorts.
2. Check Interlock (ILK) switches to assure proper func-
tion.
3. Verify voltage through the interlock string to the inter-
lock input with a voltmeter.
4. If steps 1-3 are correct and the fault persists, replace
the module.
68 ILK (Interlock) on H or L 1. Check wiring and correct any possible shorts.
2. Check Interlock (ILK) switches to assure proper func-
tion.
3. Verify voltage through the interlock string to the inter-
lock input with a voltmeter.
4. If steps 1-3 are correct and the fault persists, replace
the module.
70 Wait for leakage test completion H 1. Internal fault. Reset module.
2. If fault repeats, replace module.
78 Demand lost in run H 1. Check wiring and correct any possible errors.
2. If previous steps are correct and fault persists, re-
place the module.
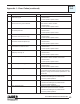
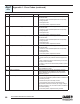
Code Description L or H Procedure
79 Outlet high limit H or L 1. Check wiring and correct any possible errors. See
Section B7.
2. Replace the outlet high limit.
3. If previous steps are correct and fault persists, re-
place the module.
80 DHW (Domestic Hot Water) high limit H or L 1. Check wiring and correct any possible errors.
2. Replace the DHW high limit.
3. If previous steps are correct and fault persists, re-
place the module.
81 Delta T limit H or L 1. Check inlet and outlet sensors and pump circuits for
proper operation.
2. Recheck the Delta T Limit to conrm proper setting.
3. If previous steps are correct and fault persists, re-
place the module.
82 Stack limit H or L 1. See Section B20.
2. Check wiring and correct any possible errors.
3. Replace the stack high limit switch.
4. If previous steps are correct and fault persists, re-
place the module.
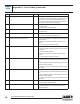
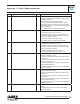
91 Inlet sensor fault H 1. Check wiring and correct any possible errors. See
Section B22.
2. Replace the Inlet sensor.
3. If previous steps are correct and fault persists, re-
place the module.
92 Outlet sensor fault H 1. Check wiring and correct any possible errors. See
Section B24.
2. Replace the outlet sensor.
3. If previous steps are correct and fault persists, re-
place the module.
93 DHW (Domestic Hot Water) sensor fault H 1. Check wiring and correct any possible errors. See
Section B26.
2. Replace the DHW sensor.
3. If previous steps are correct and fault persists, re-
place the module.
94 Header sensor fault H 1. Check wiring and correct any possible errors.
2. Replace the header sensor.
3. If previous steps are correct and fault persists, re-
place the module.
95 Stack sensor fault H 1. Check wiring and correct any possible errors. See
Section B20.
2. Replace the stack sensor.
3. If previous steps are correct and fault persists, re-
place the module.
96 Outdoor sensor fault H 1. Check wiring and correct any possible errors. See
Section B27.
2. Replace the outdoor sensor.
3. If previous steps are correct and fault persists, re-
place the module.
App1
cont.