
User Guide


79
Service Manual NeoTherm 80 - NeoTherm 285
Removing and Replacing
the SOLA Controller
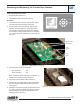
AlloftheNTunitsusetheSOLAcontroller.Thisprocedureexplainshow
toremoveandreplacethiscontroller.
Noticethat,asinstalledintheNTunit,theSOLAcontrollerismounted
“upsidedown.”Thisdoesnotaffectthewaythecontrolleroperates.
Ifyouorderareplacement,theSOLAcontrollerwillarrivewiththeEE-
PROM(programmingsoftware)alreadyinstalled.Theprogrammingis
differentfromonetypeofNTunittothenext.ThismeansthattheSOLA
controllersarenotinterchangeable.Whenyouorderthereplacement,
youmustspecifytheexacttypeofNTunityouhave.
Tools and equipment required
• 1/4”socket
Procedure
1. Beforeyoubegin,recordalloftheexistingcontrolsettings,ifpos-
sible.Thiswillallowyoutore-enterthesettingsafteryouinstallthe
newcontroller.Recordthecurrentsettingsfortemperatureset-
points,outdoorreset,andlead/lag.
2. Turnoffpowertothesystem.Usethemaindisconnectswitch
mountedabovethefrontpanel.
3. Removethefrontpanelfromtheunitbypullingitstraightout.
4. Disconnectthewiresandcablesleadingtotheunit:
Atthetopofthecontroller:
• Disconnectthegreenconnector.(Noticethatthisispluggedinto
therightendofthesocket.Besuretoreplaceitinthecorrectposi-
tion.)
Ontheleftsideofthecontroller(readingtoptobottom):
• DisconnectconnectorCP10fromJ10
• DisconnectconnectorCP9fromJ9
• DisconnectconnectorCP8AfromJ8(upperpart)
• DisconnectconnectorCP8BfromJ8(lowerpart)
Onthebottomofthecontroller:
• UnplugconnectorJ2
• UnplugconnectorJ1
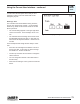
Fig. D9-1 - Honeywell SOLA
controller
D9