
User Guide


77
Service Manual NeoTherm 80 - NeoTherm 285
Removing and Replacing the Current User Interface
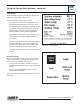
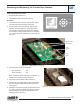
Fig. D7-1 - Current user interface
Tools and equipment required:
* Softcloth(cleantowel,etc.)
• SmallPhillips-headscrewdriver(size#1)
Procedure
1. Turnoffpowertothesystem.Usethemaindiscon-
nectswitchmountedabovethefrontpanel.
2. Pulltheupperfrontpaneloutward.Gripthetwo
handles,andpullstraightout.Oncethepanelis
free,handleitcarefully,becausethewireswillstill
beconnected.PlacethesoftclothontopoftheNT
unit.Swingthepanelupandplaceit,facedown,on
the cloth.
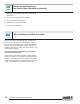
Ribboncable
connectors
X01-
12-pin
X07-
8-pin
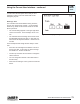
3. Disconnectthetwowiringconnectors:
• 8-pinconnector X07
• 12-pinconnector X01
Eachconnectorisheldinplacebyalockingtab.To
releasetheconnector,pushthetabdown.
4. Disconnectthetworibbon-cableconnectors.
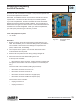
5. RemovethefourPhillips-headscrewsandseparate
theuserinterfaceboardfromthebackofthefront
control panel.
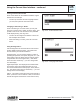
6. Belowthecircuitboardyouwillseethebuttonactua-
tor.Thisisasmallsoftplasticpartthatispartofthe
buttonassembly.Besurethispartremainsinthe
position shown in the photo.
Fig. D7-2 - Removing the connectors
Fig. D7-3 - Placing the button actuator
D7