
Install Instructions

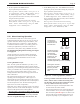


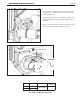
Table Of Contents
- Cover
- Table of Contents
- Table of Contents, Page 2
- Section 1 -GENERAL INFORMATION
- Section 2 -LOCATING THE APPLIANCE
- Section 3 -VENTING AND COMBUSTION AIR
- Section 4 -GAS SUPPLY AND PIPING
- Section 5 -PUMP REQUIREMENTS
- Section 6 -WATER CONNECTIONS -NTH BOILER
- Section 7 -ELECTRICAL AND WIRING DIAGRAMS
- Section 8 -THE USER INTERFACE
- 8.1 About the User Interface
- 8.2 Navigating the User Interface
- 8.3 The Home Display
- 8.4 Customizing your Home Display
- 8.5 Entering/Changing Control Settings
- 8.6 Quick Start
- Configuration and Setup
- 8.7 24 VAC Transformerwith Integral Circuit Breaker
- 8.8 Hydronic Heating Demand
- 8.9 Anti-Short-Cycle (ASC)
- 8.10 Outdoor Air Temperature Sensor
- 8.11 Outdoor Reset
- 8.12 Warm Weather Shutdown
- 8.13 Domestic Hot Water
- 8.14 About Lead Lag Operation
- 8.15 Adjusting CO2
- Section 9 -FIRST START-UP AND ADJUSTMENTINSTRUCTIONS
- Section 10 -MAINTENANCE
- Section 11 -OPERATING DETAILS AND TROUBLESHOOTING
- Section 12 -REPLACEMENT PARTS
- Appendix A -SOFTWARE CONTROL FUNCTIONS. Next 5 pages
- Appendix B -ERROR MESSAGES. Next 8 pages
- Back Cover. Contact information. Product and Service Videos

Page 42
LAARS Heating Systems
Display
Boiler 1
Boiler 2
Boiler 3 Boiler 4
Controller
Burner
Figure 33. –“LeadLag”OperationinaSystemwithFourBoilers.Note - the Displays on Boilers 2 thru 4
will display information pertaining only to that specic boiler.
Number of boilers
installed
Base load value
1 NA
2 65%
3 50%
4 35%
5 35%
6 35%
7 35%
8 35%
Table19. -BaseLoadSettings
NOTE: If your NeoTherms are Lead Lag congured,
you will nd it very useful to customize your Home
Display to show LL Operating Temp and LL
Setpoint Temp.
Please refer to Section 8.5 to learn how to customize
your Home Display. Various parameters can be
displayed on the Home Display to suit your needs.
this, the entire conguration of boilers will modulate up
or down together, in reaction to the changes in demand.
See Figure 34 through Figure 35.
Control Settings for Lead Lag System - Part 1
1. Power up all of the boilers in the system.
2. In an installation with several boilers, you can give each
boiler a different name. On each unit, go to the screen
for “System ID and Access,” and enter a unique name.
How to get there: From the “Home” screen, press “I”
to go to “Info/Install” Choose “Advanced Setup,” then
go to “System Conguration,” then “System ID and
Access,” and select “Boiler Name.”
3. The controller in each of the boilers needs a unique
“Modbus address” so the Lead Lag Master can
communicate with it. All of the units come from the
factory with a Modbus address of “1,” so you will need
to change some of these addresses. The unit operating
as the Lead Lag Master should have address “1,” and the
other boilers should each have unique Modbus address
numbers.
Caution
You should set the Modbus addresses before you
connect the Modbus wiring. If the wiring is attached
before the Modbus addresses on the controls are
changed, there will be multiple controls with the
same address, and the system will not work.
WARNING
If the Modbus addresses are not assigned properly,
the system could fail to operate correctly, or it might
operate in an unsafe manner. This could lead to
property damage, personal injury or death.
How to get there: On each boiler: From the “Home”
screen, press “I” to go to “Info/Install.” screen. Choose
“Advanced Setup,” then select “System Conguration”.
Then select “System ID & Access,” and select “MB1 Mod-
bus Address.” Change it to its new unique Modbus address
( 1-8), then select “MB2 Modbus Address” and change it to
the same address as the changed “MB1 Modbus Address”
DO NOT CHANGE THE MENU LINE “ModBus Address”.
It will automatically change when you change the “MB1
Modbus Address”
4. The next job is to identify each boiler as a Lead Lag
Master or Follower.
• On the boiler that will be used as the Lead Lag Master,
identify the unit that will operate as the master by
turning on “Master Enable.”
How to get there: From the “Home” screen, press “I”
to go to “Info/Install.” Choose “Advanced Setup,”
then go to “Lead/ Lag Conguration.” Select “Lead
Lag Master Conguration.” On the line for “Master
Enable,” select “Enable.”
8.14 AboutLeadLagOperation(continued)