
Install Instructions
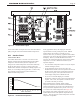
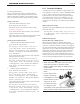

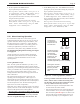
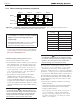


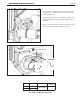
Table Of Contents
- Cover
- Table of Contents
- Table of Contents, Page 2
- Section 1 -GENERAL INFORMATION
- Section 2 -LOCATING THE APPLIANCE
- Section 3 -VENTING AND COMBUSTION AIR
- Section 4 -GAS SUPPLY AND PIPING
- Section 5 -PUMP REQUIREMENTS
- Section 6 -WATER CONNECTIONS -NTH BOILER
- Section 7 -ELECTRICAL AND WIRING DIAGRAMS
- Section 8 -THE USER INTERFACE
- 8.1 About the User Interface
- 8.2 Navigating the User Interface
- 8.3 The Home Display
- 8.4 Customizing your Home Display
- 8.5 Entering/Changing Control Settings
- 8.6 Quick Start
- Configuration and Setup
- 8.7 24 VAC Transformerwith Integral Circuit Breaker
- 8.8 Hydronic Heating Demand
- 8.9 Anti-Short-Cycle (ASC)
- 8.10 Outdoor Air Temperature Sensor
- 8.11 Outdoor Reset
- 8.12 Warm Weather Shutdown
- 8.13 Domestic Hot Water
- 8.14 About Lead Lag Operation
- 8.15 Adjusting CO2
- Section 9 -FIRST START-UP AND ADJUSTMENTINSTRUCTIONS
- Section 10 -MAINTENANCE
- Section 11 -OPERATING DETAILS AND TROUBLESHOOTING
- Section 12 -REPLACEMENT PARTS
- Appendix A -SOFTWARE CONTROL FUNCTIONS. Next 5 pages
- Appendix B -ERROR MESSAGES. Next 8 pages
- Back Cover. Contact information. Product and Service Videos

Page 38
LAARS Heating Systems
Here are instructions for setting up the Outdoor Reset
function. Notice that these instructions will be different,
depending on whether you have a single boiler or more than
one boiler (using Lead Lag operation).
Wiring Connections -
Connect the outdoor temperature sensor:
If your system has just one boiler –
Connect the sensor across terminals 1 and 2 on TB-7.
See Figure 31 on page 37.
If your system has more than one boiler, and is controlled
using the Lead/ Lag function –
Connect the sensor across terminals 1 and 2 on TB-7 on the
boiler which will be used as the Lead Lag Master.
Setting Up the Control Functions -
1. Enable the Outdoor Reset function:
Note: This function can be Enabled/Disabled only by a
factory trained technician.
2. Set the maximum outdoor temperature:
If the outdoor temperature reaches this value or above, the
system will use the Low Water Temp value as the setpoint. In
the example shown earlier, the Max. Outdoor Temp. is set to
70°F. If the outdoor temperature rises above 70°F, the system
will use 100°F (the Low Water Temp.) as the setpoint.
If your system has just one boiler –
How to get there: From the “Home” screen, press “I”
to go to “Info/ Install.” Choose “Advanced Setup,”
then go to “CH Conguration.” Select “Outdoor Reset
Conguration.” Set the value on the line for “Max.
Outdoor Temp.”
If your system has more than one boiler, and is controlled
using the Lead/ Lag function –
How to get there: From the “Home” screen, press “I” to
go to “Info/ Install.” Choose “Advanced Setup,” then go
to “Lead/ Lag Conguration.” Select “Lead/ Lag Outdoor
Reset.” Set the value on the line for “Max. Outdoor Temp.”
3. Set the minimum outdoor temperature:
If the outdoor temperature drops to this value or below, the
system will not compensate for the outdoor temperature. In
the example shown earlier, the Min. Outdoor Temp. is set to
32°F. If the outdoor temperature is below 32°F, the system
will use the normal system setpoint (130°F in this example).
If your system has just one boiler –
How to get there: From the “Home” screen, press “I”
to go to “Info/ Install.” Choose “Advanced Setup,”
then go to “CH Conguration.” Select “Outdoor Reset
Conguration.” Set the value on the line for “Min.
Outdoor Temp.”
If your system has more than one boiler, and is controlled
using the Lead/ Lag function –
How to get there: From the “Home” screen, press “I” to
go to “Info/ Install.” Choose “Advanced Setup,” then go
to “Lead/ Lag Conguration.” Select “Lead/ Lag Outdoor
Reset.” Set the value on the line for “Min. Outdoor Temp.”
4. Set the low water temperature:
If the outdoor temperature reaches the Max. Outdoor Temp. or
higher, the system will use the Low Water Temp value as the
new setpoint. In the example shown earlier, the Max. Outdoor
Temp. is set to 70°F. If the outdoor temperature reaches 70°F
or above, the system will use the Low Water Temp. value
(example - 100°F) as the setpoint.
If your system has just one boiler –
How to get there: From the “Home” screen, press “I”
to go to “Info/ Install.” Choose “Advanced Setup,”
then go to “CH Conguration.” Select “Outdoor Reset
Conguration.” Set the value on the line for “Low Water
Temp.”
If your system has more than one boiler, and is controlled
using the Lead/ Lag function –
How to get there: From the “Home” screen, press “I” to
go to “Info/ Install.” Choose “Advanced Setup,” then go
to “Lead/ Lag Conguration.” Select “Lead/ Lag Outdoor
Reset.” Set the value on the line for “Low Water Temp.”
5. Set the minimum boiler water temperature:
If a value is entered here, the temperature in the boiler will
never be allowed to drop below this temperature. This will
protect the boiler against possible damage due to expansion of
ice inside the unit. (Notice that this is different from the “low
water temperature” described above.)
If your system has just one boiler –
How to get there: From the “Home” screen, press “I”
to go to “Info/ Install.” Choose “Advanced Setup,”
then go to “CH Conguration.” Select “Outdoor Reset
Conguration.” Set the value on the line for “Min. Boiler
Water Temp.”
If your system has more than one boiler, and is controlled
using the Lead/ Lag function –
How to get there: From the “Home” screen, press “I” to
go to “Info/ Install.” Choose “Advanced Setup,” then go
to “Lead/ Lag Conguration.” Select “Lead/ Lag Outdoor
Reset.” Set the value on the line for “Min. Water Temp.”
8.12 WarmWeatherShutdown
About Warm Weather Shutdown -
The Warm Weather Shutdown feature tells the unit to stop
ring if the outdoor temperature rises above a temperature
you set. Notice that this affects the central heat or hydronic
function only. If a call for domestic hot water arrives, the unit
will still re and respond to that. Warm Weather Shutdown
requires the connection of an outdoor temperature sensor. See
Section 8.10. (If Outdoor Reset is active, the same sensor can