
Install Instructions
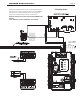

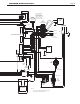
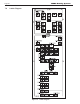
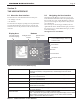
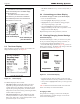
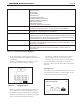
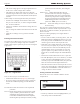
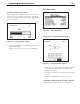
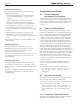
Table Of Contents
- Cover
- Table of Contents
- Table of Contents, Page 2
- Section 1 -GENERAL INFORMATION
- Section 2 -LOCATING THE APPLIANCE
- Section 3 -VENTING AND COMBUSTION AIR
- Section 4 -GAS SUPPLY AND PIPING
- Section 5 -PUMP REQUIREMENTS
- Section 6 -WATER CONNECTIONS -NTH BOILER
- Section 7 -ELECTRICAL AND WIRING DIAGRAMS
- Section 8 -THE USER INTERFACE
- 8.1 About the User Interface
- 8.2 Navigating the User Interface
- 8.3 The Home Display
- 8.4 Customizing your Home Display
- 8.5 Entering/Changing Control Settings
- 8.6 Quick Start
- Configuration and Setup
- 8.7 24 VAC Transformerwith Integral Circuit Breaker
- 8.8 Hydronic Heating Demand
- 8.9 Anti-Short-Cycle (ASC)
- 8.10 Outdoor Air Temperature Sensor
- 8.11 Outdoor Reset
- 8.12 Warm Weather Shutdown
- 8.13 Domestic Hot Water
- 8.14 About Lead Lag Operation
- 8.15 Adjusting CO2
- Section 9 -FIRST START-UP AND ADJUSTMENTINSTRUCTIONS
- Section 10 -MAINTENANCE
- Section 11 -OPERATING DETAILS AND TROUBLESHOOTING
- Section 12 -REPLACEMENT PARTS
- Appendix A -SOFTWARE CONTROL FUNCTIONS. Next 5 pages
- Appendix B -ERROR MESSAGES. Next 8 pages
- Back Cover. Contact information. Product and Service Videos

Page 31
NEOTHERM Residential Boilers
Section 8 -
THE USER INTERFACE
8.1 AbouttheUserInterface
The User Interface of the NeoTherm has two main parts:
• the ‘Display’ area and
• the ‘Buttons’
The User Interface displays operating and setup information
sent from the NeoTherms electronic burner controller and
allows the user to set all parameters of the electronic burner
controller.
Table17. -ButtonFunctionsonUserInterface
Display area This area displays several different kinds of information, including current
operating information, setup parameters, and messages from the SOLA
controller.
Up/ Down Arrow buttons Use these to go to the choice you want to select in the display area, then
press the round OK button.
Left/ Right Arrow buttons Use these to go to the choice you want to select in the display area, then
press the round OK button.
Back button Use this to go back to the previous display.
Info/ Install button Press this button at any time to go to the sub-menus that allow you to set up
and monitor the controller.
Home button Press this button at any time to go back to the Home display. (See the section
on “Home Display.”)
Round OK button Use the round OK button to conrm a value or action.
Note – Sometimes the system will present the Keyboard display screen, which
also includes a separate “OK” area. This is not the same as the round OK
button – the two have different functions.)
Note: This user interface is also referred
to as the EMEA Display. Videos are
available online.
8.2 NavigatingtheUserInterface
Navigating into the Display area menus is as easy as it
looks. The Info/Install button will be the primary button
that you will use to start, and the OK button is what you
press to select and approve the parameters that you have
set on the Display.
The arrow keys are for moving up and down, left and
right within the menus. The Back button gets you back to
the previous screen. And the Home button gets you back
to the Home Display.
SeeFigure27formoredetails.
Figure 27. TheUserInterface(EMEADisplay)
DisplayArea
(currently showing
the Home Display)
Up/Down Arrow
buttons
Left/Right Arrow
buttons
Back button
Info/Install
button
Home button
Round OK button
Buttons