
Install Instructions


Mascot ST Tankless Water Heater
Page 29
Customer Service and Product Support: 800.900.9276 • Fax 800.559.1583
Headquarters: 20 Industrial Way, Rochester, NH, USA 03867 • 603.335.6300 • Fax 603.335.3355
1869 Sismet Road, Mississauga, Ontario, Canada L4W 1W8 • 905.238.0100 • Fax 905.366.0130
www.Laars.com Litho in U.S.A. © Laars Heating Systems 1607 Document 4286A
800.900.9276 • Fax 800.559.1583 (Customer Service, Service Advisors)
20 Industrial Way, Rochester, NH 03867 • 603.335.6300 • Fax 603.335.3355 (Applications Engineering)
1869 Sismet Road, Mississauga, Ontario, Canada L4W 1W8 • 905.238.0100 • Fax 905.366.0130
www.Laars.com
Document 4286A
Mascot ST Gas Conversion Kit
pg 2 of 4
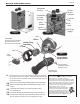
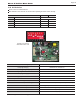
Figure A
Combustion
Air Intake
Assembly
Combustion
Test Port
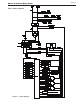
AGM
Actuator
Ignition
Transformer
Gas
valve
Gas Inlet
Pipe
Air Gas
Mixture
Chamber
Gas Pipe
(supply)
Needle / Ring
Assembly
AGM
Actuator
AGM cover
Blower
Combustion Air
Intake Assembly
2 screws holding
Combustion Air Intake
Assembly in place
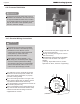
IMPORTANT!
Be sure to place an orientation
mark at the top of the Inner
Mount for ease of reassembly.
Ori ce
Air Gas Mixture
(AGM) Chamber
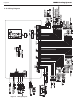
Figure C
Figure B
9.
Then remove the 3 screws. The AGM Cover and the Inner Mount
will separate away from the blower. Keep track of this disassembly
as you will need to re-assemble exactly as it comes apart. Keep all
screws and washers.
10.
Remove the ‘Needle / Ring Assembly’ (NG) from the Inner Mount.
11.
Remove the Ori ce (NG) from the AGM Chamber using a 19 mm
wrench.
12.
Thread the new Ori ce (LP) into place and tighten using
the 19 mm wrench.
13.
Thread the ‘Needle/ Ring Assembly’ (LP) into the Inner Mount.
14.
Re-assemble everything, using all screws previously removed.
Be sure that the Inner Mount has it’s Top Mark at the Top.
WARNING
This conversion shall be installed by a quali ed
service agency in accordance with the
manufacturer's instructions and all applicable codes
and requirements of the authority having jurisdiction.
If the information in these instructions is not followed
exactly, a re, an explosion or production of carbon
monoxide may result causing property damage,
personal injury or loss of life. The
quali ed service agency is responsible
for the proper and complete installation
of this kit. The installation is not proper
and complete until the operation of the
converted appliance is checked as speci ed in the
manufacturer's instruction supplied
with the kit.
Inner Mount
Customer Service and Product Support: 800.900.9276 • Fax 800.559.1583
Headquarters: 20 Industrial Way, Rochester, NH, USA 03867 • 603.335.6300 • Fax 603.335.3355
1869 Sismet Road, Mississauga, Ontario, Canada L4W 1W8 • 905.238.0100 • Fax 905.366.0130
www.Laars.com Litho in U.S.A. © Laars Heating Systems 1607 Document 4286A
800.900.9276 • Fax 800.559.1583 (Customer Service, Service Advisors)
20 Industrial Way, Rochester, NH 03867 • 603.335.6300 • Fax 603.335.3355 (Applications Engineering)
1869 Sismet Road, Mississauga, Ontario, Canada L4W 1W8 • 905.238.0100 • Fax 905.366.0130
www.Laars.com
Document 4286A
Mascot ST Gas Conversion Kit
pg 1 of 4
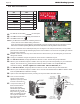
Kit # R20769
The Laars Mascot ST condensing gas water heater is
con gured for Natural Gas (NG) from the factory.
If your gas supply is Propane Gas (LP), your water
heater can be converted to burn propane gas as
follows:
NOTICE
The Natural Gas to Propane Conversion Kit (# R20769)
for the Mascot ST, is not included in the original box. To
order the conversion kit, please visit laars.com/support
to get the contact info for your nearest Laars Sales
Representative.
WARNING
This conversion kit must be installed by a quali ed service
agency in accordance with the manufacturer’s instructions
and all applicable codes and requirements of the authority
having jurisdiction. You must follow these instructions
to minimize the risk of fire or explosion or to prevent
property damage, personal injury or death. The qualified
service agency is responsible for the proper installation
of this kit. The installation is not proper and complete until
the operation of the converted appliance is checked as
specified in the manufacturer’s instructions supplied with
the kit. Installation must conform with local codes and the
latest edition of the National Fuel Gas Code, ANSI Z223.1
and CAN-B149 Failure to follow instructions could result in
serious injury or property damage.
The qualified agency performing this work assumes
responsibility for gas conversion.
CAUTION
This water heater has already been set to burn natural
gas, but can be converted to burn propane gas. Before
operating the heater, verify the type of gas supplied to
your water heater
To convert from natural gas
to propane gas
Steps 1 thru 30
1.
Turn OFF the Mascot ST.
The ON / OFF button is located at the bottom left of the
Control Display.
2.
Turn OFF the GAS and WATER supply to the Mascot ST
(valves are located on the plumbing pipes.)
3.
Using a Phillips screwdriver, remove the 4 screws on the
front cover. See Figure A.
4.
Locate the AGM (Air Gas Mixture) Chamber. See Figure B.
In order to open up the AGM Chamber and complete this
conversion, the Ignition Transformer and the Combustion
Air Intake Assembly must be removed.
5.
The Ignition Transformer will lift and pop from it’s location
on the side wall. It is designed to do this. Let it hang and do
not disconnect the wires from the transformer.
6.
Then remove the Combustion Air Intake Assembly by
removing the screw at the bracket ( See Figure C) and
the screw holding the Intake Assembly to the AGM cover.
The bracket then hinges outward so that the entire Intake
Assembly can be removed as one piece.
7.
Using a short Phillips screwdriver, remove the 2 screws
from the AGM Actuator. Do not disconnect the actuator.
Keep all screws and washers. Refer to
Figure C.
8.
IMPORTANT!
Using a paint pen or
a sharp object, place a mark onto the
Inner Mount near the top screw (there
are 3 screws). See Figure C. This
‘Top’ mark that you make will be very
important during reassembly.
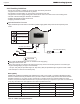
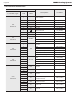
Original Natural Gas (NG) Conversion Propane Gas (LP)
Needle / Ring Ass’y
9.7 mm (0.382˝)
Orifi ce
9.5 mm (0.374˝)
Needle / Ring Ass’y
6.8 mm (0.268˝)
Orifi ce
7.0 mm (0.276˝)
Table A. Natural gas to Propane gas conversion parts
ON / OFF
H2373700A