
Install Instructions
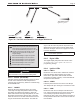

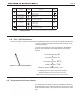

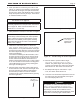

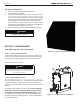
Table Of Contents
- Cover
- TABLE OF CONTENTS
- SECTION 1 GENERAL INFORMATION
- SECTION 2 LOCATING THE BOILER
- SECTION 3 AIR AND VENTING
- SECTION 4 GAS CONNECTIONS
- SECTION 5 PUMP REQUIREMENTS
- SECTION 6 WATERCONNECTIONS
- SECTION 7 ELECTRICAL AND WIRING DIAGRAMS
- SECTION 8 THE DIGITAL DASHBOARD
- SECTION 9 INITIAL STARTUP
- SECTION 10 MAINTENANCE
- SECTION 11 OPERATING DETAILS AND TROUBLESHOOTING
- SECTION 12 REPLACEMENT PARTS

Page 40
9.E System Shutdown
1. Turn o the main electrical disconnect switch.
2. Close all manual gas valves.
3. If you think the unit might freeze, drain it. All water must be
removed from the heat exchanger, or damage from freezing
may occur. To completely drain the boiler, rst drain the right
side by opening the boiler drain. Then remove the PRV and
related ttings. Then remove the top and left side panels.
Remove BOTH 1/2” plugs from the side of the boiler located
at the bottom of the casting. Once the water is fully drained,
reinstall the plugs and panels. See 10.A.3
4. Be sure to protect the piping in the building from freezing.
WARNING
This step must be performed by
a qualied service technician.
SECTION 10 MAINTENANCE
10.A Removing the covers and panels
WARNING
Do not leave this panel o in normal operation.
High voltage and temperatures could cause a
hazardous condition
10.A.1 Access Cover Removal
To remove the front access cover simply turn the lock at the top
center of the panel with a at screw driver (slot indicates locking
arm direction). Lift slightly and tip the top of the panel forward.
Reverse the process to reinstall.
10.A.2 Flue Collector Access
After removing the front access cover, the top access panel can
then be lifted up and o the unit. This will expose the ue collector.
Lift the ue collector using the handle in the front and slide it up
and out. This will allow access to the top of the heat exchanger for
cleaning.
Re-install the ue collector in reverse order, ensuring that the
front tabs contact the castings and the bottom ange
is inserted into the front heat exchanger bae. Return
the top panel by inserting the rear edge rst at approximately a
15-degree angle then dropping the front. There is a slight spring
force pushing forward.
Figure 36. Remove the Front Cover
Figure 37. Lift Flue Collector Up and Out
LAARS Heating Systems