
Installation Guide

WS-8418U-IT www.lacrossetechnology.com/support Page | 2
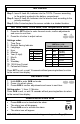
Get Started
Step 1: Insert 2 fresh AA, batteries into the TX37U-IT sensor according
to the polarity marked in the battery compartment.
Step 2: Insert 2 fresh AA, batteries into the atomic clock according to the
polarity markings.
Step 3: After 5 minutes place the sensor outside in a shaded location.
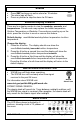
Set Time, Date, 12/24 Hour, and Temperature Units
1. Press the SET button to enter time set mode, confirm adjustments
and move to next item.
2. Press the + button to adjust values.
Settings order:
1. Time Zone
2. Daylight Saving Indicator
3. Language
4. Hour
5. Minutes
6. Year (2 digit)
7. Month
8. Date
9. Weekday
10. 12/24 Hour Format
11. Fahrenheit/Celsius
Press SET to exit, or wait 15 seconds without pressing buttons to return
to the normal time display.
Set Alarm Time
1. Hold ALM to enter ALM set mode.
2. Press + to adjust values.
3. Press ALM to confirm adjustments and move to next item.
Setting order: 1. Hour, 2. Minutes
Press ALM to exit, or wait 15 seconds without pressing buttons to return
to the normal time display.
Deactivate/Activate ALM
Press ALM once to deactivate the alarm.
The alarm icon will disappear.
Press ALM once to activate the alarm.
The alarm icon will appear.
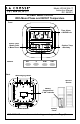
SET
+
ALM
+
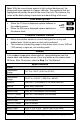
This clock has time zones from
GMT 0 to +/-12h
North American time zones:
-4
ATL
Atlantic
-5
EST
Eastern
(default)
-6
CST
Central
-7
MST
Mountain
-8
PST
Pacific
-9
ALA
Alaska
-10
HAW
Hawaiian
Languages
US
English
F
French
E
Spanish
d
German
Alarm
Icon