
Installation Guide


WS-8157U-IT www.lacrossetechnology.com/support Page | 2
Get Started
Step 1: Insert 2 fresh AA, LR6 1.5 volt Alkaline batteries into
TX37U-IT sensor according to the polarity marked in
the battery compartment.
Step 2: Insert 2 fresh AA, LR6 1.5 volt Alkaline batteries into
the atomic clock according to the polarity markings.
Restart: If the outdoor temperature shows dahes, remove
batteries from the atomic clock and outdoor sensor. Press any
button on the atomic clock 20 times. After 15 minutes, return
to Step 1 above.
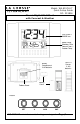
Set Time, Date, Temperature Units
1. Press the SET button to enter time set mode,
confirm adjustments and move to next item.
2. Press the + button to adjust values.
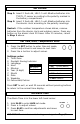
Settings order:
1. Time Zone
2. Daylight Saving Indicator
3. Language
4. Hour
5. Minutes
6. Year (4 digit)
7. Month
8. Date
9. Weekday
10. Fahrenheit/Celsius
Press SET to exit, or wait 30 seconds without pressing buttons
to return to the normal time display.
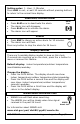
Set Alarm Time
The Alarm Time is in the lower left-hand corner.
1. Hold ALM to enter ALM set mode.
2. Press + to adjust values.
3. Press ALM to confirm adjustments and move
to next item.
This clock has time zones
from GMT 0 to -12h
North American time zones:
-4 ATL - Atlantic
-5 EST - Eastern (default)
-6 CST - Central
-7 MST - Mountain
-8 PST - Pacific
-9 ALA – Alaska
-10 HAW -Hawaiian
Languages:
US English
F French
E Spanish
ALARM
SET
+
+