
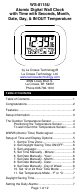
User Guide


Page 7 of 12
Press the “SET” button a ninth time and the
Day of Week abbreviation will flash. Use the
“PLUS“ button to set the correct day of week.
10. Set 12 or 24 Hour Time Mode:
Press the “SET” button a tenth time and the 12
or 24 Hour Time Mode digits will flash. Use
the “PLUS“ button to set the time mode to
either a 12 or 24 hour clock.
11. Set Temperature Mode - °F or °C:
Press the “SET” button an eleventh time and
the Temperature Mode abbreviation will flash.
Use the “PLUS“ button to set the temperature
mode to °F or °C.
Daylight Saving Time
• The National Institute of Standards and
Technology and WWVB encode a special DST
“bit” in the WWVB transmission for DST.
• Your La Crosse Technology® clock will read
this information (only if "DST" is set to "On")
and automatically advance the time one hour
in the spring and back an hour in the fall.
• Arizona and Indiana: If you live in an area that
does not recognize DST you must de-activate
Daylight Saving Time by setting "DST" to
"OFF"
• See "Set Daylight Saving Time ON/OFF" on
page 6 for instructions.
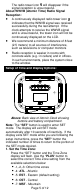
Setting the Daily Alarms:
• To turn the alarm on:
Press the "ALARM" button. The LCD will
display the alarm icon
.
• To set the Alarm Time - Hour: Press and
hold down the "ALARM" button for 2 seconds
until the hours digits flash. Use the “PLUS”
button to set the hour. Press the "ALARM"
button to confirm your setting and move to
setting the minutes.
• To set the Alarm Time - Minutes: The
Minutes digits of the Alarm Time will flash. Use
the “PLUS” button to set the minutes. You can
hold the "PLUS" button in to speed up the
setting of minutes by using five minute
increments. Press the "ALARM" button to
confirm your minutes setting and to end the
setting procedure.
• To activate or deactivate the daily alarms,
briefly press the “ALARM” button once. When
the alarm is active the clock displays the alarm