
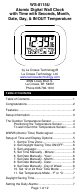
User Guide


Page 3 of 12
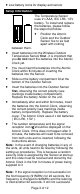
• Low battery icons for display and sensor
Setup Information:
The Temperature Sensor
uses 2 x AAA, IEC LR3, 1.5V
battery. To install and replace
the batteries, please follow
the steps that follow:
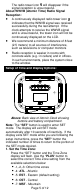
• Position the Atomic
Clock and the Outdoor
Sensor five to six feet
apart with nothing
between them.
• Insert batteries into the Wireless Outdoor
Temperature Sensor first - it is important that
you do not insert the batteries into the Atomic
Clock yet.
• You must insert the batteries into the Atomic
Clock within 3 minutes of inserting the
batteries into the Sensor.
• Slide out the battery compartment lid at the
bottom of the Outdoor Sensor.
• Insert the batteries into the Outdoor Sensor
first, observing the correct polarity (see
markings inside battery compartment).
Replace the battery holder on the unit.
• Immediately after and within 3 minutes, insert
the batteries into the Atomic Clock, observing
the correct polarity (see markings inside
battery compartment). Replace the battery
cover. The Atomic Clock uses 2 x AA batteries
( IEC LR6, 1.5V ).
• The outdoor temperature and the signal
reception icon should be displayed on the
Atomic Clock. If this does not happen after 3
minutes, the batteries will need to be removed
from both units and re-inserted, following the
instructions above.
Note: In the event of changing batteries in any of
the units, all units need to be reset by following the
setting up procedures. This is because a random
security code is assigned by the Sensor at start-up
and this code must be received and stored by the
Atomic Clock in the first 3 minutes of power being
supplied to it
Note: If the signal reception is not successful on
the first frequency (915MHz) for 22 seconds, the
frequency is changed to 920MHz and the learning
is tried another 22 seconds. If still not successful