
User's Manual

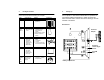


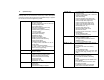

1. Low battery indicator
2. WWVB radio controlled time icon
3. Date display
4. Time zone display
5. Date, seconds, alarm time and time
zone
6. Alarm icon
7. Weather forecast icons
8. Weather tendency indicator
9. Pressure alarm display
10. hPa/inHg air pressure unit
11. Pressure units (relative or absolute)
12. 433MHz reception icon
13. Rainfall display
14. Indoor, outdoor, humidity, dew point,
wind chill, rainfall alarm icon
15. 24h, 1h or total hour display
16. Humidity display as RH%
17. Rainfall units (inch or mm)
18. Temperature display units (ºC or ºF)
19. Outdoor temperature/humidity display
20. Indoor temperature/humidity display
21. Dew point temperature display
22. Wind chill temperature display
23. Wind alarm icon
24. Wind information for Min/Max speed
and wind speed low, high, direction
alarm
25. Wind direction and speed (m/s, knots,
Beaufort, km/h or mph) display
26. Alarm buzzer ON/OFF icon
27. General alarm icon
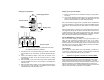
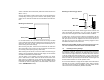
To operate using cable connection, simply use the enclosed 32ft
cable and connect the thermo-hygro sensor to the base station. Once
the connection is detected, the base station will automatically con-
tinue reading the data from the sensor.
The user may at any time switch from cable connection to using
433MHz (or vice versa) by simply disconnecting (or connecting) the
cable from the base station to the sensor. When the base station
detects no cable connection to the sensors, the base station will
automatically change to using 433 MHz for reception of the weather
data from the sensors.
The data receiving intervals are as follows:
- Using cable connection data is updated every 8 seconds.
- Using wireless 433 MHz data is updated from 16 to 128 second
intervals depending on wind speed and rain activity.
Using the AC adaptor to operate the base station will also supply
power to the sensor if the cable is connected to it. Batteries used for
433MHz transmission may be left in the sensor when using cable
connection for power back up in case of AC power failure. A loss of
power would desynchronize the base station and the sensor and no
weather data will be received. To Synchronize the units so that the
weather data can be received, press and hold the PLUS (+) key for 2
seconds. However in general, batteries that will not be used for long
periods should be removed to avoid leakage.
Wireless 433MHz transmission:
Using 433MHz wireless transmission of weather data from the sensor
to the base station will provide users greater freedom as to where
units can be positioned without the need to be restricted by cable.
Note:
If no outdoor weather data is displayed or the signal to the sensors is
lost during setting up, mounting, changing of batteries to the sensor or
plugging or unplugging cables, simply press and hold the PLUS (+)
key for 2 seconds and a short beep will sound to synchronize the
base station to sensors. Without being synchronized, weather data
will not be received.
7. LCD Overview
The following illustration shows the full segments of the LCD for
description purposes only and will not appear like this during
normal operation and use.
16
1
2
3
4
5
6
7
8
9
10
13
12
14
15
17
23
11
19
20
22
21
18
24
25
26
27