WS-8015U Wireless 433 MHz Weather Station with Sun/Moon Time Instruction Manual
TABLE OF CONTENTS Topic Inventory of Contents/ Additional Equipment Quick Set Up Guide About WWVB Detailed Set Up Guide Battery Installation Start Up Sequence Explanation of LCD Information Function Key Layout Program Mode Time, 12/24 Hour Mode and Date Setting City Location Setting U.S.
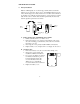
INVENTORY OF CONTENTS 1. WS-8015U—indoor weather station 2. TX4U—remote thermo/hygro (temperature/humidity) sensor 3. Instruction manual and warranty card Figure 1. ADDITIONAL EQUIPMENT (not included) 1. Five fresh AA 1.5V alkaline batteries. 2. One wall-mounting screw (optional) ABOUT WWVB (radio-controlled time) The NIST (National Institute of Standards and Technology—Time and Frequency Division) radio station, WWVB, is located in Ft.
QUICK SET-UP GUIDE Hint: Use good quality Alkaline Batteries and avoid rechargeable batteries. 1. 2. 3. 4. Have the indoor weather station and remote thermo/hygro sensor 3 to 5 apart. Batteries should be out of both units for 10 minutes. Place the batteries into the remote thermo/hygro sensor first then into the indoor weather station. (All remote thermo/hygro sensors must be started before the indoor weather station) DO NOT PRESS ANY BUTTONS FOR 10 MINUTES.
DETAILED SET-UP GUIDE I. Battery Installation Batteries will fit tightly. To avoid start-up problems, make sure that the batteries do not spring free. Also be sure to insert alkaline batteries into the remote thermo/hygro sensor first, then the indoor weather station. Initial set up should be done with the remote thermo/hygro sensor and indoor weather station in the same room. The units should be permanently mounted only after the signal reception has been verified.
II. Start Up Sequence A. Initial Start 1. Immediately after the batteries have been installed, the indoor weather station will sound a “beep”, and the LCD will completely light up for a brief moment. 2. All information will then appear in normal mode, with “12:00” as the default time and “1.1” as the default date (2001 as the year). 3. “DCA” is the default city (Washington, DC, USA), with the sunrise, sunset, moonrise and moonset times displayed for that city at that date. 4.
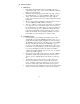
5. Once the time and date are set, the indoor weather station will conduct a search every night at midnight and correct to the accurate time and date (Daylight Saving Time is automatic). If the signal has been received in the past 24 hours, the reception indicator will be displayed. III. Explanation of LCD Information A. The below picture highlights the LCD features B. There are many different modes the indoor weather station can be set to.
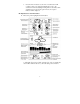
IV. Function Key Layout A. The below picture shows the eight function keys used in programming and operation of your indoor weather station V. Program Mode The program mode is laid out in a manner that allows you to program each function separately, or you can follow the instructions entirely to program the indoor weather center. Complete programming is usually done for the initial set-up, and will require you to skip step 1 and 2 of each programming section.
B. Time, 12/24 Hour Mode and Date Setting The WWVB signal will override any manual set time and date information. The time will be based on the time zone selected. 1. 2. 3. Press and hold the “SET” button for 1 second. The hour is now flashing. Press and release the “+” or “–“ button to select the current hour. Note: In 12h mode “PM” will appear to the left of the time during PM hours. If the time is not within the PM hours nothing will be displayed.
C. City Location Setting The list of the cities available is listed after this section. 1. 2. 3. 4. 5. Press and hold the “SET” button for 1 second. Press and release the “SET” button 6 times. The country location will flash (USA default/factory setting). Press and release the “+”or “–“ button to select the country (USA=United States, CAN=Canada, MEX=Mexico). Press and release the “SET” button to advance to the state setting (USA only) or the city location (Canada or Mexico).
D. City Location Listing The following list of city locations is entered in the database. Due the limited memory, 245 cities are listed. Every attempt has been made to provide a location close to all parts of North America. The choices were based first on state capitals, then nearby locations based on population and difference of latitude and longitude. There are cases where your city may be closer to a city in a nearby state rather than your state.
IN Indiana MN Minnesota ND EVV Evansville AEL Albert Lea GFK Grand Forks North Dakota, cont. HUF Terre Haute IND Indianapolis SBN South Bend BJI Bemidji DLH Duluth GPO Grand Portage NE Nebraska GRI LNK Grand Island Lincoln KS Kansas INL International Falls OMA Omaha DDC Dodge City STP St.
OK Oklahoma TX Texas (cont.) WV West Virginia 17K Boise City LAW Lawton DFW Dallas/Ft. Worth ELP El Paso CRW Charleston HLG Wheeling OKC Oklahoma City TUL Tulsa HOU Houston LRD Laredo WY OR ODO Odessa CPR Casper SAT CYS Cheyenne Oregon BNO Burns San Antonio Wyoming BYG Buffalo EUG Eugene UT Utah LAA MFR Medford SAL Saline WYE West Yellowstone PDX Portland SLE Salem SGU St.
Canada City Listing Code City Code City Code City EDM Edmonton YEL Yellowknife CHT Charlotte Town ALB Calgary OTT Ottawa MON Montreal VAN Vancouver SUD Sudbury QUE Quebec WIN Winnipeg THU Thunder Bay REG Regina FRE Fredericton TOR Toronto WHI Whitehorse HAL Halifax City Code City HER Hermosillo Mexico City Listings Code City Code CHH Chihuahua MEX Mexico City DUR Durango GUA Guadalupe E. Time Zone and Daylight Saving Time Settings 1. 2. 3. 4. 5. 6. 7.
F. Weather measurement units (°F/°C, inHg/hPa) 1. 2. 3. Press and hold the “SET” button for 1 second. Press and release the “SET” button 11 times. The selected temperature units will now flash (°F default/factory setting). 4. Press and release the “+”or “–“ button to select °F (Fahrenheit) or °C (Celsius). 5. Press and release the “SET” button to advance to the barometric air pressure units setting. 6. The selected air pressure units will now flash (inHg default/factory setting). 7.
. Press and release the “+”or “–“ button to select the storm warning setting. This can be set to 0.09, 0.12, 0.15, 0.18, 0.21, 0.24, or 0.27 inHg (from 3 to 9 hPa). This setting will determine how much of a drop in air pressure over six hours will sound the storm warning alarm. 17. Press and release the “SET” button to advance to the storm warning alarm on/off setting. 18. The storm warning on or off setting will now flash (AOFF default/factory setting). 19.
FEATURES AND OPERATIONS A. Sunrise/set and Moonrise/set Calculation The indoor weather station will calculate the sunrise/set moonrise/set each day based on the location entered through the programming mode. To view another location and/or date without affecting the programmed city location and date, follow section A.2 in Features and Operations. 1. Daylight Hours and Minutes Calculation Press and release the “SUN/MOON” button.
m. Press and release the “SET” key to advance to the month setting. n. The month is now flashing (the current month). o. Press and release the “+” or “–“ key to select the month desired. p. Press and release the “SET” key to advance to the date setting. q. The date is now flashing (the current date). r. Press and release the “+” or “–“ key to select the date desired. s. Press and release the “SUN/MOON” key to calculate the new city location at the date selected.
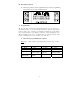
B. Moon Phase 1. There are 12 moon phases shown on the indoor weather station; the black portion signifies the portion of the moon visible in the sky. Thus, when the moon icon is all black, it is a full moon. The indoor weather station is programmed with all moon phases from the year 2000 until 2099. 2. The moon phase for any date may be found by selecting a different date through the sun rise/set moon rise/set programming section (section A in Features and Operations). C.
2. Outdoor Minimum and Maximum Temperature and Humidity The indoor weather station automatically stores the minimum and maximum outdoor temperature and humidity. The minimum and maximum values are updated automatically when a new minimum or maximum is recorded, or until manually reset. a. b. The outdoor (remote) minimum and maximum temperature values are displayed below the outdoor temperature display. These values are rounded down for minimum and rounded up for maximum.
f. 2. Follow the Detailed Set-Up Guide for programming and operating instructions. Viewing and Operating with Multiple Remote Sensors a. b. c. To view the temperature of a different remote sensor press and release the “CHANNEL” button. A shift from one “boxed” number to the next should be observed in the OUTDOOR LCD. The minimum and maximum temperature of the additional remote sensor will be displayed below the current temperature of the remote sensor in the OUTDOOR LCD.
g. 3. Press and release the “SET” key to return to the normal display mode (or the display will timeout after fifteen seconds and return to the normal mode automatically). Canceling the Temperature Alarm While Sounding a. While the alarm is sounding, press any key to mute the alarm. The temperature will flash as long as the value is above the set value. b. The alarm will reactivate automatically once the value has fallen below the set value, or if a new value is entered. F.
1. Weather Icons a. There are 3 possible weather icons that will be displayed at various times in the center of the indoor weather station. i Sunny—indicates that the weather is expected to improve (not that the weather will be sunny). ii Sun with Clouds—indicates that the weather is expected to be fair (not that the weather will be sunny with clouds). iii Clouds with Rain—indicates that the weather is expected to get worse (not that the weather will be rainy). b. c. d. e. f.
when the air pressure stabilizes or begins to rise. I. Storm Warning Alarm 1. 2. 3. 4. J. An alarm can be set to warn of a drop in air pressure. Please follow the programming instructions in section F of the Detailed Set Up Guide to activate this alarm When the air pressure drops by the level set, an alarm will sound (if the alarm is activted). To cancel the alarm while sounding press any key.
7. 8. 9. Air pressure trends can be determined by simply glancing at the bar graph. a. If the bars are rising (higher on the right than the left) then the air pressure has a rising trend, and the weather should improve. b. If the bars are dropping (lower on the right than the left) then the air pressure has a falling trend, and the weather should worsen. Multiply the two values to find past air pressure (note the + or – sign of values on the verticle axis); i.e. 0.03 hPa x 3 = 0.
VII. MOUNTING Note: Before permanently mounting, ensure that the indoor weather station is able to receive signals from the sensors and WWVB signal at the desired location. To achieve a true temperature reading, avoid mounting the remote thermo/hygro sensor (or any sensor) where direct sunlight can reach the remote sensor. We recommend that you mount the remote sensor on a North-facing wall or under an eve.
2. Mounting with Adhesive Tape a. b. c. d. e. f. With a nonabrasive solution, clean and dry the back of the mounting bracket and the mounting surface to ensure a secure hold. The mounting surface should be smooth and flat. Remove the protective strip from one side of the tape. Press firmly onto the designated area on the back of the mounting bracket. Remove the protective strip from the other side of the tape, and situate the mounting bracket. Firmly press the mounting bracket onto the mounting surface.
Maintenance and Care Instructions A. Extreme temperatures, vibration, and shock should be avoided to prevent damage to the units. B. Clean displays and units with a soft, damp cloth. Do not use solvents or scouring agents; they may mark the displays and casings. C. Do not submerge in water. D. Immediately remove all low powered batteries to avoid leakage and damage. E. Opening the casings invalidates the warranty. Do not try to repair the unit. Contact La Crosse Technology for repairs.
TROUBLESHOOTING Problem: The LCD is faint. Solution: 1) Set the LCD contrast to a higher level. 2) Replace batteries. Problem: No outdoor temperature/humidity is displayed. Solution: 1) Remove all batteries, reinsert into the remote thermo/hygro sensor first, then into the indoor weather station. 2) Place remote thermo/hygro sensor closer to the indoor weather station. 3) Be sure all batteries are fresh.
SPECIFICATIONS Radio-controlled Time Signal Indoor weather station recommended operating temperature LCD contrast Sunrise/set, Moonrise/set, and moon phase dates available Temperature measuring range Indoor WWVB, 60 kHz from Ft. Collins, CO 32°F to 122°F (0°C to 50°C) Outdoor -22°F to 140°F with 0.2°F resolution (-29.9°C to 59.9°C with 0.
Power supply Weather Center: Thermo Hygro Sensor: Dimensions (L x W x H) Indoor weather station Remote thermo/hygro sensor 3 x AA (IEC LR6) 1.5V batteries. 2 x AA (IEC LR6) 1.5V batteries. 7.75 x10.00 x 1.00 inches (196 x 254 x 25mm) 1.56 x 0.78 x 4.29 inches (40 x 20 x 110 mm) WARRANTY INFORMATION La Crosse Technology, Ltd provides a 1-year limited warranty on this product against manufacturing defects in materials and workmanship.
the cost of installation or removal from a fixed installation, normal set-up or adjustments, claims based on misrepresentation by the seller or performance variations resulting from installation-related circumstances. LA CROSSE TECHNOLOGY, LTD WILL NOT ASSUME LIABILITY FOR INCIDENTAL, CONSEQUENTIAL, PUNITIVE, OR OTHER SIMILAR DAMAGES ASSOCIATED WITH THE OPERATION OR MALFUNCTION OF THIS PRODUCT. THIS PRODUCT IS NOT TO BE USED FOR MEDICAL PURPOSES OR FOR PUBLIC INFORMATION. THIS PRODUCT IS NOT A TOY.
A. City Location Listing The following list of city locations is entered in the database. Due the limited memory, 245 cities are listed. Every attempt has been made to provide a location close to all parts of North America. The choices were based first on state capitals, then nearby locations based on population and difference of latitude and longitude. There are cases where your city may be closer to a city in a nearby state rather than your state.
IN Indiana MN Minnesota ND EVV Evansville AEL Albert Lea GFK Grand Forks North Dakota, cont. HUF Terre Haute IND Indianapolis SBN South Bend BJI Bemidji DLH Duluth GPO Grand Portage NE Nebraska GRI LNK Grand Island Lincoln KS Kansas INL International Falls OMA Omaha DDC Dodge City STP St.
OK Oklahoma TX Texas (cont.) WV West Virginia 17K Boise City LAW Lawton DFW Dallas/Ft. Worth ELP El Paso CRW Charleston HLG Wheeling OKC Oklahoma City TUL Tulsa HOU Houston LRD Laredo WY OR ODO Odessa CPR Casper SAT CYS Cheyenne Oregon BNO Burns San Antonio Wyoming BYG Buffalo EUG Eugene UT Utah LAA MFR Medford SAL Saline WYE West Yellowstone PDX Portland SLE Salem SGU St.
2. Canada City Listing Code City Code City Code City EDM Edmonton YEL Yellowknife CHT Charlotte Town ALB Calgary OTT Ottawa MON Montreal VAN Vancouver SUD Sudbury QUE Quebec WIN Winnipeg THU Thunder Bay REG Regina FRE Fredericton TOR Toronto WHI Whitehorse HAL Halifax City Code City HER Hermosillo 3.