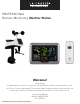
PROFESSIONAL Remote Monitoring Weather Station Welcome! -------------- Congratulations on your new Professional Weather Station and welcome to the La Crosse Technology family! This product was designed with you in mind by our hometown team of weather enthusiasts based in La Crosse, Wisconsin.
Table of Contents 3 Step 1: Power Up 14 Alerts 3 Step 2: Station Options 14 Set Alerts 3 Step 3: Mounting Basics 15 Disarm Alerts 4 Option 1: Connect with La Crosse View 15 Active Alerts 4 Wi-Fi Network Requirements 16 Temperature | Humidity Trend Arrows 5 La Crosse View 16 Seasonal Changes in Foliage 6 La Crosse View Enhancements 16 Sensor Search | Sensor ID 7 Simple Status Messages 17 Delete your Sensor ID 8 Connect Additional Sensors to Your La Crosse View™ App 17 Facto
STEP 1: POWER UP Insert batteries (in any order): • 3-AA batteries into multi-sensor • 2-AA batteries into thermo-hygro sensor • 5 volt power cord (required) into V40A-PRO station *3-AA batteries for optional backup of your time and date *Battery operation only, station will not update sensor or Wi-Fi data. Power cord is required.
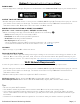
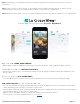
Option 1: Connect with La Crosse View™ DOW NLOA D • Visit the App Store or Google Play Store to download the free La Crosse View™ app on your mobile device. C H EC K YOU R NE TWORK • Confirm that your mobile device is connected to a 2.4GHz (802.11 b/g/n) Wi-Fi band before trying to connect your station to the La Crosse View app. The station itself cannot accept 5GHz Wi-Fi bands that most dual-band routers offer. Dual band routers also have a 2.4GHz channel.
Note: If switching to a new Wi-Fi network, your station may take up to 3 minutes to reacquire all sensor information. Note: In the event of a power outage, or your station being unplugged temporarily, your station should automatically reconnect to your existing Wi-Fi network, once power is reestablished. Note: Weather station power cord use is required. Battery operation only, will not update sensor or Wi-Fi data. Connecting You to Your Home Anytime, Anywhere.
La Crosse View™ Enhancements NWS (National Weather Service) Daily HI | LO temperature Note: When not using the app, the daily HI | LO will come from your outdoor TH sensor.
Simple Status Messages • Your station has built-in connection status messages for your convenience. • Press and release the SET button to view. Note: Only one relevant status message will display. “ALL OK ” • Your station is connected, there are no problems. “LOST Wi-Fi” • Check your power cord connection. (power cord required to connect) • When trying to reestablish your station’s Wi-Fi connection, be sure your mobile device is on the same 2.4GHz network you want your station to use.
Connect Additional Sensors to Your La Crosse View™ App DID YOU KNOW? You can expand your system’s coverage with additional sensors (sold separately). These add-on sensors will use your weather station as a gateway to the La Crosse View app, where their data can be viewed and tracked 24/7 from anywhere. Expand your coverage: • Your baby’s room • Your wine cellar • Your basement • Your attic • Your garage Just add a sensor and use your La Crosse View™ app to monitor its data anywhere on-the-go.
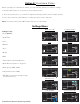
Option 2: Standalone Station When operating as a standalone station, you can manually adjust your station’s settings 1. Hold the SET button for 3 seconds to enter settings menu. 2. Press and release the + or - buttons to adjust the flashing values. Hold to adjust quickly. 3. Press and release the SET button to confirm and move to the next item.
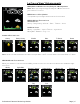
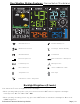
Your Weather Station Features: Connected or Standalone Wi-Fi Indicator Icon Relative Humidity Icon Weather Forecast Icons Percentage - Relative Humidity AM | PM Indicators Trend Arrows Sensor Reception Icon Miles or Kilometers - Wind Speed Low Battery Icons Wind Speed Icon HI | LO Alert Icons Inches or Millimeters of Rain Temperature Icon Rain Graph Fahrenheit or Celsius - Temperature Backlight Brightness (5 levels) Your station has 5 levels of brightness for the backlight: • When operating
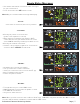
Wind Readings Wind Speed: Reflects highest current wind speed Top Speed: Reflects highest wind speed in the past 60 minutes. Wind Direction: The triangles indicate wind direction on the compass rose. Wind direction can be shown in degrees or in letters in the center of the compass rose. Wind Cup Animation: The wind cups spinning speed will vary with actual wind speed. When wind speed is higher, the cups spin faster.
Reset Wind Speed History 1. Press and release the WIND button to view individual wind speed readings. 2. Hold the MINUS button for five seconds to reset the individual value. 3. Wind speed history reading will reset to current wind speed, time and date. 4. Press and release the LIGHT button, or wait 20 seconds to return to a full, normal display. Rainfall Readings • Simply press and release the RAIN button to cycle through the exact history you’d like displayed (other readings will disappear temporarily).
Reset Rainfall Readings 1. Press the RAIN button to view individual rain readings. 2. Hold the MINUS button for five seconds to reset the individual value. 3. Rainfall reading will reset to 0.00 4. Press and release the LIGHT button, or wait 20 seconds to return to a full, normal display. HI | LO Temperature/Humidity Records • Press and release the TEMP button to view your HI and LO records with time and date of occurrence. • A new HI or LO record will replace the existing record.
Reset HI | LO Temperature/Humidity Records 1. Press the TEMP button to view individual readings. 2. Hold the MINUS button for five seconds to reset the individual value. 3. HI | LO reading will reset to current temperature, humidity, and current time/date. Alerts There are 10 programmable weather alerts on this weather station.
Outdoor Humidity Alerts Wind Speed and Rain Alerts Disarm Alerts 1. Hold the ALERTS button 3 seconds to enter alert set mode. 2. Press and release ALERTS button until you see the alert you wish to disarm. 3. Press the +/- buttons to disarm the alert. The alert text goes from ON to OFF. 4. Press the LIGHT button to exit. Active Alerts • When armed alert value is reached, station will beep 5 times each minute, until out of alert range. • The flashing alert icon will indicate the type of alert.
Temperature | Humidity Trend Arrows Your temperature and humidity trend arrows update every 15 minutes. The trend reflects changes over the past one hour period. UP ARROW: For this to show, the temperature will have to rise by 2°F (1°C), or the humidity go up by 3%RH or more within the current hour. DOWN ARROW: For this to show, the temperature will have to fall by 2°F (1°C), or the humidity drop by 3%RH or more within the current hour.
Search for all sensors: • While viewing sensor ID, hold the SENSOR button for 3 seconds to search for all sensors. • The station will search for all sensor ID numbers on the station. • The sensor reception icon will flash for each sensor while searching. • The sensor reception icon will be solid when sensor signal is acquired. • Allow up to 3 minutes to receive sensor signal.
Detailed Sensor Set Up and Mounting LTV-WR1 Multi-sensor: 1. Insert 3 AA batteries into the bottom of the sensor. Observe the correct polarity. The red LED light will show briefly before transmission. Wind cups Red LED Light Rain funnel (collector) Battery compartment AA AA + AA RESET - - Drain holes for multi sensor + + - Bubble Level Reset button Directional Vane Mounting Bracket Draining vents for rain sensor The Multi sensor provides wind speed, wind direction and rainfall readings.
LTV-TH3 Thermo-Hygro Sensor 1. Install 2-AA batteries according to polarity and replace battery cover. The blue LED light will flash when transmitting. Hole for mounting ∙ Press TX to send a signal + ∙ Press F/C to select Fahrenheit or Celsius display on sensor. - F/C - TX AA + AA LED Light Battery Cover Mounting: 1. Use the hole at the top to hang your sensor from the back using a nail. Or, insert one mounting screw through the front of your sensor. 2.
Replace Wind Cups 1. Loosen the screw on side of cups 2. Remove cups 3. Install new cups 4. Tighten screw Replace Directional Vane 1. Loosen the screw on side of vane 2. Remove direction vane 3. Install new vane 4. Tighten screw Clean Rain Sensor 1. Remove rain funnel (pull flat side firmly upward). 2. Gently remove debris or insects inside the rain sensor. 3. Clear debris from drain vents. 4. Clear debris from the rain funnel. 5. Reinstall the rain funnel. Note: Do not oil the rain sensor.
Connect to Weather Underground Your station has the ability to connect to Weather Underground as well as La Crosse View™. • Use your existing Wi-Fi to connect your weather station to Weather Underground with the Weather Connect App.
Never connected: If the station has not uploaded its data to Weather Underground: • First, move the station and mobile device to a different network. • Check to be sure it is a protected Wi-Fi network. • Complete a Factory Restart to clear the station. Changing networks: If you have been using the app to view your weather at your summer home. When you move the station and sensors to your winter home, reconnect your app through the Wi-Fi network at your new location. 1.
Specifications Indoor Temperature Range: 32˚F to 122˚F (0˚C to 50˚C) Humidity Range: 10% RH to 99%RH Thermo-hygro Sensor -40˚F to 140˚F (-40˚C to 60˚C) Note: Temperatures below -20°F (-29°C) require Lithium batteries in the outdoor sensor. Humidity Range: 10% RH to 99%RH Transmission Range: Up to 400 feet (121 meters) in open air, RF 915 MHz Temperature Range: Multi-Sensor Wind Speed Range: 0-111.
Warranty and Support La Crosse Technology, Ltd. provides a 1-year limited time warranty (from date of purchase) on this product relating to manufacturing defects in materials & workmanship. Before returning a product, please contact our friendly customer support with questions or visit our online help: Phone: 1-844-200-8752 Online Product Support and Registration: www.lacrossetechnology.