
User's Manual


Page | 13 www.lacrossetechnology.com/S85807 S85807
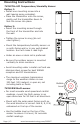
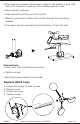
Mounting Instructions
Option 1:
• Install one mounting screw into a
wall leaving some extended.
• Place the transmitter onto the screw,
gently pull the transmitter down to
lock the screw into place.
Option 2:
• Insert the mounting screw through
the front of the transmitter and into
the wall.
• Tighten the screw to snug (do not
over tighten).
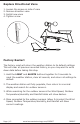
• Mount the temperature/humidity sensor on
a north-facing wall or in any well shaded
location. Sun will make it read high.
• Under an eave or deck rail is preferred.
• Be sure the outdoor sensor is mounted
vertically to drain moisture.
• Avoid mounting under a metal roof and use
stainless steel screws for best WWVB
reception and RF transmission.
• The maximum wireless transmission
range to the weather station is over
330 feet (100 meters) in open air, not
including walls or oors.
TX232TH-LCD Temperature/Humidity Sensor
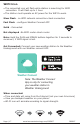
• For most accurate wind speed and rainfall
readings, mount the Multi-sensor in an
open area clear for 50 feet in all directions.
• Mount with the solar panel facing south so
the wind direction is correct. See N, S, E W,
embossed on the top of the sensor.
• Use the bubble level on the top of the
sensor to ensure it is level, for accurate
rainfall readings.
TX231RW Multi-sensor
Bubble
Level