WI R ELESS TEM P E R AT UR E & HUM I DI TY STATI ON I NST R U C TI ON M ANUAL MODEL: S82967 DC: 071118 FI N D M A N UA LS , FAQ S, A N D MO R E U N DE R T HE SU PPO RT TA B H E RE : www.lacrossetechnology.
TAB LE O F C O N TEN TS 3. Power Up 3. LCD Features 4. Settings Menu 5. Adjustable Backlight 6. Auto Dim 6. Temperature & Humidity Alerts 7. Arm/Disarm Alerts 8. HI/LO Temperature & Humidity Records 9. Rest Temperature and Humidity Records 10. Heat Index and Dew Point Explained 10. Temperature & Humidity Trend Arrows 10. Change Batteries 10. Sensor Search 11. Low Battery Indicators 11. Factory Restart 11. Sensor Weather Shield 11. We’re Here to Help! 11. Join the Conversation 12. Specifications 12.
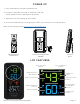
P OW ER U P 1. Insert 2-AA batteries into your Outdoor Sensor. 2. Insert the 5 volt power cord into an outlet, then into your station. Optional: Insert 2-AA batteries for backup. 3. Adjust time and date settings on your station. 4. Once the Outdoor Sensor is reading to your station, place it outside in a shaded location. Watch sensor mounting video: http://bit.
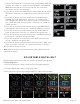
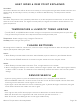
HI/LO Temperature Alert Indicators HI/LO Humidity Alert Indicators INDOOR Percent Relative Humidity (RH) Indicator Indoor Temperature Fahrenheit or Celsius Indoor Humidity Weekday Month AM/PM Indicator Time Date Station Low Battery Indicator & Auto Dim Indicator SE TTI N G S M EN U It is best to press one button at a time when setting your station. 1. Hold the SET button to enter the Settings Menu. 2. Press the + or - button to adjust the values. Hold to adjust quickly. 3.
1. Hold the SET button for 2 seconds to enter setting mode. ENGLISH will flash. Press the + or - button to select ESPANOL, or FRANCAIS. Note: When Español or Francais are selected, the reset of the menu items will be in that language. 2. Press SET to confirm and move to beep sound. BEEP ON will show. ON flashes. Press the + or - button to turn the button beep sound off. 3. Press SET to confirm and move to 12/24 hour time format. 12Hr FORMAT will show. 12HR flashes.
AUTO D I M B AC K L I G H T This station allows you to program a time for the backlight to automatically Dim to level one setting. This way the station will not interfere with your sleep. Setup Auto Dim: 1. Hold the AUTO DIM button to set Auto Dim Start and Stop times. 2. Use the + or - button to turn the Auto Dim feature ON. Press the AUTO DIM button to confirm and move to next item. 3. START TIME will flash. Use the + or - buttons to select your Auto Dimmer’s starting hour.
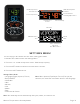
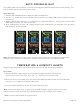
OUTDOOR OUTDOOR OUTDOOR OUTDOOR Outdoor HI Temperature Alert Outdoor LO Temperature Alert OUTDOOR OUTDOOR OUTDOOR OUTDOOR Outdoor HI Humidity Alert Indoor HI Temperature Alert Indoor HI Humidity Alert Outdoor LO Humidity Alert INDOOR INDOOR INDOOR INDOOR INDOOR INDOOR INDOOR INDOOR Indoor LO Temperature Alert Indoor LO Humidity Alert Arm & Disarm Alerts: 1. Hold the ALERTS button 3 seconds to enter alert set mode. 2.
Alert Sounds: • When armed alert value is reached, station will beep 5 times each minute, until out of alert range. • The flashing alert icon will indicate the type of alert HI or LO. • Press any button to stop the alert from sounding. • The alert icon will continue flashing while alert value is in alert range. • Disarm the alert to stop the alert entirely. HI/LO T E MP E RAT U R E & H U M I D I TY R EC O R D S The HI & LO temperature and humidity readings are recorded with time and date of occurrence.
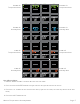
INDOOR INDOOR INDOOR Indoor Temperature Records OUTDOOR INDOOR Indoor Humidity Records OUTDOOR Indoor/Outdoor Heat Index Indoor / Outdoor Dew Point INDOOR INDOOR Reset Temperature and Humidity Records: Your temperature and humidity readings will reset individually. 1. Press and release the TEMP button to view the reading you wish to reset. 2. Hold the MINUS button for 5 seconds to reset individual temperature or humidity value to current temperature, humidity, time and date.
HE AT INDE X & D EW PO I N T EXP L A I N ED Heat Index: Heat Index combines the effects of heat and humidity. It is the apparent temperature of how hot it feels to a human being. As humidity increases, the body is unable to cool effectively. The temperature will feel warmer. Dew Point: Dew Point Temperature is the saturation point of the air, or the temperature to which the air has to cool in order to create condensation.
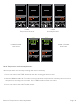
LOW B ATTERY I N D I CATO R S • When Battery Indicator shows next to the word Outdoor, replace batteries in your Outdoor Sensor. • When Battery Indicator shows next to your Time, replace batteries in your Station. FACTO RY R ESTA RT • The Factory Restart is a great way to return your station to “out of the box” condition. • Generally this is more effective than removing all power for clearing out the station. • All history records will be removed, so write down anything you want to keep.
SP E C I F I CATI O N S Indoor: Temperature Range: 32°F to 99°F (0°C to 37°C) Humidity Range: 10% to 99% RH Outdoor: Temperature Range: -40°F to 140°F (-40°C to 60°C) Humidity Range: 10% to 99% RH Transmission Range: over 300 feet (91 meters) in open air RF 433MHz Power Requirements: S82967: AC6: GPU280500150WA00 (required) Optional: 2 “AA” LR6 Batteries (not included) TX141TH-Bv2: 2 “AA” LR6 Batteries (not included) Battery Life: S82967: over 24 months with reputable batteries TX141TH-Bv2: over 24 months w
FCC STATEM EN T This equipment has been tested and found to comply with the limits for a Class B digital device, pursuant to part 15 of the FCC Rules. These limits are designed to provide reasonable protection against harmful interference in a residential installation. This equipment generates, uses and can radiate radio frequency energy and, if not installed and used in accordance with the instructions, may cause harmful interference to radio communications.