WS-8001U Radio Controlled Moon Phase Clock Instruction Manual Ρ Α ∆ Ι Ο Χ ΟΝ Τ Ρ ΟΛ Λ Ε ∆
TABLE OF CONTENTS Topic Inventory of Contents/ Additional Equipment About WWVB Quick Set-Up Guide Detailed Set-Up Guide Battery Installation Program Mode Function Buttons Time Zone Setting DST (Daylight Saving Time) Setting Language Selection Time Setting Calendar Setting 12/24-Hour Setting Selecting °F or °C Features & Operations Displaying the Seconds The Alarm Moon Phase Mounting Maintenance & Care Troubleshooting Specifications Warranty Information 2 Page 3 3 3 4 5 5 6 6 6 7 7 7 8 8-9 9 10 11 12 12 13
INVENTORY OF CONTENTS 1) WS-8001U 2) Instruction manual and warranty card. ADDITIONAL EQUIPMENT (not included) 1) Two fresh 1.5V AA batteries. 2) Three wall-hanging screws. 3) Appropriate screwdriver for screws. ABOUT WWVB (Radio Controlled Time) The NIST (National Institute of Standards and Technology—Time and Frequency Division) WWVB radio station is located in Ft. Collins, Colorado, and transmits the exact time signal continuously throughout the United States at 60 kHz.
1) Remove the battery cover, located on the backside of the unit and directly below the function buttons. 2) Observe the correct polarity, and install 2 AA batteries. 3) Replace the battery cover. Note: After the batteries have been installed a tone will sound, and all the LCD’s (Liquid Crystal Display) will briefly light up. Then the indoor temperature, the date as “1/ 1”, the weekday as “MON”, and the Moon Phase will be displayed. Also, the time will appear as “-:--” for approximately 1 minute.
I) FUNCTION BUTTONS There are 4 function buttons located on the backside of the Moon Phase Clock. The function buttons are labeled: SET, +, ALARM, and SNOOZE. II) TIME ZONE SETTING 1) Hold down the “SET” button for 2 seconds, the default setting “-5EST” will flash in the Date LCD. 2) Press the “+” button to select the appropriate time zone.
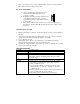
IV) LANGUAGE SELECTION FOR THE WEEKDAY 1) Hold down the “SET” button for 2 seconds (the selected time zone will flash), press the “SET” button 2 more times, until the default language “US” flashes in the time LCD. 2) Press the “+” button to toggle through and to select the desired language. There are 3 languages to select from: US F E English French Spanish 3) Press the “SET” button to confirm the language setting, and to advance to manually set the time.
6) The default date “1” will flash. Press the “+” button to select the appropriate date. 7) Press the “SET” button to confirm the date, and to set the weekday. 8) The default weekday “MON” (depends on selected language) will flash. Press the “+” button to select the appropriate weekday. 9) Press the “SET” button to confirm the calendar settings, and to advance to select either 12 or 24-hour time display.
second periods, the rate of the alarm increases. 1) Hold down the “ALARM” button for 5 seconds. The “TIME” icon to the right of the minutes (in the time LCD) shifts to “ALARM”, and the hour digit of the alarm flashes. 2) Press the “+” button to set the alarm hour. 3) Press the “ALARM” button to confirm the hour, and to set the alarm minutes. 4) The alarm minutes flash, press the “+” button to set the alarm minutes. 5) Press the “ALARM” button to confirm and to exit the alarm setting mode.
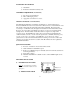
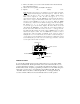
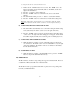
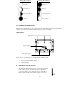
Waxing Moon Phases Waning Moon Phases New Moon Full Moon Crescent Moon Gibbous First Quarter Moon Last Quarter Moon Gibbous Crescent Moon IV) INDOOR TEMPERATURE The Indoor Temperature appears on the right side of the Date LCD. The temperature is checked every 10 seconds, and updated whenever there is a change. MOUNTING Hanging Holes Function Buttons Foldout Table Stands There are two possible ways to mount the Moon Phase Clock: • • I) use of the foldout table stands, or wall mounting.
folded out towards the edge. Once the Foldout table stands are extended, place the Moon Phase Clock in an appropriate location. II) WALL MOUNTING 1) Using a straightedge, horizontally space at 315/16 of an inch (100.58mm) three screw positions on a wall. 2) Install three mounting screws (not included) into a wall within transmission range—leaving approximately 3/16 of an inch (5mm) extended from the wall. 3) Place the Moon Phase Clock onto the screws, using the hanging holes on the backside.
Problem: Solution: Problem: Solution: Hour is incorrect (minute and date are correct). 1) Be sure correct time zone and daylight saving time are selected. Moon phase is incorrect. 1) Check the calendar data. 2) Check batteries. 3) Contact La Crosse Technology. Note: For any questions not answered, contact La Crosse Technology with the contact information found at the end of this instructional manual.
For warranty work, technical support, or information contact: La Crosse Technology, Ltd 2809 Losey Blvd. S. La Crosse, WI 54601 Phone: 608.782.1610 Fax: 608.796.1020 e-mail: support@lacrossetechnology.com (warranty work) sales@lacrossetechnology.com (information on other products) web: www.lacrossetechnology.com FCC ID: OMO-01RX (receiver) THIS DEVICE COMPLIES WITH PART 15 OF THE FCC RULES. OPERATION IS SUBJECT TO THE FOLLOWING TWO CONDITIONS: 1. THIS DEVICE MAY NOT CAUSE HARMFUL INTERFERENCE, AND 2.