Wireless Rain Station For online video support: http://bit.ly/LaxTechTalk Instructional Manual Model: 724-2310 DC:062817 Protected under U.S.
CONTENTS Contents ............................................................................ LCD Features ...................................................................... LTV-R1 Rain Sensor ............................................................. Quick Startup Instructions .................................................... Detailed Startup Instructions ................................................ Settings .............................................................................
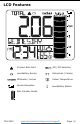
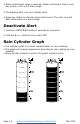
LCD Features 24 Hour Rain Alert AM | PM Selection Low Battery Sensor Fahrenheit | Celsius Millimeter | Inches Indoor Temperature Sensor Reception Low Battery Station Rain Cylinder Graph 724-2310 www.lacrossetechnology.
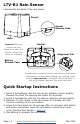
LTV-R1 Rain Sensor Lets identify the parts of the rain sensor. Funnel Funnel Release Tabs Base Important: Remove the twist tie from below the rocker. The twist tie secured the rocker for shipment Rocker Alignment Tab Battery Release Tabs An extra piece of plastic used for repositioning the battery compartment correctly. After batteries are installed, make sure this alignment tab is facing the front of the Base to lock all four Battery Release Tabs back into place. Quick Startup Instructions 1.
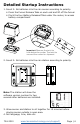
Detailed Startup Instructions 1. Insert 2- AA batteries into the rain sensor according to polarity. • Press the Funnel Release Tabs on each end and lift off the funnel. • Pinch the four Battery Released Tabs under the rocker, to access battery compartment. AA Important: Remove the twist tie from below the rocker. The twist tie secured the rocker for shipment AA 2. Insert 2- AA batteries into the rain station according to polarity.
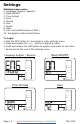
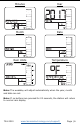
Settings Settings menu order: 1. Language (English, Spanish) 2. Beep ON/OFF 3. Time Format 4. Hour 5. Minute 6. Year 7. Month 8. Date 9. Unit (Inches/Millimeters of Rain) 10. Temperature Fahrenheit/Celsius To begin: • Hold the SET button for 3 seconds to enter settings menu. • Press and release the + or - button to adjust a value. • Press and release the SET button to confirm and move to next item and to exit at the end of the settings menu.
Minutes Year Month Date Rain Units Temperature Note: The weekday will adjust automatically when the year, month and date are set. Note: If no buttons are pressed for 20 seconds, the station will return to normal rain display 724-2310 www.lacrossetechnology.
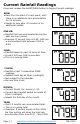
Current Rainfall Readings Press and release the ALERT/RAIN button to toggle Current readings: NOW: • Rain from the start of a rain event, until there is no additional rain accumulation for 30 minutes. • Resets to zero after 30 minutes of no additional rainfall. ONE HR: • Rainfall that has accumulated during the past one hour period. • Example: If current time is 6:49, 1HR rain is accumulated total between 5:50 to 6:49. 24HR: • Rainfall based on past 24 hours of time. • At each full hour, 1HR is recorded.
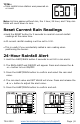
TOTAL: • Total rainfall since station was powered on or reset. Note: As time passes without rain, the 1 hour, 24 hour, and 7 day rain totals will count down to zero. Reset Current Rain Readings • Hold the RESET button for 5 seconds to reset all current rainfall readings at the same time. • All current rainfall reading s will be set to 0.00. • This is useful if you accidentally added a rain reading when positioning the sensor. 24-Hour Rainfall Alert 1.
• When armed alert value is reached, station will beep 5 times, once per minute, until out of alert range. • The flashing alert icon will indicate alert. • Press any button to stop the temp alert sound. The alert icon will flash while value is in alert range. Deactivate Alert 1. Hold the ALERT/RAIN button 3 seconds to view alert. 2. Use the + or - button to turn alert OFF. Rain Cylinder Graph • The cylinder graph is a visual representation of rain readings.
Rainfall History: by Month View up to 12 months of past rainfall totals, one month at a time. 1. Press and release the MONTH/HISTORY button to view rainfall history by the month. 2. Use the + or - button to toggle thru individual months. The rainfall total for the selected month will display. 3. Press the MONTH/HISTORY button to exit history mode. Reset History by Month • While viewing History by the Month, hold the RESET button for 5 seconds to reset that month’s history to “---”.
4. Press and release the FIND/DATA button to select ending month and date. 5. DATE TO will display. Use the + or - button to select a ending month. 6. Press and release the FIND/DATA button to move to ending date. Use the + or - button to select a ending date. 7. Press and release the FIND/DATA button to view the total rainfall (RANGE TOTAL) for the selected date range. 8. Hold the FIND/DATA button for 3 seconds to exit History mode.
Search for Rain Sensor • Press and release the SENSOR button to view the sensor ID for up to 20 seconds. • While viewing ID, hold the SENSOR button for 3 seconds to search for the rain sensor. • The sensor reception icon will animate until the sensor signal is received, or for 3 minutes, if there is no signal available. • If the station loses connection with the sensor for more than 10 minutes, it will automatically begin searching for the lost sensor for 2 minutes.
Replace Sensor In the event your sensor is damaged and needs to be replaced, you will need to delete the existing sensor’s ID in order to add the replacement sensor. 1. 2. 3. 4. Press the SENSOR button to view sensor ID. Hold the RESET button for 5 seconds to delete the old sensor’s ID. Install batteries in replacement sensor. Press and release the SENSOR button to view sensor area (ID will show dashes). 5. Hold the SENSOR button 3 seconds to search.
Visit Us on Social Media Latest video content http://bit.ly/LaxTech_YouTube For personalized interaction http://bit.ly/LaxTech_Facebook Join the conversation http://bit.ly/LaxTech__Twitter Pin and share http://bit.ly/LaxTech_Pinterest Specifications Indoor Temperature Range Update Interval 32°F to 122°F (0°C to 50°C) About every 48 seconds Rain Rain Reading Transmission Range Up to 393.6 inches (9999 mm) Distance: Over 330ft.
Care and Maintenance • • • • • • • • Do not mix old and new batteries. Do not mix Alkaline, Standard, Lithium, or Rechargeable Batteries. Always purchase the correct size and grade of battery most suitable for intended use. Replace all batteries of a set at the same time. Clean the battery contacts and also those of the device prior to battery installation. Ensure the batteries are installed with correct polarity (+ and -). Remove batteries from equipment when it is not used for an extended period of time.