
User's Manual


batteries are not installed, the controller will lose real time in the event of
a power outage. The batteries should be replaced once a year.
NOTE: Since all programs are stored in non-volatile memory, you will not lose
program settings during a power failure - even if there is no battery installed.
CAUTION: Use AA alkaline batteries only. An AA NiCad battery may leak or
explode causing personal injury or property damage.
Close the front panel, being sure not to damage wires. If wires are stiff, you
may find it helpful to pre-bend them. Turn on the power source.
You’re now ready to start programming!
PROGRAMMING INSTRUCTIONS
Programming Overview
The EZ Pro can be programmed under AC power or powered from the two AA
alkaline batteries. If equipped with an EZ Command Radio module the EZ Pro can
be programmed from the EZ Command Remote Programmer. Before programming the EZ
PRO, it may be helpful to become familiar with some general programming
guidelines:
If a segment(s) on the LCD is flashing, it means that it can be changed by
the user.
When using or keys, hold the button three seconds to start a fast scroll.
Be sure the appropriate program letter is displayed when you are
programming; program changes are specific to the program letter displayed on the
LCD.
There is no “ENTER” key. Key-presses and dial settings are stored
automatically for you.
If you make a programming change while a program is running, the program
terminates immediately. The new program starts at the next start time scheduled.
When not running, the controller displays the current time and the current
day.
During manual operations, there is a 5-second delay before the operation
begins. During this time, you can change your settings. Each time you make a
change, the delay resets to 5 seconds.
MANUAL, CYCLE, and 3 MINUTE TEST procedures only operate with the Program
dial set in the AUTO position.
After a test procedure runs, the controller reverts back to the AUTO
procedure and runs the next program scheduled.
The test procedures ignore the sensor connection; this allows you to water
or run your program even if the sensor has suspended operation.
PROGRAMMING INSTRUCTIONS
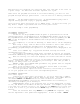
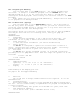
Front Panel Layout
Looking at the front panel (see figure 3), you see a large LCD, 4 rubber
buttons, one large rotary dial, and two small rotary dials. The rubber buttons
are marked SELECT and ADJUST and are the heart of Nelson’s exclusive
SELECT&ADJUST‰ programming. The keys are identified with for increasing or
decreasing the segment you’re working on.
SELECT&ADJUST‰ works on the principle that you first SELECT what you want
to set, and ADJUST the variables of what you selected. For example, if you want
a run time of 10 minutes on zone 5, you would use the SELECT keys to select zone
5 and, once on zone 5, you would use the ADJUST keys to set the run time to 10
minutes.
There are instances when only SELECT or only ADJUST are required. They
will be explained in this guide where appropriate. A Rule of Thumb: SELECT