
Handrail Instructions

Mark Cut Line at
Tangent Point
Step 4 - Mark the Handrail and Fitting
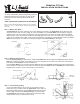
Use the LJ-3044 VersaTool™, or make a template to mark the location
of the Rail Bolt by cutting a 1/8” piece o the end of a piece of hand-
rail. Center and drill a 1/16” hole 15/16” up from the bottom of the rail
as shown in Fig. 4. Mark one face of the template “Rail” and mark the
other face “Fitting”. Align the template on the end of the handrail and
the Fitting Easement. Mark the location to drill the hole for the Rail
Bolt on each.
Step 5 - Drill the Fitting and Handrail
Drill a 1/4” Dia. hole 2 1/8” deep into the Fitting Easement. Using the
LJ-3032 Rail Bolt-Runner™ or LJ-3044 VersaTool™, install the lag
screw end of the Rail Bolt into the Fitting Easement until 1 7/16” of it
remains exposed as shown in Fig. 5a.
Drill a 1” Dia. hole 1 1/2” deep in the bottom of the handrail as shown
in Fig. 5b. Drill a 3/8” Dia. hole in the end of the handrail into the 1”
Dia. hole as shown in Fig. 5b and 6.
Step 6 - Attach Fitting to Handrail
Attach the Fitting to the end of the handrail using the Rail Bolt as
shown in Fig. 5a. Align the proles and tighten the nut with a 1/2” box-
end wrench or the LJ-3044 VersaTool™. Before nal assembly with
glue, drive two small nish nails in the end of the handrail as shown in
Fig. 5b and 6. Cut o the heads of the nails leaving about 1/8” of the
nail exposed. The nails will help keep the proles aligned until the glue
sets.
NOTE: Always assemble the balustrade completely without glue to
reassemble with glue.
1/8” Template
15/16”
Drill 1/16”
Dia. Hole
Fig. 4
1/4” Dia. Hole
Fig. 5a
1 7/16”
2 1/8”
Fitting
Fig. 6
Finish Nails
3/8” Dia.
Hole
Finish
Nail
Fig. 5b
1”
Dia.
Hole
1 1/2”
1 3/8”
3/8” Dia.
Hole
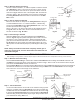
Step 1 - Mark the Gooseneck Fitting
Place the Gooseneck Fitting on a at surface. Slide the Pitch Block under the tting with the Rise side down until
the Rake side contacts the bottom of the easement as shown in Fig. 7. Place a mark on the easement at the tangent
point where the Pitch Block contacts the easement.
Place the Pitch Block next to the tting with the Run side down and the Rake side aligned with the rst mark made on
the easement. Scribe a line on the side of the easement along the Rake side of the Pitch Block as shown in Fig. 8.
This is the line to cut the correct angle on the easement.
When installing a 2-rise gooseneck, cut the rail drop to length and attach the easement to the rail drop before continuing on to the next step.
Fig. 7
Fig. 8
Mark Tangent
Point
Easement
Rail Drop
Fig. 9
Cut Line
Step 2 - Trim the Easement
It is recommended that the cut be made on the easement using a power
miter box, if possible. Place the Pitch Block on the miter box table with
the Rise side down and the Rake side towards the saw as shown in Fig.
9. Position the Gooseneck Fitting in the saw and slide the Pitch Block
under the tting to help hold it at the proper angle. Always double check
your marks before cutting. Make Cut.
Manufactured by: L.J. Smith, Inc., 35280 Scio-Bowerston Rd.
Bowerston, Ohio 44695
Form Number: 3RSHEET