
User Manual


Hyperlink Extended Range WLAN Kit Installation Manual Rev. A Page
10
Hyperlink Technologies, Inc.
ANTENNA SYSTEM CONNECTION
NOTE: THE ANTENNA SYSTEM SHALL BE INSTALLED ONLY BY
EXPERIENCED ANTENNA INSTALLERS WHO ARE FAMILIAR WITH LOCAL
BUILDING AND SAFETY CODES, AND WHEREVER NECESSARY HAVE
BEEN LICENSED BY APPROPRIATE GOVERNMENT REGULATORY
BODIES. FAILURE TO DO SO MAY VOID THE PRODUCT WARRANTY, AS
WELL AS EXPOSE THE END-USER TO LEGAL AND/OR FINANCIAL
LIABILITIES. HYPERLINK TECHNOLOGIES, ITS AGENTS, RESELLERS OR
DISTRIBUTORS, ARE NOT LIABLE FOR INJURY, DAMAGE, OR VIOLATION
OF GOVERNMENT REGULATIONS THAT MAY ARISE FROM FAILING TO
COMPLY WITH THE GUIDELINES DESCRIBED IN THIS DOCUMENT.
Surveying the Antenna Site
Before beginning system installation, emphasis should be placed on system
planning. It is important that no large obstructions exist near the antenna, such as
retaining walls, chimneys, air-conditioning units or other antenna masts. These
types of objects can have an impact on the antenna system performance.
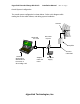
Plan to mount the antenna as high as possible. You will need enough mast to
elevate the antenna approximately 10-15 feet above the roof or above any
obstruction that might be in the antenna's signal path.
You will need to identify the location where the antenna cable will be routed. If you
run the antenna cable through the roof, a water-proof fitting will be required. Consult
a building contractor or licensed electrician to help you with the routing if necessary.
Take note of the length of the mast you will need and the type of mounting hardware
required. The amplified antenna kit is shipped with U-Bolt mounting hardware which
should be ideal for mounting the antenna and amplifier to most types of mast. Also,
make plans on how you are going to talk to the person at the remote antenna while
you are going through the antenna alignment procedure. For example, cellular
phones or walkie-talkies can be used.