
Install Manual Part 3
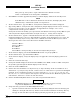
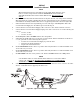
Table Of Contents
- CHAPTER 4- MAINTENANCE
- APPENDIX A - SIGNAL & CABLE CHARACTERISTICS
- APPENDIX B - CHECKOUT USING TCAS-201 RAMP TEST SET
- APPENDIX C - CHECKOUT USING T-49C FLIGHTLINE TESTER
- APPENDIX D - USING THE TERMINAL DEVICE
- APPENDIX E - CHECKOUT USING ALTERNATE DISPLAY

SKY497
Installation Manual
E-3
Rev. C
NOTE
The Patch Antenna may be used without a tripod. The Patch Antenna can be
held, or secured, and pointed towards the SKYWATCH aircraft under test
WITH THE MOUNTING STUD POINT TOWARD THE GROUND. This orientation is
critical.
b. Mount the chassis lid, with the Patch Antenna facing the aircraft, onto a tripod (not included).
The tripod must be capable of holding the antenna (approximately 2.5 lb) and must provide a
standard base mounting stud threaded 1/4"-20. A typical tripod mount is shown in figure E-1.
c. If the internal batteries are being utilized, proceed to sub-step f. If the Flightline Tester AC
Converter Power Supply is to be utilized, proceed to sub-step d.
d. Connect the AC Converter Power Supply cable connector to the chassis external connector.
e. Connect the AC Converter Power Supply input power cable connector to one of the following AC
sources:.
• 115 Vac, 60 Hz
• 115 Vac, 400 Hz
f. Set the Flightline Tester POWER switch to the ON position.
g. Verify that the LOW indicator is not steady on (it may flash). If the LOW indicator remains on
(i.e., lit), perform one of the following three options:.
• Use the AC Converter Power Supply to power the unit.
• Recharge the internal batteries.
• Replace the internal batteries.
h. Set the SELF-TEST switch to the 1030 position and verify that the 1030 indicator blinks on for
1/2 second every 5 seconds.
i. Set the SELF-TEST switch to the 1090 position and verify that the 1090 indicator blinks on for
1/2 second every 5 seconds.
j. Set SELF-TEST switch to center position (off). Set the POWER switch to the OFF position.
NOTE
Care should be taken to ensure that the Patch Antenna is connected to TT391
connector J1 and NOT J2. IF THE PATCH ANTENNA IS CONNECTED TO
J2 THE TT391 WILL NOT FUNCTION CORRECTLY.
k. Connect the Flightline Tester coax cable to J3 on the Patch Antenna and to connector J1 in the
chassis. (J2 should remain capped by the dust cover).
Figure E-1. Typical Patch Antenna Tripod Mount