KM-C2525E KM-C3225E KM-C3232E KM-C4035E Advanced Operation Guide
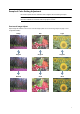
Sample of Color Setting Adjustment This section explains the color calibration feature together with the following examples. NOTE: To illustrate the difference between features, the copy sample colors in this document have been modified from the actual colors output by this machine. One touch Image Adjust Adjust images as desired to more vivid or more dull images.
Color Balance Adjust Adjust the strength of cyan, magenta, yellow, and black to make fine hue adjustments.
Hue Adjust Adjust the color (hue) of images. Make adjustments such as adjusting red to a strong yellow-red or yellow to a strong green-yellow to make more creative copies. (Refer to Hue Adjust on page 1-50 for configuration details) Original Adjust yellow to more green, adjust blue to more magenta... (1) Adjust yellowish-red to more yellow, adjust bluish-cyan to more blue... (2) Sharpness Adjust Adjust the sharpness of image outlines.
Legal and Safety Information Please read this information before using your machine. Regarding Tradenames • PRESCRIBE and ECOSYS are registered trademarks of Kyocera Corporation. • KPDL is trademark of Kyocera Corporation. • Windows and Windows Server are registered trademarks of Microsoft Corporation. • Windows NT is a trademark of Microsoft Corporation. • PCL and PJL are registered trademarks of Hewlett-Packard Company.
IBM PROGRAM LICENSE AGREEMENT THE DEVICE YOU HAVE PURCHASED CONTAINS ONE OR MORE SOFTWARE PROGRAMS (“PROGRAMS”) WHICH BELONG TO INTERNATIONAL BUSINESS MACHINES CORPORATION (“IBM”). THIS DOCUMENT DEFINES THE TERMS AND CONDITIONS UNDER WHICH THE SOFTWARE IS BEING LICENSED TO YOU BY IBM. IF YOU DO NOT AGREE WITH THE TERMS AND CONDITIONS OF THIS LICENSE, THEN WITHIN 14 DAYS AFTER YOUR ACQUISITION OF THE DEVICE YOU MAY RETURN THE DEVICE FOR A FULL REFUND.
Monotype Imaging License Agreement 1. “Software” shall mean the digitally encoded, machine readable, scalable outline data as encoded in a special format as well as the UFST Software. 2. You agree to accept a non-exclusive license to use the Software to reproduce and display weights, styles and versions of letters, numerals, characters and symbols (“Typefaces”) solely for your own customary business or personal purposes at the address stated on the registration card you return to Monotype Imaging.
About this Operation Guide This Operation Guide contains the following chapters: 1 Copy Functions Describes the full-featured copying functions of the machine. 2 Document and Output Management Functions Explains the copier’s versatile functions for managing original documents and jobs during copying. 3 Printer Settings Explains how to configure the printer function. 4 Scanner Settings Explains the scanner functions and settings that can be configured from the machine touch panel.
Included Guides The following guides are included with this machine. Refer to the proper guide based on your requirements. Operation Guide Describes how to load paper, basic copy, print and scan operations, and troubleshooting. Advanced Operation Guide (This Guide) Explains copying, printing and scanning features in depth, as well as default settings. This guide is contained on the CD-ROM as a PDF file. Kyocera Extended Driver User Guide Explains how to install and setup the printer driver.
Conventions in This Guide The following conventions are used depending on the nature of the description. Convention Description Example Bold Indicates a message or button displayed on the machine’s operation panel key or a computer screen. Press the Start key. [Regular] Indicates touch panel keys. Press [Basic]. Italic Indicates touch panel messages. Ready to copy is displayed. Note Indicates supplemental information or operations for reference.
Originals and Paper Sizes This section explains the notation used in this guide when referring to sizes of originals or paper sizes. As in A4 and B5, which may be used either in the horizontal or vertical direction, in order to indicate the orientation of the original/paper, horizontal orientation is indicated by an additional R character. Set direction Indicated size † Vertical direction A4, B5, A5, B6, A6, 16K B A B A Original Size For original/paper, dimension A is longer than B.
Contents Sample of Color Setting Adjustment ............................................................................................................... i One touch Image Adjust .............................................................................................................. i Color Balance Adjust .................................................................................................................. ii Hue Adjust ....................................................................
3 Printer Settings ............................................................................................. 3-1 Print Status Page .................................................................................................................... 3-2 Interface Configuration .......................................................................................................... 3-5 Emulation ..............................................................................................................
Appendix ..................................................................................................... Appendix-1 Paper .......................................................................................................................... Appendix-2 Intercompatibility of Functions .................................................................................... Appendix-8 Glossary .................................................................................................................
xiv
1 Copy Functions This chapter covers the following topics. • Selecting Paper Source...1-2 • Proof Copy...1-35 • Selecting original size...1-3 • Repeat Copy...1-36 • Copy Quantity...1-6 • OHP Backing Sheet Mode...1-39 • Orientation of Original Document...1-7 • Auto Rotation...1-41 • Offset Mode...1-9 • Selecting Output Destination...1-42 • Stapling...1-10 • EcoPrint...1-43 • Punching...1-12 • Inverted Copying...1-44 • Combine Mode...1-14 • Mirror Copying...
Copy Functions Selecting Paper Source To select paper of different sizes, change the cassette or MP tray paper source. Follow the steps as below to select the paper source. 1 Place the original. When [APS] is selected, paper matching the size of the original will be selected automatically. NOTE: You may override the automatic paper selection default. For further details, refer to Setting Auto Paper Selection on page 7-5. 2 Ready to copy.
Copy Functions Selecting original size Specify the size of originals that will serve as the basis for scanning. Be sure to specify the original size when copying originals of nonstandard sizes. Select the original size from the following groups of original size. • Standard Sizes – Select from commonly used standard sizes.
Copy Functions 4 Press [Other stand.Size] ([Others stand.Size]). Ready to copy. ( Full-Color ) Shortcut Select Original Size Select size 5 Select the original size. 6 Press the Start key. Copying begins. Paper Size 11×1 100% Back A3 B4 B6 8K A5 B5 Folio 16K 16K Input size A5 B5 P.Card Other stand.Size A6 B6 OUFUKU HAGAKI Input Original Size Follow the steps as below to enter the original size when not listed in the standard sizes. 1 Place the original. 2 Press [Function].
Copy Functions 5 Press the Start key. Copying begins.
Copy Functions Copy Quantity Sets the number of sheets to copy. You may specify up to 999 sheets for a single copy job. Follow the steps as below to specify the copy quantity. 1 Place the original. 2 Use the numeric keys on the operation panel to enter the desired copy quantity. to copy. ( Full-Color ) Paper Size Set 11×8½" 100% Combine NOTE: To clear the copy quantity, press the Stop/Clear key. Copy quantity will be reset to 1. APS MP tray Plain User choice 3 1-6 Press the Start key.
Copy Functions Orientation of Original Document Orientation of the original must be specified to to use the following functions.
Copy Functions 4 According to the placed orientation of the original, press [Top Edge] ([Back Edge]) or [Left Top Edge] ([Left top corner]). to copy. tion ( Full-Color ) Shortcut Paper Size Set 11×8½" 100% Select Original Image Direction. "Select Original Image Direction." can be shown at right side of display. Follow the steps. If setting mode is wrong, incorrect copy will result. Top Edge 1-8 Close Back Left Top Edge 5 Press [Close].
Copy Functions Offset Mode 3 2 1 NOTE: Use of this feature requires paper of the same size must be loaded in the different cassettes with portrait and landscape orientations. Only 11 × 8 1/2", A4, B5 and 16K paper sizes may be used with Offset mode. Original 3 2 1 3 2 1 Outputs printed copies such that each set is stacked perpendicular (rotated 90 degrees) to the previous set. 3 2 1 Copy Follow the steps as below for using Offset mode. 1 Press [Function]. 2 Press [Sort/Offset] ([Sort/Group]).
Copy Functions Stapling Staples sets of copies. NOTE: Requires the optional document finisher or 3000 sheet document finisher. The orientations of the original and corresponding staple positions are as follows. Cassette Paper Load Direction 3000 Sheet Document Finisher Original Orientation: Top Edge (Back Edge) Original Orientation: Top Edge (Back Edge) Original Orientation: Left Top Edge (Left top corner) Original Orientation: Left Top Edge (Left top corner) Follow the steps as below for stapling.
Copy Functions 3 Press [1 staple] or [2 staples]. Ready to copy. ( Full-Color ) Staple/Punch Staple 4 Select the staple position. 5 Place the original and press the Start key. Shortcut Punch Position Off Left side Off 1 staple Right side 2 holes 2 staples Top side 3 holes Paper Size 11×8 100% Back Select Original I Direction. Top Edge If the original has been placed on the optional document processor, copying begins automatically.
Copy Functions Punching Punch holes in sets of finished copies in preparation for binding. NOTE: Requires the optional 3000 sheet document finisher and punching unit. The orientations of the original and corresponding punch positions are as follows. Original Copy Orientation of Original Platen Document processor NOTE: The inch model provides two-hole and three-hole punching. The metric model provides two-hole and four-hole punching. Follow the steps as below for punching.
Copy Functions 3 Press [2 holes] or [3 holes] for the inch model. Press [2 holes] or [4 holes] for the metric model. Ready to copy. ( Full-Color ) Staple/Punch Shortcut Punch Staple 4 Select the hole punch position. 5 Place the original and press the Start key. Position Off Off Left side 1 staple 2 holes Right side 2 staples 3 holes Top side Paper Size 11×8 100% Back Select Original I Direction.
Copy Functions Combine Mode Images from either two or four originals are reduced and combined onto a single copy. The page boundary of each original can be indicated by a solid or dotted line. NOTE: Combine mode supports 11 × 17", 11 × 8 1/2", 8 1/2 × 11", A3, B4, A4, A4R, B5, B5R, 8K and 16K paper sizes. 2-in-1 Mode Copy two originals onto a single sheet. This mode can be used with Duplex mode to copy four originals onto one sheet. The orientations of the original and corresponding output are as follows.
Copy Functions 4-in-1 Mode For copying four originals onto a single sheet. This mode can be used with Duplex mode to copy eight originals onto one sheet. The orientations of the original and corresponding output are as follows. Original Copy Orientation of Original Platen Document processor NOTE: When placing the original on the platen, copy originals in the page order. Types of Page Boundary Lines Choose from the following options for lines to indicate page boundaries.
Copy Functions 3 Press either [2 in 1] ([2-in-1]) or [4 in 1] ([4-in-1]). Ready to copy. ( Full-Color ) Shortcut Combine Layout Off Solid 2 in 1 Dotted 4 in 1 Borders Select desired page sequence from Layout. 5 Select the page boundary line from Border line. 6 Place the original and press the Start key. Back Border line None 4 Paper Size 11×8 50% Select Original I Direction. Top Edge If the original has been placed on the optional document processor, copying begins automatically.
Copy Functions Margin Mode You can shift the original image to make space on the copy for binding on the left (right) or top (bottom) side. Margin widths are as follows. Model Type Range Inch models 0 - 3/4" (1/8" increments) Metric models 0 - 18 mm (1 mm increments) Margin on the Back Side When duplexing, you can also specify the margin on the back side. Auto – automatically sets margins to match the front side setting.
Copy Functions Centering Originals When copying onto paper larger than the original size, centers the original image on the paper. Follow the steps as below for centering. 1 Place the original so the top edge is aligned with the back or left of the platen. 2 Press [Function]. 3 Press [Margin/Centering] ([Margin/Imag.Shift]). 4 Press [Auto Center] ([Image shift]). Ready to copy. Margin/Centering ( Full-Color ) Shortcut Paper Size 11×8 100% Back Select Original I Direction.
Copy Functions Border Erase Prevents the appearance of shadows from around the edges of originals. Choose from the following Border Erase modes. • Sheet Border Erase – Use this mode to erase black borders around the single sheet original. Original • Book Border Erase – Use this mode to erase black borders around the edges and in the middle of the original such as a thick books. You can specify the widths individually to erase the borders around the edges and in the center of the book.
Copy Functions 4 Press [Sheet Erase] ([Border Erase]). Ready to copy. ( Full-Color ) Border Erase Paper Size 11×8 100% Shortcut Back ( 0~2 ) Border .¼ " Off Sheet Erase Individual BordrErase Book Erase 5 Press [+] or [–] to set the border erase width. With metric models, you can enter the border width directly using the numeric keys afer pressing [#-Keys]. 6 Press the Start key. Copying begins.
Copy Functions 4 Press [Individual BordrErase] ([Individual Erase Mode]). Ready to copy. Paper Size 11×8 100% ( Full-Color ) Shortcut Border Erase ¼" Top ¼" Back Select Original I Direction. Bottom Off Sheet Erase Book Erase Individual BordrErase ¼" Left ¼" Right Top Edge 5 Depending on orientation of the placed original, select [Top Edge] ([Back Edge]) or [Left Top Edge] ([Left top corner]) from Select Original Image Direction.
Copy Functions Poster For using this device to make copies larger than the maximum paper size, use Poster mode to separate and copy an enlarged image onto multiple pages. The completed copies have overlapping areas. A single large page can be created by pasting those areas together. Choose from one of the following 3 enlargement settings. • Original Copy Copy size – The output paper size is chosen from the following sizes. Copy is enlarged according to the selected paper size.
Copy Functions Page Numbering Numbers multi-page originals in sequential order. The formats of numbering include: [- 1 -], [P. 1], or [1/n]. [1/n] prints the total number of pages in the place of ‘n’. The page number will be centered at the bottom of the page. Original [- 1 -] [P. 1] [1/n] Follow the steps as below for page numbering. 1 Place the original so the top edge is aligned with the back or left of the platen. 2 Press [Function]. 3 Press [Page #] ([Page numbering]).
Copy Functions 8 Press [+] or [–] to select the starting page and press [Close]. Press [# keys] ([#-Keys]) to enter with numeric keys. Ready to copy. ( Full-Color ) Back Select start # ( 1~999) Select Original I Direction. Top Edge # keys 9 10 Paper Size 11×8 100% To specify the page to end numbering, press [Select last page] ([Setting last page]). Press [Manual]. Ready to copy. Paper Size 11×8 100% ( Full-Color ) Back Select last page ( 0~-10) Page Select Original I Direction.
Copy Functions Cover Mode Use a distinctive front and/or back cover. Change the paper source and copy the first and lage page of the original onto colored or thick paper. Cover sheet types Description Front cover Copies the first page of the original onto cover sheet specified paper as the cover page. Front Cvr + Back Cvr Copies the first page and last page of the original onto cover sheet paper as back and front covers. Paper for the cover page is fed from the MP tray.
Copy Functions Booklet from Sheets Delivers booklet of two-sided copies with facing pages from one-sided or two-sided originals. Booklets such as magazines can be created by folding at the center. Also, thick paper or colored paper may be inserted as a cover page. Paper for the cover page is fed from the MP tray. To supply cover paper from a cassette, refer to Specifying Cassette for Cover Paper on page 7-7.
Copy Functions 3 Press [Booklet]. 2 sided mode. Shortcut Booklet Original Finished Booklet Book JBooklet 4 Back Stitching Off Off Paper Size 11×1 100% ( Full-Color ) 1 sided Open from left Stitching Front cvr 2-sided Left/Right 2-sided Top/Bottom Open from right Open from top Saddle Stitch Select Original I Direction. Off Top Edge Select binding orientation for Original and Finished. If the message Cannot copy with these settings.
Copy Functions Booklets from Facing Pages Copies book originals to booklets consisting of two-sided copies with facing pages. Booklets such as magazines can be created by folding at the center. Also, thick paper or colored paper may be inserted as a cover page. You can change the cassette set as the paper to be used for the cover page. For further details, refer to Specifying Cassette for Cover Paper on page 7-7.
Copy Functions 8 Press the Start key. Scanning of the original begins. Scan next original(s) is displayed. Place the next original and press the Start key. If all original pages have been scanned, press [Scanning finished]. Copying begins.
Copy Functions Memo Mode Makes copies with a space for adding notes. You can also copy two originals onto the same sheet with a space for notes. NOTE: Memo page mode supports 11 × 17", 11 × 8 1/2", 8 1/2 × 11", A3, B4, A4, A4R, B5, B5R, 8K, 16K page sizes. Layout A Reduces images of one original page for copying onto half of a single page, leaving the other half blank for notes.
Copy Functions 2 Press [Memo Pages]. 3 Press [Layout A] or [Layout B]. Ready to copy. ( Full-Color ) Memo Pages Shortcut Layout Border line None Off Solid Layout Manual A Dotted Layout B Borders 4 Select desired page sequence from Layout. 5 Select the page boundary line from Border line. 6 Place the original and press the Start key. Paper Size 11×8 50% Back Select Original I Direction.
Copy Functions Batch Scanning Scans multiple originals for a single copy job without using the optional document processor. Divide the original into smaller sets and scan each set with the document processor. In Batch Scanning mode, you can continue scanning originals until you press [Scanning finished]. Follow the steps as below to use batch scanning. 1 Press [Function]. 2 Press [Batch Scanning]. 3 Press [On]. Paper Size 11×8 100% Place originals then press Start key.
Copy Functions Sharpness Adjust Adjust the sharpness of image outlines. When copying penciled originals with rough or broken lines, clear copies can be taken by adjusting sharpness toward [Sharpen]. When copying images made up of patterned dots such as magazine phots, in which moire† patterns appear, edge softening and weakening of the moire effect can be obtained by setting the sharpness toward [Unsharpen].
Copy Functions Background Exposure Adjust Lightens the background of color originals with dark backgrounds. NOTE: This feature is used with full color and auto color copying. Background Exposure Adjust is disabled during auto color copying when the a black & white original has been detected. Original Copy Follow the steps below to use background exposure adjust. 1 Place the original. 2 Press [Color func.] ([Colour func.]). 3 Press [Background exp.adj.]. 4 Press [On]. Ready to copy.
Copy Functions Proof Copy Make a test copy of a single set to verify settings before printing the remaining sets. If a problem is found, avoid wasting paper canceling the remaining copy job. Follow the steps below to do a Proof copy job. 1 Press [Function] and then press [T Down]. 2 Press [Proof Copy] ([Test Copy]). 3 Press [On]. Ready to Proof Copy.
Copy Functions Repeat Copy Set Repeat Copy to enable printing additional sets if required after copy completion. For confidential documents, configure a passcode to use with Repeat Copy. If set, enter the correct passcode when using Repeat Copy. Printing will not occur if the passcodes do not match. NOTE: Repeat Copy jobs are erased when the main power is switched off. Repeat Copy is not available when using document management function.
Copy Functions 2 Select the job to reprint and press [Reprint]. Repeat Copy Job User Original Set Type Registration Norm. Copy Norm. Copy Delete Reprint Check Details Repeat Copy 3 If a passcode was specified, a passcode input screen is displayed. Use the numeric keys to enter the pass code and press [Enter]. 4 Press [+] or [–], or use the numeric keys to set the number of copies. Stop Set Printing 5 Press [Printing]. Printing begins.
Copy Functions Deleting Repeat Copy Jobs Follow the steps as below to delete stored Repeat Copy jobs. 1-38 1 Press the Repeat Copy key. 2 Select the job to delete and press [Delete]. 3 Press [Yes] to delete the selected job. To delete other jobs, repeat steps 2 and 3. 4 Press [End]. The touch panel will return to the [Basic] screen.
Copy Functions OHP Backing Sheet Mode When two or three OHP transparencies are stacked on top of each other, static electricity may make them difficult to handle. When using OHP Backing mode, a paper sheet is automatically inserted between each transparency, making them easier to handle. Also, the same original page can be copied to the backing sheet for multiple page copying. NOTE: Never load OHP transparencies into trays or cassettes other than the MP tray.
Copy Functions 5 Press [Copy] or [Blank]. Ready to copy. OHP Backing Off Copy Blank 6 1-40 Press the Start key. Copying begins. ( Full-Color ) Shortcut Paper Size 11×8 100% Back Insert a blank paper between piec OHP film, or copy to a OHP back p Place the OHP film in the Multipurpose tray.
Copy Functions Auto Rotation Copies the original image rotated clockwise 90 digress if set original and the paper loaded into the cassette are the same size but different orientations. NOTE: Set whether to enable or disable Auto Rotate mode in default settings mode. For further details, refer to Selecting Auto Rotation on page 7-9. Auto Rotate mode supports 11 × 8 1/2", 8 1/2 × 11", 5 1/2 × 8 1/2", A4, A4R, A5R, B5, B5R, B6R, 16K paper sizes only. Follow the steps as below to use Auto Rotate.
Copy Functions Selecting Output Destination The optional job separator, document finisher, 3000 sheet document finisher or mailbox can be specified as copy output destinations. Paper Output Description Top tray Outputs to the built-in output tray. Job separator Outputs to the optional job separator. Finisher tray Outputs to the optional document finisher tray. Tray A Outputs to Tray A of the optional 3000 sheet document finisher.
Copy Functions EcoPrint Set EcoPrint mode to recude the energy consumed. Use this mode when high-quality copying is not required (e.g., when making test copies). NOTE: The image may appear lighter. Follow the below steps to configure EcoPrint. 1 Press [Function] and then press [T Down]. 2 Press [EcoPrint]. 3 Press [On]. EcoPrint is enabled. to copy. ( Full-Color ) Shortcut Paper Size Set 11×8½" 100% Back Close EcoPrint Conserve toner consumption. Image is light. EcoPrint mode saves toner.
Copy Functions Inverted Copying Copies the black and white inverted (reversed) images of black and white originals. NOTE: This function is only available for Black/White copy mode. Follow the steps as below for Inverted copying. 1 Press [Function] and then press [T Down]. 2 Press [Invert]. 3 Press [On]. Inverted copying is enabled. Ready to copy. Invert Off On 1-44 ( B&W ) Paper Size 11×8 100% Shortcut Back Copy the scanned image with reve black and white parts.
Copy Functions Mirror Copying Copies mirrored images of the original. Follow the steps as below for Mirror Copying. 1 Press [Function] and then press [T Down]. 2 Press [Mirror Image]. 3 Press [On]. Mirror copying is enabled. Ready to copy.
Copy Functions Auto Selection Mode Use the optional document processor to place originals of different widths in one operation. The size of each original page is automatically detected and each original is automatically printed to the matching paper size or all originals printed are on the same size output paper. NOTE: This operation requires the optional document processor. Up to 30 sheets can be loaded in to the document processor at once for Auto Selection mode. The following paper sizes can be used.
Copy Functions 3 Press [Auto selection] or [Unify Size Filing] ([Electronic Filing]). For [Unify Size Filing] ([Electronic Filing]), select the size of the first original page and press [Close]. Select the paper tray from the [Basic] screen. Ready to copy. ( Full-Color ) Shortcut Auto Selection Paper Size 11×8 100% Back 1st pg.
Copy Functions Image Repeat Copy Tiles the 1 copied sheet with an original image. You can also specify the area of the original to repeat. NOTE: This function is only available when Auto-Rotate (see page 1-41) is set to [Off]. Follow the steps as below to use Image Repeat Copy. 1 Place the original. 2 Press [Function] and then press [T Down]. 3 Press [Image Repeat]. 4 Press [Auto zoom priority]. Original Ready to copy.
Copy Functions Color Balance Adjust Adjust the strength of cyan, magenta, yellow, and black to make fine hue adjustments. NOTE: This feature is used with full color and auto color copying. This feature can not be used together with Auto Exposure mode (see Operation Guide). This feature can not be used together with One-Touch Image Adjust mode (see page 1-52). Refer to the sample image in Color Balance Adjust on page ii for examples of the effect of color balance adjustment.
Copy Functions Hue Adjust Adjust the color (hue) of images. Make adjustments such as adjusting red to a strong yellow-red or yellow to a strong green-yellow to make more creative copies. The items that may be configured are as follows. Yellow • All: Adjust hue for all colors. • Yellow-Green&Blue-Magenta: Adjust color balance for yellow and green, and blue and magenta. • Green-Cyan&Magenta-Red: Adjust color balance for green and cyan, and magenta and red.
Copy Functions Example 1 Select [Yellow-Green&Blue-Magenta], and press [ to adjust yellow closer to green, and blue closer to magenta. (See page iii – Sample (1)) Yellow ] Green Red Magenta Cyan Blue Example 2 Select [Cyan-Blue Red-Yellow], and press [ ] to adjust yellow closer to red , and blue closer to cyan. (See page iii – Sample (2)) Yellow Red Green Magenta Cyan Blue 5 Press the Start key. Copying begins.
Copy Functions One touch Image Adjust Adjust images as desired to more vivid or more dull images. The items that may be configured are as follows: Vivid, Dull, Sharp, Smooth, Light, Dark Refer to the sample image in One touch Image Adjust on page i for examples of the effect of each setting. NOTE: This feature is used with full color and auto color copying. This feature can not be used together with Auto Exposure mode (see Operation Guide).
Copy Functions Color/B&W Selection Use to output a combination of color copies and black & white copies only a few color copies are needed and the rest can be black & white. NOTE: Color/B&W Selection is only available during full color copying. Original Copy Follow the steps as below to use Color/B&W selection. 1 Place the original. 2 Press [Color func.] ([Colour func.]). 3 Press [Color/B&W selction] ([Color/B&W selction]). 4 Press [On]. Ready to copy.
Copy Functions MonoColor Copy Specify one of Cyan, Magenta, Yellow, Red, Green, or Blue, and produce copies with that color regardless of original type. Follow the steps as below for MonoColor Copy. 1 Place the original. 2 Press [Color func.] ([Colour func.]). 3 Press [Mono color] ([Mono colour]). 4 Select color for copying from [Cyan], [Magenta], [Yellow], [Red], [Green] or [Blue]. Ready to copy. ( Cyan ) Paper Size 11×8 100% Shortcut MonoColor Back Off 5 1-54 Press the Start key.
Copy Functions Programmed Copying Press the program number (1 to 8) to recall the program. After registering sets of frequently used functions as a single program, you can simply press the program number as needed to recall those functions. You can also name the programs to identify them. Registering Programs Follow the steps as below to register a program. 1 Access the copy mode you would like to register and press [Program]. 2 Press [Register].
Copy Functions 3 4 Press the number (1 to 8) of the program to rename. Registration name change Select the number for changing name. abc list d list a No registration list b file 1 list c file 2 Re-enter the program name and press [End]. The modified program name is saved. NOTE: Refer to Character Input Method on page 7-47 for how to enter text characters. Deleting programs Follow the steps below to delete saved programs. 1 Press [Program]. 2 Press [Delete].
Copy Functions Assigning Register Keys Assigns three frequently used functions listed on the [Function] screen and [Color func.] ([Colour func.]) screen to assign keys. Functions may also be assigned from the [Basic] screen or [User choice] screen. Assigning Register Keys Follow the steps as below to assign register keys. NOTE: To assign a register key, first set Showing the Register Key on page 7-11 to [On]. 1 Open the function you would like to assign. 2 Press [Shortcut] ([Register]).
Copy Functions Job Build Job Build allows you to scan originals in several separate steps and copy at once. In each step of the scanning process you can specify different settings (such as zooming and border erase) and you can specify different types of originals. Other examples include inserting a blank sheet between sets of copies from each step and specifying a front cover page during a duplexing step. Job Build Procedure This procedure describes how to use a job build for the following example.
Copy Functions 2 Press [1 sided/2 sided] ([1-sided/2-sided]) . Ready to Job build. Job Build - Step 1 sided 11×8½" Select Paper Original Type Auto % Offset Reduce /Enlarge Finished Basic 3 Press [2 sided Copy] ([2-sided Copy]), and from Finished select [Open from left] ([Left binding]) and press [Close]. ( Full-Color ) Place originals then press Start key. Quality 1 sided Copy 1 sided/ 2 sided Top Edge 1 sided copy-Left Finished page #: Orig.
Copy Functions 7 Select the MP tray and press the [Close]. Ready to Job build. ( Full-Color ) Place originals then press Start key. Select Paper Back 11×8½" Plain 11×17" Color 11×8½" Plain 11×8½" Color 11×8½" Plain 8 Place the Original A and press the Start key. Scanning of the original begins. Step 2: Set Original A Back Side to Blank 9 Press [Print from Front page]. The back side of the page will be left blank and copying will continue from the next page. riginal(s).
Copy Functions Step 5: Leave Back Side of Original C Blank 16 Press [Print from Front page]. The back side of the page will be left blank and copying will continue from the next page. riginal(s). riginals and press start key. nning finished" key when starting copy. - Set Cancel Step 1 sided Original Type 2 sided Copy 1 sided/ 2 sided Top Edge Auto % Reduce /Enlarge Orig.
Copy Functions Setting Functions This section explains the copying functions available when using Job Build. Select Paper Select the paper size. 1 Press [Basic]. On the next screen, press [Select Paper]. Ready to Job build. Place originals then press Start key. Job Build - Step 11×8½" Select Paper 1 sided Original Type Offset Finished Auto % Reduce /Enlarge Basic 2 ( Full-Color ) Quality 1 sided Copy 1 sided/ 2 sided Top Edge 1 sided copy-Left Finished page #: Orig.
Copy Functions 3 Check the orientation of the original. NOTE: Incorrect copying may occur if the original is not placed correctly. 4 Press [Close]. Finish Set the Finish options. The following settings are available. 1 • Offset (Group) – Each completed set is rotated 90 degrees to the next before stacking. • Stapling – Use the optional document finisher or 3000 sheet document finisher to staple the completed copies.
Copy Functions NOTE: Incorrect copying may occur if the original is not placed correctly. 3 Press [Close]. Exposure Level Set the copy exposure. The setting items are as follows. 1 Item Description Auto Automatically adjusts copy contrast. Manual Manually adjust the copy contrast. Press [Quality] and on the next screen press [Exposure Mode]. Ready to Job build. Job Build - Density 4 Exposure Mode Off Color balance Basic 2 ( Full-Color ) Place originals then press Start key.
Copy Functions 2 Press [On] to adjust each color. For further details, refer to Color Balance Adjust on page 1-49. 3 Press [Close]. Hue Adjust Adjust the color (hue) of images. 1 Press [Quality] and on the next screen press [Adjust Hue]. 2 Press [All] or [Each] to adjust the hue. For further details, refer to Hue Adjust on page 1-50. 3 Press [Close]. Sharpness Adjust Adjust the sharpness of image outlines. 1 Press [Quality] and on the next screen press [Sharpness].
Copy Functions Repeat Copy Specify Repeat Copy as follows. Simply complete this setting once as an initial step. 1 Press [Edit] and on the next screen press [Repeat Copy]. NOTE: Repeat Copy setting is common to all steps. It may only be configured as the first step. 2 Press [On] to activate Repeat Copy. For further details, refer to Repeat Copy on page 1-36. 3 Press [Close]. Margin/Centering Set margin (blank borders) and centering options.
2 Document and Output Management Functions This chapter explains the functions used for managing original documents as well as jobs during copying. • Document Management Functions...2-2 • Output Management Functions...
Document and Output Management Functions Document Management Functions Overview of Document Management Functions Document management functions enable you to store documents (such as scanned images of originals) on the machine hard disk for printing later. Documents are assigned to different ‘boxes’, the document storage areas, depending on the functions to be used. Stored documents are accessible from the boxes where they are kept until deleted. The following boxes are available.
Document and Output Management Functions 4 Press the Auto Color, Full Color or Black&White key to select a color mode. 5 Complete the scanning settings required for the original. The following functions are available.
Document and Output Management Functions Reviewing and Renaming Documents Check the size, save time and other information on documents stored in the Shared Data Box. Also, rename documents. You can also print the first page of documents for review. 1 Press the Document Management key. 2 Press [Document Printing] or [Box Editing] under Shared Data Box. 3 Select the document to verify and press [Document Properties] ([Check/Rev. Details]). NOTE: You can change the document sort order.
Document and Output Management Functions Synergy Print Box Register originals as documents in the Synergy Print Box to print later in the desired quantity as needed without the originals themselves. Up to ten of these documents can be combined into a single copy job for printing. You can also print out all documents in the Synergy Print Box as a single job. The Synergy Print Box holds 100 individual boxes (numbered 001 to 100). The boxes can be assigned to each department.
Document and Output Management Functions 6 Complete the scanning settings required for the original. The following functions are available. Tab Function Basic Selection of original sizes, selection of original types, selection of document sizes, zooming, and original orientation Quality Scan exposure level, image quality, color balance †, hue adjustment †, sharpness Edit Border erase and batch scanning † 7 This setting is available when the color mode is set to Full Color or Auto Color.
Document and Output Management Functions 5 Complete the function settings as required. The following functions are available. Tab Function Basic Paper selection, 1-sided/2-sided, sort/offset, stapling † Edit Cover page, booklet, margins, page numbering, output selection †† † Requires the optional document finisher or 3000 sheet document finisher. †† Requires the job separator, document finisher, or 3000 sheet document finisher.
Document and Output Management Functions 4 Select the document to verify and press [Document Properties] ([Check/Rev. Details]). End Up 1 SUN 05:46 NOTE: You can change the document sort order. Press [Order of indication] and select from [Sort by Date] ([NewJOld] and [OldJNew]) and [Sort by Name] ([AJZ] and [ZJA]). 5 Check the displayed selection.
Document and Output Management Functions Deleting All Documents Delete all documents in selected Synergy Print boxes in one operation. 1 Press the Document Management key. 2 Press [Box Editing] under Synergy Print Box. 3 Select the box where all documents to be deleted are stored. Directly press the box key or use the numeric keys to input the box number and press [Enter]. If a password has been set up for the box, a screen for password entry will be displayed.
Document and Output Management Functions 6 2-10 Press [End]. Display is returned to Document Management.
Document and Output Management Functions Output Management Functions Overview of Output Management Functions Output management functions enable you to manage multiple copy jobs in job queue. You can manage both queued and finished jobs. Also, printing from a computer or data received when using the optional fax function can be managed as a single print job or fax job, just like a copy job. Output management functions are convenient in the following situations.
Document and Output Management Functions Using the Output Management Functions Manage jobs using the [Prt Status] ([Prnt Status]) screen for output management function. Press the Output Management key. [Prt Status] ([Prnt Status]) screen is displayed. [Prt Status] Screen Displays information about current printing status and queued jobs.
3 Printer Settings This chapter explains how to configure the printer function. Operation panel settings are used as default settings according to the usage environment. Normally, the printer driver settings made by the application software take precedence. The main configurable settings are as follows. • Print Status Page...3-2 • Interface Configuration...3-5 • Emulation...3-10 • Font Setting...3-13 • Page Set Configuration...3-17 • Print Quality...3-21 • Setting Color Mode...
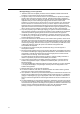
Printer Settings Print Status Page Print a status page to check details such as current settings, available memory, and installed optional equipment. 1 Press the Printer key. 2 Press [Printer Menu]. 3 Press [Print Status Page]. Select item. Printer menu 4 Print Status Page Font Paper Handling Interface Page Set Color Mode Emulation Print Quality RAM DISK Mode Press [Printing]. Processing is displayed and the status page is printed.
Printer Settings Status Page Details A sample status page output is displayed. NOTE: Items or values contained in the status page may vary depending on the firmware version.
Printer Settings 3-4 Item Description Firmware version The version and publication date of the loaded firmware. Hardware Information Shows major function setting information such as the paper size and paper type for each cassette. Memory Shows overall installed memory, currently available memory, and current RAM disk status. Page Information Shows the current resolution, set page count, and overall page count. Installed Options Shows the status of installed optional equipment.
Printer Settings Interface Configuration This device includes as standard equipment a parallel interface, a USB interface, and a network interface. An optional serial interface or network interface can be installed as needed. Emulation and font environments may be set individually for each of these interfaces.
Printer Settings Serial Interface Mode Configuration An optional serial interface can be installed. Configure the baud rate (communication speed), data big, stop bit, parity, and protocol to be used by the serial interface. These protocol settings must match the settings of the computer serial interface.
Printer Settings 1 Press the Printer key. 2 Press [Printer Menu]. 3 Press [Interface]. Select item. Printer menu 4 Print Status Page Font Paper Handling Interface Page Set Color Mode Emulation Print Quality RAM DISK Mode Others Press [Network]. NOTE: To set the optional network interface, press [Option]. 5 Press [S] or [T] to select TCP/IP and press [Change #].
Printer Settings 15 Press [S] or [T] to select Subnet Mask and press [Change #]. 16 Set the address in the same manner as Steps 12 - 14 to set the IP address. 17 Press [S] or [T] to select Gateway and press [Change #]. 18 Set the address in the same manner as Steps 12 - 14 to set the IP address. 19 Press [Close]. The display returns to the Interface Configuration screen. 20 Press [Close]. The display is returned to the Printer menu screen.
Printer Settings Network Status Page The network status page can be printed when printing the status page. Use the network status page to verify the network interface firmware version, network address and network protocol information. The default setting is [Off] (Do not print). 1 Refer to steps 1 - 4 of TCP/IP Settings on page 3-6 to display the Interface screen. 2 Press [S] or [T] to select Network Status Page and press [Change #].
Printer Settings Emulation NOTE: Emulation can be separately specified for each interface. Emulation Mode Selection [PCL6], [KPDL], [KPDL (Auto)] and [KC-GL] emulation modes are available. 1 Press the Printer key. 2 Press [Printer Menu]. 3 Press [Emulation]. Select item. Printer menu 4 Press the interface to be configured. 5 Select the desired emulation.
Printer Settings Print KPDL errors When printing in KPDL emulation mode, prints details of any errors that occur. The default setting is [Off] (Do not print). 1 Refer to steps 1 to 4 of Emulation Mode Selection on page 3-10 on page to display the Emulation screen. 2 Press [KPDL] or [KPDL (Auto)]. 3 Press [Print KPDL errors]. Close Alt. Emulation On Print KPDL errors Network USB 4 Press [On] or [Off]. 5 Press [Close]. The display is returned to the Emulation screen.
Printer Settings 6 Press desired pen color. 7 Press [Close]. The display is returned to the Pen Adjust screen. 8 Press [Close]. The display is returned to the Emulation Setting screen. 9 Press [Page Set]. Close Page Set On Pen Adjust Network 10 USB Press the button corresponding to the desired size. NOTE: [SPSZ] is the size specified by the prescribed SPSZ command. For further details on prescribed command, refer to the PRESCRIBE Commands Command Reference. 11 3-12 Press [Close].
Printer Settings Font Setting Select the default font for the currently selected interface. In addition to device internal fonts, fonts downloaded to the device memory, or fonts stored on a memory card or hard disk can be specified as the default font. You can also specify the font width, size and pitch. Follow the steps as follows to set fonts.
Printer Settings 6 Press [S] or [T] to select the Font ID. For internal font numbers, refer to Print List of Fonts on page 3-16. The alphabet characters preceding the font number are shown as below according to the font type. 7 Display Description I Internal Font SO Soft font (downloaded) MO Font stored on memory card HO Font stored or RAM disk or hard disk Press [Close]. The display returns to the Select the font screen. Font Size Setting Set the default font size.
Printer Settings Courier/Letter Gothic Font Thickness Setting Select the Courier/Letter Gothic font Thickness. 1 Refer to steps 1 - 5 of Font Selection on page 3-13 to display the Select the font screen. 2 Press [Internal] or [Dark] in the Courier area. Back Courier Font ID Close Letter Gothic I000. Internal Internal Dark Dark Detail USB Network - Font 3 Press [Internal] or [Dark] in the Letter Gothic area. 4 Press [Close]. The display returns to the Font screen.
Printer Settings 7 Press [Close]. The display returns to the Font screen. Print List of Fonts Print a list of fonts for use as a quick guide during font selection. A list of optional fonts may be printed in the same manner. 1 Press the Printer key. 2 Press [Printer Menu]. 3 Press [Font]. Select item. Printer menu 4 Print Status Page Font Paper Handling Interface Page Set Color Mode Emulation Print Quality RAM DISK Mode Press [Internal].
Printer Settings Page Set Configuration The following items can be configured for Page Set. • Copy Quantity • Print Orientation Setting • Setting Page Protect Mode • LF (Line Feed) Action • CR (Carriage Return) Action Copy Quantity Set number of pages to print from 1 - 999. 1 Press the Printer key. 2 Press [Printer Menu]. 3 Press [Page Set]. Select item. Printer menu 4 Press [S] or [T] to select Copies and press [Change #].
Printer Settings Print Orientation Setting Set printing direction to [Portrait] or [Landscape]. Orientation can be separately configured for each interface. Portrait Landscape Printer 1 Press the Printer key. 2 Press [Printer Menu]. 3 Press [Page Set]. Printer Select item. Printer menu 4 Press [S] or [T] to select Orientation and press [Change #].
Printer Settings 3 Press [Page Set]. Select item. Printer menu 4 Press [S] or [T] to select Page Protect and press [Change #]. Print Status Page Font Paper Handling Interface Page Set Color Mode Emulation Print Quality RAM DISK Mode Others Page Set Setting Item Copies Orientation Page Protect LF Action CR Action Value 001. Auto Change # Printer menu 5 Press [Auto]. 6 Press [Close]. The display returns to the Page Set screen. 7 Press [Close].
Printer Settings 5 Press the interface to be configured. 6 Press the desired LF action key. 7 Press [Close]. The display returns to the Page Set screen. 8 Press [Close]. The display is returned to the Printer menu screen. CR (Carriage Return) Action Set the action to be performed by the device when a carriage return code (text code 0DH) is received.
Printer Settings Print Quality Set the tone mode at the print quality setting. Tone Mode Setting Select from normal mode and fine mode. Item Description Normal Appropriate for text and relatively simple graphical objects. Fine Enables photographs or gradated illustrations to be finely reproduced with smooth scaling. NOTE: The data size is increased when fine mode is enabled. Compared to normal mode, printing may take longer to complete and there is a higher possibility of memory overruns.
Printer Settings Setting Color Mode Set whether to print status reports in color or in black and white. 1 Press the Printer key. 2 Press [Printer Menu]. 3 Press [Color Mode] ([Colour Mode]). Select item. Printer menu 3-22 Print Status Page Font Paper Handling Interface Page Set Color Mode Emulation Print Quality RAM DISK Mode 4 Press [Color] ([Colour]) or [Black&White] ([Black White]). 5 Press [Close]. The display is returned to the Printer menu screen.
Printer Settings Paper Handling Set the following items for setting paper handling. • MP Tray mode specification • Feed Select • Duplex Print Mode Setting • Paper Output Select • Shared A4/Letter Size Feed Select MP Tray mode specification Set the paper handling method for the MP Tray. Item Description First If there is paper in the MP tray, paper is fed from the MP tray for printer output even if another paper source has been selected.
Printer Settings 2 Press [Printer Menu]. 3 Press [Paper Handling]. Select item. Printer menu 4 Press [S] or [T] to select Feed Select and press [Change #]. Print Status Page Font Paper Handling Interface Page Set Color Mode Emulation Print Quality RAM DISK Mode Others Paper Handling Setting Item Multipurpose tray mode Feed Select Duplex Mode Paper Output Override A4/LT Value (Not Cassette specified) 1st paper Off Tray A Off Change # Printer menu 5 Press the desired Feed Select key.
Printer Settings 4 Press [S] or [T] to select Duplex Mode and press [Change #]. Paper Handling Setting Item Multipurpose tray mode Feed Select Duplex Mode Paper Output Override A4/LT Value (Not Cassette specified) 1st paper Off Tray A Off Change # Printer menu 5 Press [Off], [Short edge bind] or [Long edge bind]. 6 Press [Close]. The display returns to the Paper Handling screen. 7 Press [Close]. The display is returned to the Printer menu screen.
Printer Settings 7 Press [Close]. The display is returned to the Printer menu screen. Shared A4/Letter Size Feed Select Sets whether to detect A4 and Letter size paper. Item Description On Handle A4 and Letter size in the same manner and print on either available paper size. Off Do not handle A4 and Letter size paper as the same. 1 Press the Printer key. 2 Press [Printer Menu]. 3 Press [Paper Handling]. Select item.
Printer Settings Handling Memory Devices You can use three types of memory devices with this device: memory card, optional hard disk, or RAM disk. Use memory card and hard disk by installing into the printer's provided slots. Use RAM disk by assigning a portion of the printers memory to RAM disk mode. The basic usage of each type of memory is the same. Here, memory device usage is explained using a memory card. Memory Card Operation This device has a memory card slot.
Printer Settings 2 Press [Printer Menu]. 3 Press [Memory Card]. Select item. Printer menu Print Status Page 4 Press [Format]. Font Paper Handling Interface Page Set Color Mode Emulation Print Quality RAM DISK Mode Others Memory Card Memory Card The message All data in the memory card will be deleted. Are you sure? is displayed. Delete Read Write Data On Language List of Partitions Data Program Data Format Font Macro Font Printer menu 5 Press [Yes].
Printer Settings 6 Press [GO]. Reading Data Read data, program data, fonts, or macro data saved to a memory card. 1 Press the Printer key. 2 Press [Printer Menu]. 3 Press [Memory Card]. Select item. Printer menu Print Status Page 4 In the Read area, press [Data], [Program], [Font] or [Macro].
Printer Settings 4 In the Delete area, press [Data], [Program], [Font], [Macro] or [Language]. Close Delete Read Write Data 5 Language List of Partitions Data Program Data Program Off Format Font Macro Font Macro Press [S] or [T] to select the item to delete and press [Delete]. Processing message is displayed and data is deleted from the memory card. Cancel Up Data Delete Down - Memory Card 6 The screen returns to printer mode when done deleting.
Printer Settings 5 Press [Printing]. Processing data is displayed and the partition list is printed. PARTITION LIST Device Information Partition Information 6 When printing is complete, the screen returns to printer mode. RAM Disk Operation This device includes a RAM disk function. A RAM disk is a virtual disk device that uses a portion of physical memory.
Printer Settings 3 Press [RAM DISK Mode]. Select item. Printer menu 4 Press [On]. 5 Press [Close]. Print Status Page Font Paper Handling Interface Page Set Color Mode Emulation Print Quality RAM DISK Mode Others Restart now? message is displayed. 6 Press [Yes]. This device restarts. RAM Disk mode is set to [On] (enabled). RAM Disk Size Setting Specify the amount of memory from this device total memory to allocate to the RAM disk.
Printer Settings 7 Press [Yes]. The RAM Disk size will be changed after restart is complete. Hard Disk Operation All e-MPS functions are available after installing the optional hard disk. For more on e-MPS functions, refer to e-MPS Functions on page 3-34. The following hard disk operations also become available.
Printer Settings e-MPS Functions e-MPS (enhanced-Multiple Printing System) enables advanced printing functions such as saving print data to this device’s hard disk and for later printing when needed, virtual mailbox and electronic sorting functions. Configure e-MPS functions from the printer driver. The following operations can be used with e-MPS. • Quick Copy...3-34 • Proof and Hold...3-35 • Private Print /Job Storage...3-35 • Printing Data Stored in a Virtual Mailbox (VMB)...
Printer Settings 4 Press [S] or [T] to select the user and press [Next]. Cancel name. User Up Down 5 Next Press [S] or [T] to select the job and press [Next]. Cancel Job Up Delete Down Next NOTE: Select the job and press [Delete] to delete the selected job. 6 Press [+], [–] or numeric keys to set the desired number of copies and press [Printing]. Processing message is displayed and printing begins. 7 When printing is complete, the screen returns to printer mode.
Printer Settings 4 Press [S] or [T] to select the user and press [Next]. Cancel name. User Up Down 5 Next Press [S] or [T] to select the job and press [Next]. Cancel Job Up Delete Down Next NOTE: Select the job and press [Delete] to delete the selected job. 6 Press [+] , [–] or numeric keys to set number of copies. 7 Press [Printing]. If access code has been enabled, Enter ID-code is displayed.
Printer Settings Printing Data Stored in a Virtual Mailbox (VMB) The virtual mailbox function is used to save jobs into a virtual mail box. When using the virtual mailbox to print a document, the job is saved and printing does not begin until it is started from the operation panel. To configure the print driver, refer to the Kyocera Extended Driver User Guide. 1 Press the Printer key. 2 Press [e-MPS]. 3 Press [Print VMB Data Tray]. Select item.
Printer Settings Processing message is displayed and printing of list begins. VIRTUAL MAIL BOX LIST 5 When printing is complete, the screen returns to printer mode. Printing the Code Job List Print a list of (permanent) saved code jobs stored in the hard disk. 1 Press the Printer key. 2 Press [e-MPS]. 3 Press [List of Code JOB]. Select item. e-MPS Quick Copy List of VMB Private/ Stored List of Code JOB Print VMB Data Tray 4 Press [Printing].
Printer Settings e-MPS Detailed Settings The following settings can be modified, such as the maximum number of items that can be stored in the hard disk. • Maximum Quick Copy Jobs • Temporary Code JOB Size • Permanent Code JOB Size • Virtual Mailbox (VMB) Size Maximum Quick Copy Jobs 1 Press the Printer key. 2 Press [e-MPS]. 3 Press [Configuration]. Select item.
Printer Settings 3 Press [Configuration]. Select item. e-MPS Quick Copy List of VMB Private/ Stored List of Code JOB Configuration Print VMB Data Tray 4 Press the [S] or [T] to select Temporary Code JOB Size and press [Change #]. Configuration Setting Item Quick Copy Temporary Code JOB Size Permanent Code JOB Size VMB Size Auto Cassette Value 32. Auto Change # e-MPS 5 Press [+] or [–] to set the maximum size. 6 Press [Close]. The display returns to the Configuration screen.
Printer Settings Other Settings The following items can be set for other settings.
Printer Settings Setting Resource Protect Mode When this devicer's emulation switches from PCL 6 to another emulation type, all downloaded files and macros are lost. Set the Resource Protect Mode to Protect or Permanent to protect the PCL environment and preserve those resources for use when again returning to PCL 6 emulation. Item Description Auto Saves permanent PCL resources such as fonts, macros, and symbol sets in this device's memory when switching emulation types.
Printer Settings 3 Press [Others]. item. Close 4 Press [S] or [T] to select Auto Continue and press [Change #]. Font Paper Handling Page Set Color Mode Print Quality RAM DISK Mode Others Others Setting Item Value Form Feed Time Out Resource Protect Auto Continue Finishing Error 30. Sec. Permanent Off Change # Service Printer menu 5 Press [On] or [Off]. 6 If [On] is pressed, press [+] or [–] to set the Auto Continue delay time.
Printer Settings 4 Press [S] or [T] to select Finishing Error and press [Change #]. Others Setting Item Value Form Feed Time Out Resource Protect Auto Continue Finishing Error 30. Sec. Permanent Off Change # Service Printer menu 5 Press [S] or [T] to select Staple Mode and press [Change #]. Finishing Error Setting Item Proces. Duplex print Staple Mode Value On On LF Action Change # Printer menu - Others 6 Press [On] or [Off]. 7 Press [Close].
Printer Settings 4 Press [S] or [T] to select Finishing Error and press [Change #]. Others Setting Item Value Form Feed Time Out Resource Protect Auto Continue Finishing Error 30. Sec. Permanent Off Change # Service Printer menu 5 Press [S] or [T] to select Proces. Duplex Print and press [Change #]. Finishing Error Setting Item Value Proces. Duplex print Staple Mode On On LF Action Change # Printer menu - Others 6 Press [On] or [Off]. 7 Press [Close].
Printer Settings 5 Press [Print Status Page]. Service Print Status Page A4 Standard Paper Feed Operation sizes Printer menu 6 - Others Press [Printing]. Processing message is displayed and printing of the service status page begins. 7 When printing is complete, the screen returns to printer mode. Printer Reset (Reboot) Reset the printer function only without switching off ({ position) the main power switch. 1 Press the Printer key. 2 Press [Printer Menu]. 3 Press [Others]. item.
Printer Settings 3 Press [Others]. item. Close 4 Font Paper Handling Page Set Color Mode Print Quality RAM DISK Mode Others Press [Print HEX-DUMP]. Close Printing mode with dump Rx data. Are you sure? is displayed. Item ime Out tect e or Value 30. Sec. Permanent Off Printer Reset Change # 5 Service Print HEX-DUMP Press [Yes]. Processing is displayed, followed by Page remaining. 6 Send data to this device while it is in this state. The dump page is printed.
Printer Settings 3-48
4 Scanner Settings This chapter explains the scanner functions and settings that can be configured from the machine touch panel. For basic scanner operation, refer to the Operation Guide. • Setting Scanner Functions...4-2 • Scanner Default Settings...4-12 • Programmed Scanning...4-20 • Confirming Sending History...
Scanner Settings Setting Scanner Functions This section explains how to configure the scanner functions from the machine. NOTE: Refer to each scanner function operation procedure as explained in Operation Guide for information how to display the scanner function settings screen. The available settings may vary depending on the sending method. The following settings are available from the scanner function screen’s [Basic] tab. Ready to scan. Place the original and select destination.
Scanner Settings Selecting Original Size Select the original size (scanning area).
Scanner Settings Selecting Original Orientation Specify the top edge of the placed original. Item Description Top Edge (Back Edge) Sets the top edge as the original's upper edge. Left Top Edge (Left top corner) Sets the left edge as the original's upper edge.
Scanner Settings File Name Input Specify a filename to assign to a scanned image. Item Description Auto Automatically assign a filename. Manual The file name can be changed. Press [Change Name] and input the filename. NOTE: This selection is not available for TWAIN and Database Connection. Enter the filename using less than 20 characters. To change the filename specified under default settings mode, refer to File Name on page 4-16.
Scanner Settings Setting Image Quality The following settings are available from the scanner function screen’s [Quality] tab. Ready to scan. Place the original and select destination. ( Full-Color ) Register Prgrm Scan to PC-Sending Density 4 Destination Scanning Density Original 11×8½" Cont. TX to Save at User PC Address Book • Exposure Level...4-6 • Background Exposure Adjust...4-6 • Original Image Quality...4-7 • Sharpness Adjust...4-7 • B&W Setting...4-7 Background exp. adj.
Scanner Settings Original Image Quality Choose the image quality suited to the type of original. Item Description Text+Photo When scanning originals with mixed text and photos. Photo To reproduce depth of photo originals. Text To clearly reproduce penciled or fine lines. OCR For use with OCR applications (software to convert optical characters to text data). NOTE: For Send E-mail, [Photo] is not available. Sharpness Adjust Adjust the sharpness of image outlines.
Scanner Settings Border Erase Removes black borders from around the edges of originals. Function Value Description Sheet Erase (Border Erase) Inch models Border: 0 - 2" (1/8" increments) Use this mode to erase black borders around single sheet originals.
Scanner Settings One Page Per File Creates and sends a separate file for each page of a scanned original. Item Description On Enables One Page Per File. Off Disables One Page Per File. NOTE: When file type is set to [JPEG] One Page Per File is automatically set to [On]. Auto Center When scanning with zoom, by specifying the Original size and the Send size, blank borders around the bottom or left and right will be shown, depending on the sizes.
Scanner Settings Item Value Supplementary Explanation Copy image and other cont Allow, Refuse Changes Allowed [Change pg layout] is displayed when encryption Comment, Any except level is set to [Low Level 40bit]. extract pg, Change pg layout, Insert/del/rotate pg, [Insert/del/rotate pg] is displayed when encryption Refuse level is set to [High Level 128bit]. Printing Allowed Allow, Allow (Low Res.), Refuse [Allow (Low Res.)] is displayed when encryption level is set to [High Level 128bit].
Scanner Settings 6 Press [Change #] for Password confirm. 7 Enter the password again for verification and press [End]. 8 Press [Close]. Display is returned to PDF Encryption. 9 Press [S] or [T] to select Encryption Level and press [Change #]. Ready to scan. Place the original and select destination. ( Full-Color ) PDF Encryption 10 08/0 Back Default menu Document Open Password Doc.
Scanner Settings Scanner Default Settings Change the default settings for the scanner function. Default Settings This section explains how to change default settings which are applied when the machine is powered up or the Reset key is pressed. Automatically configured details set in default setting mode are called default settings. You can change the default settings as desired to meet your usage patterns.
Scanner Settings Original Density Set the image quality for default settings mode. The setting items are as follows. Item Description Text+Photo When scanning originals with mixed text and photos. Photo To reproduce depth of photo originals. Text To clearly reproduce penciled or fine lines. OCR For use with OCR applications (software to convert optical characters to text data). For further details on original image quality, see page 4-7.
Scanner Settings 3 Press [Lighter] or [Darker] to adjust the density. 4 Press [Close]. The display returns to the Setting default function screen. File Type Configure the file type for default settings mode. The setting items are as follows. Item Description Full-Color B&W&Gray PDF (Full-Colour B&W&Grey) TIFF Configures PDF. Black&White Configures TIFF. JPEG Color&Gray (JPEG Col. Gray) Configures JPEG Color/Grayscale. HiComp. PDF Color Configures High compression color PDF.
Scanner Settings High Compression PDF Quality Configure the image quality for [HiComp. PDF Color] file type for default settings mode. The setting items are as follows. Item 1 Description Comp. Priority Sets standard image quality. 2 3 Set high compression to take precedence over image quality. Quality Priority Set image quality to take precedence over high compression. For further details about file type, see page 4-5.
Scanner Settings Batch Scanning Configure batch scanning for default settings mode. The setting items are as follows. Item Description On Enables batch scanning. Off Disables batch scanning. For further details on batch scanning, refer to page 4-8. 1 Referring to Accessing the Setting default function Screen on page 4-12, access the Setting default function screen. 2 Press [S] or [T] to select Batch Scanning and press [Change #]. 3 Select [On] or [Off]. 4 Press [Close].
Scanner Settings Auto Center Configure Auto Center for default settings mode. The setting items are as follows. Item Description On Enables Auto Center. Off Disables Auto Center. For further details about Auto Center, see page 4-9. 1 Referring to Accessing the Setting default function Screen on page 4-12, access the Setting default function screen. 2 Press [S] or [T] to select Auto Center (Image shift) and press [Change #]. 3 Select [On] or [Off]. 4 Press [Close].
Scanner Settings File Name Input File Name Input on page 4-5 configure the machine to display the filename input box without displaying the auto/manual selection screen. Doing so allows this operation to be skipped each time when entering filenames. Item Description Manual Displays the filename input box without displaying the auto/manual selection screen. Auto/Manual Displays the auto/manual selection screen.
Scanner Settings 4 Press [Close]. The display returns to the Setting default function screen. Color Mode Setting Set the color mode for default settings mode. The setting items are as follows. Item Description Auto color key (Auto col. key) Sets to auto color mode. Full-Color key (Full col. key) Sets to full color mode. B&W key Sets to Black and White mode. 1 Referring to Accessing the Setting default function Screen on page 4-12, access the Setting default function screen.
Scanner Settings Programmed Scanning Up to 5 different combinations of destination, sending mode and functions can be registered for programmed scanning. After registering sets of frequently used destinations and modes as a single program, simply press the program number to recall those settings. You can also name the programs to identify them. NOTE: When registering programmed scanning, up to 20 destinations can be specified for simultaneous transmission.
Scanner Settings Using Programs to Scan Follow the steps below to use programs for scanning. 1 Press the Scanner key. 2 Press the button for the desired program number (1 - 5). If a password was entered when the user was registered, the password input screen is displayed. Input the password and press [Enter]. Select scanner function. 08/08/ Recall Program List A. List B. Send E-mail Scan to PC Database Connection Scan to FTP TWAIN List C. List D. 3 List E.
Scanner Settings Deleting programs Follow the steps below to delete saved programs. 1 Press [Register Prgrm]. 2 Press [Delete]. Select item. Registering Programs Menu Register Delete Change Name 3 Press the number (1 to 5) of the program to delete. Delete registration Select the number of program to delete. List A. List B. List C. List D. List E. 4 4-22 Press [Yes]. The program is deleted.
Scanner Settings Confirming Sending History Confirm the sending history from the operation panel. 1 Press the Scanner key. 2 Press [History of Sending] ([Report of sent data]). scanner function. 08/08/’05 14:00 Recall Program Edit Addr. Book Scan to PC Change User Info. TWAIN Scan to FTP 3 The transmission history is displayed. Press [S] or [T] to scroll the screen to show the next page. History of Sending Sending history No.
Scanner Settings 4-24
5 Setting Scanner from a Web Browser This chapter explains the scanner settings that can be configured from a web browser. The main configurable settings are as follows. • Web Page Feature...5-2 • System Setting...5-6 • Scan to PC Setting...5-16 • Send E-mail Setting...5-20 • Scan to FTP Setting...
Setting Scanner from a Web Browser Web Page Feature Use the web page feature to manage the scanner functions from a web browser. Modifications to network settings, scanner default settings, Scan to PC, Send E-mail, and Scan to FTP can be easily made over the network. Confirm the following before using the web page feature. • This feature requires a web browser software to be installed. Netscape Navigator 4.0 or newer, or Internet Explorer 4.0 or newer is recommended.
Setting Scanner from a Web Browser Page not found. error is displayed • The machine has not finished booting or rebooting. Please try again later. Access forbidden XXX error is displayed • The machine is in use. Try again after verifying that the scanner operation is complete and the display has returned to the startup screen. Using the Web Page Feature 1 Launch the Web browser software. 2 Enter the scanner IP address or hostname into the address bar and press the Enter key on the keyboard.
Setting Scanner from a Web Browser Screen Layout The top page consists of 3 frames. 1 Top Frame 2 Menu Frame 3 Main Frame 1 Top Frame: Displays the scanner IP address and scanner status. (See page 5-4) 2 Menu Frame: Select the desired configuration items for the scanner. (See page 5-5) 3 Main Frame: Displays the scanner system information. (See page 5-5) Top Frame Scanner information is displayed in the top frame. Display Description Host Name Displays the hostname registered to the scanner.
Setting Scanner from a Web Browser Menu Frame From the menu frame, select the desired configuration items for the scanner. NOTE: Each item in the menu frame can be configured in succession. However, if the same item is selected during configuration, settings made until then are lost. Display Description Home Select Home to return the browser to the top page for accessing the scanner. System Setting System Setting is used to configure scanner related settings, and contains the following items.
Setting Scanner from a Web Browser System Setting Configure the scanner settings under System Setting. Each item may only be configured when the scanner is in Ready to Scan status, or the machine is in Low Power Mode or in Sleep Mode. Setting Method The administrator password is required to configure the scanner network interface and scanner related settings. NOTE: Change the password under System Basic Setting using the Administrator item. No password is set by default.
Setting Scanner from a Web Browser Display Description Default Gateway Enter the scanner default gateway in ‘XXX.XXX.XXX.XXX’ notation. DHCP/BOOTP Set DHCP and BOOTP to either Enabled or Disabled. The default setting is Enabled. RARP Set RARP to either Enabled or Disabled. The default setting is Enabled. ARP/PING Set ARP/PING to either Enabled or Disabled. The default setting is Enabled. DNS Server (Pri.
Setting Scanner from a Web Browser Display Description Firmware update There is a great security risk if anyone could be allowed to update the firmware without administrator permission. Network instability may occur if someone other than the network were to intentionally or accidentally replace the firmware with an inappropriate firmware version. To address this concern, a security feature is provided to prevent unauthorized firmware upgrades.
Setting Scanner from a Web Browser 3 Select Mail Server Authentication. 4 Choose SMTP Authentication, POP before SMTP or POP before SMTP (APOP) for Authentication Type. 5 Enter the Login Account Name to use in mail server authentication. 6 To enter a new password or change a password, set Change Password to Yes. NOTE: To skip changing the password, set to No and proceed to Step 9. 7 Enter the new password in the New Password field. 8 Verify the new password.
Setting Scanner from a Web Browser 4 Check the box to the left of the protocol name to enable filtering for that protocol. 5 Up to 4 IP address ranges can be enabled for filtering. To filter a single IP address, only enter the Starting Address. 6 Click the Registration button. NOTE: The setting shown in the screen only allows access from the IP address range 10.10.10.1 - 50 and from IP address 10.10.10.125 to the scanner's home page (HTTP) and Address Editor.
Setting Scanner from a Web Browser Basic - Black and White Mode The setting items are as follows. Setting Item Value Description Orig. image quality Photo, Text, Text+Photo, OCR Select from the following four modes depending on the type of original being scanned. File Type TIFF, PDF Specify the file type when saving a scanned image. Basic - Color/Monochrome (Gray) Mode The setting items are as follows.
Setting Scanner from a Web Browser Extension The setting items are as follows. 5-12 Setting Item Value Description Centering On, Off When scanning with zoom, by specifying the Original size and the Send size, blank borders around the bottom or left and right will be shown depending on the sizes. When setting Auto Center, the image is moved to the center so that blank borders around the top and bottom or left and right become even.
Setting Scanner from a Web Browser Sender List Configure the Sender (User) List for use with network scanner functions (Send E-mail, Scan to PC, Database Connection, Scan to FTP). Sender (User) List Click Sender List to display the Sender (User) List. Up to 40 entries (No.001 - 020, No.021 - 040) senders (users) can be added, verified, or edited. NOTE: For each number (No.) that has a Registration Name input, the name is shown in the text box.
Setting Scanner from a Web Browser Sender (User) Setting Click the user number from the Sender (User) List to show the Sender (User) Setting screen. Setting Item Description Registration Number The number selected from the Sender List is shown here. This is shown for to verify which number from the Sender Setting table is being added or modified, and cannot be modified itself. Registration Name Field to enter the Registration Name.
Setting Scanner from a Web Browser Setting Item Description Registration Button Click the Registration button to save the settings to the scanner. Entered information is lost if you browse to another page before clicking this button. Reset Button Click the Reset button to reset any changes to the setting options. Delete Button Click the Delete button to delete the displayed Sender (User). Reset Click each Reset button to show a verification dialog box.
Setting Scanner from a Web Browser Scan to PC Setting When using the scanner, you can send scanned image data to a specified folder on a pre-registered computer. This section explains how to register a destination PC for use with this feature. NOTE: For further details on the Scanner File Utility, see Scanner File Utility on page 6-3. Sender List Sender List (PC) Click this item to show the Destination PC registration screen. Up to 100 Destination PCs (No.001 100) can be added, verified, or edited.
Setting Scanner from a Web Browser Add Destination (PC) Select whether to add as Single Regist or Group Regist. Click the Single Regist button or Group Regist button to show the registration/edit screen. Add Destination (PC) Single Registration Add or edit registration name/destination PC/save number. Setting Item Description Registration Number The number selected from the Destination List is shown here.
Setting Scanner from a Web Browser Setting Item Description Save Number To select multiple save destinations on a single computer, enter the save number. Up to 100 save destinations (folders) can be specified for a single computer. (Use save numbers between 1 - 100) Registration Button Click the Registration button to save the settings to the scanner. Entered data is lost if this button is not clicked. Reset Button Click the Reset button to reset any changes to the setting options.
Setting Scanner from a Web Browser Setting Item Description Registration Button Click the Registration button to save the settings to the scanner. Entered information is lost if you browse to another page before clicking this button. Cancel the selection Button Click the Cancel the selection button to cancel the selection for the destination. Reset Button Click the Reset button to reset any changes to the setting options. Delete Button Click the Delete button to delete the displayed destination.
Setting Scanner from a Web Browser Send E-mail Setting This section explains the settings for sending scanned images to computers via e-mail. E-mail Basic Setting Set the basic components here for sending e-mail. IMPORTANT: Press the Registration button after making changes. Setting Item Description Item Select destination domain from Non-restricted sending/Permitted destination domain names/Restricted destination domain names.
Setting Scanner from a Web Browser Setting Item Description Character Code Here, specify the character code set to describe e-mail. Select code set from among US-ASCII (English)/SHIFT-JIS (Japanese)/ ISO-8859-1 (West Europe)/Windows-1252 (West Europe)/ Windows-1250 (Central Europe). The default setting is US-ASCII (English). Set the code set matching the computer environment of the e-mail recipient. Registration Button Click the Registration button to save the settings to the scanner.
Setting Scanner from a Web Browser IMPORTANT: Always press the Registration button after making changes. Destination Registration (E-mail) Select whether to add as Single Regist or Group Regist. Click the Single Regist button or Group Regist button to show the registration/edit screen. Destination Registration (E-mail) Single Add or edit registration name/destination e-mail address for each individual number.
Setting Scanner from a Web Browser Setting Item Description Registration Button Click the Registration button to save the settings to the scanner. Entered data is lost if this button is not clicked. Reset Button Click the Reset button to reset any changes to the setting options. Delete Button Click the Delete button to delete the displayed destination.
Setting Scanner from a Web Browser Destination Registration (E-mail) Group Registration Add or edit the destination (E-mail) group. IMPORTANT: Destination Registration (E-mail) Group Registration cannot be performed until after Destination (E-mail) Single Registration has been performed. Select the destination to add to the group and click the checkbox next to the No. Enter the group registration name and password details and click the Registration button to add the destination group.
Setting Scanner from a Web Browser Scan to FTP Setting Scanned image data can be uploaded to a pre-registered FTP server. This section explains how to register an FTP server for use with this feature. Sender List Destination List (FTP) Click this item to show the FTP server registration screen. Up to 10 FTP servers (No.001 - 010) can be added, verified, or edited. NOTE: For each number that has a Registration Name specified, the name is shown in the text box.
Setting Scanner from a Web Browser Destination Registration (FTP) Add or edit an FTP server. 5-26 Setting Item Description Registration Number The number selected from the Destination List is shown here. This is shown for to verify which number from the Destination Registration (FTP) Table is being added or modified, and cannot be modified itself. Registration Name Field to enter the Registration Name.
6 Included Scanner Utilities This chapter introduces the scanner utilities. • Introducing the Scanner Utilities...6-2 • Scanner File Utility...6-3 • Address Editor...6-13 • Address Book for Scanner...6-32 • TWAIN Source...6-42 • DB Assistant...
Included Scanner Utilities Introducing the Scanner Utilities • Scanner File Utility (See page 6-3) Scanner File Utility is a utility that enables a computer to receive images from the scanner and save in specified folders. Scanner File Utility saves the received images as files. • Address Editor (See page 6-13) Address Editor is a tool used for the registration or modification of addresses in the scanner Address Book (Common Address Book).
Included Scanner Utilities Scanner File Utility About the Scanner File Utility Scanner File Utility is a utility that enables a computer to receive images from the scanner and save in specified folders. Scanner File Utility saves the images received from the scanner onto a computer. After installation, Scanner File Utility starts automatically when the computer is turned on. An icon is displayed on the task bar to indicate the running status and wait for incoming scanner data.
Included Scanner Utilities 2. Register save destination computer using Address Editor, Address Book for Scanner, or a web browser 3. Scan the original 4. Transmit scanned data 5. Receive image data into the save folder Operating Environment Hardware IBM PC/AT Compatible Interfaces 10BASE-T/100BASE-TX Operating System Windows NT 4.
Included Scanner Utilities NOTE: For Windows 2000, Windows XP or Windows Server 2003, a Setup Type selection dialog is shown. Select the following setup type and proceed to the next step. • Installing a service mode Select this mode to install Scanner File Utility as a service on a file server or a shared computer. (Scanner File Utility will remain running even if no users are logged in to the computer.
Included Scanner Utilities Start Dialog Box Scanner File Utility launches automatically after installation, but to shut down the program, or change settings such as registering the save destination for images received from the scanner, or to set folder passwords, open the start dialog box. Displaying the Start Dialog Box • When the program is running Double-click the taskbar icon. The Scanner File Utility start dialog box appears.
Included Scanner Utilities File Save Folder Settings About the Setup Dialog Box To set save folders or to change or set a password, click the Setup button on the start dialog box. The Setup dialog box appears, where you can confirm previously set folders. Item Description New Button Click to configure a new save folder. Edit Button Click to configure a change the settings of an existing save folder. Delete Button Click to configure delete the settings of a save folder. No.
Included Scanner Utilities Configuring a New Save Folder To specify a new save folder, click the New button on the Setup dialog box. The New Folder Setting dialog box is shown. 1 Input a number (from 1 - 100) for the No. column. NOTE: The number input here is assigned to the save folder and used as the save number. Use this number to specify the save folder from the scanner operation panel which was configured from the web browser (save number). 2 To enter a new folder for saving images, click the ...
Included Scanner Utilities 6 Set programs to connect to the system in the System Connection Program field. Always choose if the image to be scanned will be integrated as below. NOTE: Use of this feature requires configuration of DB Assistant (see page 6-49) or Network FAX. (For further Network FAX details, refer to the optional fax kit Operation Guide.) • None Scan data is saved as-is in the specified folder. • PDF Keyword Embedder PDF Keyword Assist option (Adds keywords to scanned images.
Included Scanner Utilities 5 To change a save folder comment, enter less than 32 characters into the Comment field. 6 To change the details of the System Connection Program field, do so referring to Configuring a New Save Folder on page 6-8, Step 6. 7 Click the OK button. The settings for the save folder are modified. Deleting References to Existing Save Folders Follow the procedure below to delete a reference to a previously specified save folder.
Included Scanner Utilities File Names When saving data files at the computer, the details configured in advance from the web browser are added to the filename (character string less than 16 characters + file extension). If not specified, the filename will be automatically determined based on predefined rules. The file naming convention for automatic naming is as follows. Filename: *******nnnn_mmm.extension Text String Description ******* Filename stored in each scanner.
Included Scanner Utilities If a hard disk error occurs If the hard disk runs out of available space during receiving image data from the scanner, reception of subsequent images will be aborted and image data received up to that point will be lost. IMPORTANT: Caution when the icon color changes to yellow! If the used space of the hard disk reaches the preconfigured warning percentage, the Windows taskbar icon will change to yellow to alert this condition to the user.
Included Scanner Utilities Address Editor About the Address Editor Use the Address Editor to register or modify addresses in the scanner Address Book (Common Address Book). This tool is used by the administrator to perform address book maintenance. If there are multiple Address Editor-compatible scanners present, they can be easily managed by specifying all of the scanners in the same destination list.
Included Scanner Utilities 2 The Address Editor main menu is displayed. 1 2 3 4 No. Item Description 1 Menu Bar Use toolbar or menu area buttons selecting from the menu bar. 2 Toolbar A row of buttons is provided for easy access to write edited data to the scanner or other operations. 3 Menu Area Select desired items to configure such as scanner or e-mail settings. 4 Work Area Display each setting window here for configuration.
Included Scanner Utilities Scanner Address Setting Item Description Scanner Address Enter the address (hostname or IP address) of the scanner to connect. The dropdown list shows the most recently used 10 scanner addresses. Enter the hostname using less than 32 characters. Search Button Search for connected scanners. Use this button when configuring scanners whose IP address is set by a DHCP server or if you do not know the scanner’s IP address.
Included Scanner Utilities Item Description Start Searching Button Begins searching for scanners. Scanner Address Click the search result list to show the scanner address. You can skip searching and select a scanner address that was discovered previously from the drop down menu. You can directly enter the scanner address. Start Editing Button Connect to the selected scanner and begin editing the specified scanner data. Hostname will not be shown for a scanner that was in use when search was performed.
Included Scanner Utilities System Setting Configure the scanner’s basic settings. System Basic Setting Set the scanner’s network settings such as the IP address. Network 1 Tab Item Description Network 1/Network Switch between Network 1, Network 2, and IP-Filters settings. 2/IP-Filters Tab Host Name Input a scanner host name no longer than 32 characters. IP Address Enter the scanner interface IP address in ‘XXX.XXX.XXX.XXX’ notation.
Included Scanner Utilities Network 2 Tab Item Description SMTP Server Name Enter into this field the SMTP server hostname in less than 32 characters or IP address in ‘XXX.XXX.XXX.XXX’ notation. SMTP Port No. Enter the SMTP port number in this field. The default port is 25. DB Assistant Enter the IP address or hostname (under 32 characters) of the computer with DB Assistant installed. Firmware update To allow firmware upgrades, set to ON; to deny, set to OFF.
Included Scanner Utilities SMTP TX Authentication (Administrator) Set the administrator mail server authentication. 1 Choose SMTP Authentication, POP before SMTP, POP before SMTP (APOP) or No Authentication. 2 Enter the Login Account Name to use in mail server authentication. 3 Enter the password into the Password field. NOTE: Enter a password less than 31 characters long. 4 Enter the POP3 server IP address or server name to use for Mail Server Authentication under POP3 Server Name.
Included Scanner Utilities IP-Filter Tab Selection NOTE: For further details on IP-Filter and configuration, refer to IP-Filters on page 5-9. Item Description Item Check the item for which you would like to perform filtering. Use the same IP Address for all items For all Items with a check, enables the same IP address set in Set Allowed IP Address Range (IP Address). Set Allowed IP Address Range (IP Address) Up to 4 IP address ranges can be enabled for filtering.
Included Scanner Utilities Basic - Color/Monochrome (Gray) mode The setting items are as follows. Setting Item Value Description File Type JPEG, TIFF, PDF, PDF (High Complex) Specify the file type when saving a scanned image. JPEG quality 1 (Low), 2, 3 (Standard), 4, 5 (High) Set the JPEG quality. High Compression 1 (Low size), 2 (normal), 3 (High PDF quality quality) Sets high compression PDF quality. Output Color Type RGB, sRGB Configure the color output type.
Included Scanner Utilities Setting Item Value Skip sender (user) On, Off select Description When using this scanner, a sender (user) must be first selected. Set to ON to force the sender (user) to User No. 001 and skip sender (user) selection. Color setting Full Color, Auto Color, Black/White Set the color mode for default settings mode. B&W setting Black&White, Grayscale When scanning in B&W, select between B&W and grayscale.
Included Scanner Utilities Sender Address Registration (Editing) Register a new sender address or edit a sender address. Item Description Name Field to enter the Registration Name. Enter a registration name less than 16 characters long. Registration Number Enter the sender data registration number. Specify a registration number from 001 - 040. E-mail Address Enter the sender e-mail address. Signature Enter signature data to be attached during e-mail transmission.
Included Scanner Utilities E-mail Send Setting Set basic settings and register/edit destinations for sending scanned images to computers by e-mail. Mail Basic Setting Set the basic items here for sending e-mail. 6-24 Item Description E-mail Transmission Restriction Select destination domain from Non-restricted sending/Permitted destination domain names/Restricted destination domain names. Select Non-restricted sending to allow e-mail to be sent to any domain and ignore domain registration settings.
Included Scanner Utilities E-mail Destination List Display or edit the E-mail Destination List for Send E-mail. Item Description Name As the E-mail destination, displays the name displayed at the top of the scanner operation panel. S When the address associated with the Sender (User) List has been registered, a * is shown in this field. When editing, the Sender (User) List is also modified. Registration Number Displays the destination data registration numbers.
Included Scanner Utilities Destination Editing (E-mail) Display or edit destination e-mail address. Item Description Name Field to enter the Registration Name. Enter a registration name less than 16 characters long. Registration Number Enter the destination data registration number. E-mail Address Enter the destination e-mail address. Destination Address Registration/Editing Display or edit destination e-mail group address. 6-26 Item Description Name Field to enter the Registration Name.
Included Scanner Utilities Scan to PC Setting Set basic settings and register/edit destinations for sending scanned images to computers. Sender List Display or edit the Destination List for Scan to PC. Item Description Name As the Scan to PC destination, displays the name at the top of the scanner operation panel. S When the address associated with the Sender (User) List has been registered, a * is shown in this field. When editing, the Sender (User) List is also modified.
Included Scanner Utilities Destination Editing (Scan to PC) Display or edit destination PC addresses. Item Description Name Field to enter the Registration Name. Enter a registration name less than 16 characters long. Registration Number Enter the destination PC registration number. PC address Enter the hostname or IP address of the destination PC. Save number Enter the save destination folder number. Destination Address Registration/Editing Display or edit destination PC group addresses.
Included Scanner Utilities Toolbar A row of buttons is provided for easy access to write edited data to the scanner or other operations. 1 2 3 4 5 No. Item Description 1 Open Button Specify and open an Address Editor file. 2 Save Button Save modified data to a file. 3 Data Send Button Writes setting data for the edited page to the scanner. 4 Batch Send Button Writes all modified page setting data to the scanner. 5 Help Button Displays help.
Included Scanner Utilities Field Settings If a CSV file has been selected, match the text fields with the Destination List items. Item Description Name The name displayed at the top of the scanner operation panel as the e-mail destination. E-mail Address The e-mail address for the destination list. Fields of the CSV file The item names described in the CSV file are displayed. Select the fields to match with the Destination List.
Included Scanner Utilities Item Description Warning column Displays a warning mark for entries containing import errors. The warning marks are as follows. ? The name exceeds the maximum number of characters. This display is cleared by editing to reduce the number of characters. ! The name includes double byte (such as Japanese) characters. This display is cleared by editing to single byte alphanumeric characters.
Included Scanner Utilities Address Book for Scanner About Address Book for Scanner Address Book for Scanner is a utility to register or delete destination lists for use from the scanner to send scanned images via e-mail or to PCs. After installation, Address Book for Scanner starts automatically when the computer is turned on. An icon is added to the taskbar to indicate running operation. Operating Environment Hardware IBM PC/AT Compatible Interfaces 10BASE-T/100BASE-TX Operating System Windows NT 4.
Included Scanner Utilities Start Dialog Box Address Book for Scanner is launched automatically after installation. Use the start dialog box to close this program or register or edit a Destination List. Displaying the Start Dialog Box • When the program is running Double-click the taskbar icon. The Address Book for Scanner start dialog box is displayed.
Included Scanner Utilities Destination List Setting About Address Book Dialog Box To register or edit destination address for sending scanned images by e-mail or to other computers, press the Setup button on the start dialog box. The Address Book dialog box is shown. You can verify already registered destination addresses. By default, the destination list for Send E-mail is shown. 1 2 6-34 3 4 5 6 7 No. Item Description 1 Save Button Click to save changes to a destination list.
Included Scanner Utilities E-mail Destination List In the Address Book dialog box, click the E-mail Address button. The destination list for e-mail sending is shown. Item Description Destination List field Shows a list of e-mail destinations saved to the destination list. Name Displays the destination (group) name. The same name is displayed on the scanner’s operation panel. ID Displays the destination (group) register number.
Included Scanner Utilities Registering and Editing E-mail Destination Group For adding an e-mail destination group to a destination list or editing details of an already registered e-mail destination group, use the Destination Group Registration (E-mail) dialog box. 1 In the Address Book dialog box, click the New Group button. The Destination Group Registration (E-mail) dialog box is shown.
Included Scanner Utilities PC Destination List In the Address Book dialog box, click the PC Address button. The destination list for Scan to PC is shown. Item Description Destination List field Shows a list of destination PCs saved to the destination list. Name Displays the destination (group) name. The same name is displayed on the scanner’s operation panel. ID Displays the destination (group) register number.
Included Scanner Utilities 8 In the Address Book dialog box, click the Save button. The changes to the destination list are saved. Registering and Editing Destination PC Groups For registering a destination PC group to a destination list or editing details of an already registered destination PC group, use the Destination Group Registration (PC) dialog box. Registration Procedure 1 In the Address Book dialog box, click the New Group button to show the Destination Group Registration (PC) dialog box.
Included Scanner Utilities 2 Enter a new password under 8 digits (numeric characters). 3 For verification, enter the new password again. 4 Click the OK button. The display returns to the Destination Group Registration (PC) dialog box. Adding Destination PC to a Destination PC Group Add destinations to a destination PC group from the Edit member (PC) dialog box. 1 In the Destination Group Registration (PC) dialog box, click the Add button. The Editing member (PC) dialog box is shown.
Included Scanner Utilities Importing CSV files Open data created with other mail applications and saved as CSV files to use the address data with Address Book for Scanner. 1 From the Address Book dialog box menu, select FileJImportJCSV file. The Open dialog box is shown. 2 Select the folder containing the address data file in CSV format. 3 Select the file type. Only .csv files can be chosen. 4 Enter the filename in the File name field. You can also select a file from the list of CSV files.
Included Scanner Utilities 11 To edit the registration details of the selected e-mail address, click the Edit button. The Destination Registration (E-mail) dialog box is shown. (See page 6-35) 12 Click the OK button. The selected e-mail address is added to the Address Book for Scanner E-mail Destination List. IMPORTANT: About the Warning column A warning icon is displayed for e-mail addresses that cannot be registered to Address Book for Scanner due to import problems.
Included Scanner Utilities TWAIN Source About TWAIN Source TWAIN Source is a utility used from a TWAIN-compliant application to scanned images from the scanner into the TWAIN-compliant application. This section explains how to import images using TWAIN-compliant general purpose applications. IMPORTANT: Install TWAIN Source onto the computer before importing images using this method. Install TWAIN Source onto each computer if multiple computers will be used. Scanner 1. TWAIN Mode Configuration 2.
Included Scanner Utilities Installing TWAIN Source 1 Click Scanner Utilities from the Software Library CD-ROM main menu. 2 Click on TWAIN Source. 3 Follow the wizard to complete the installation. Uninstalling TWAIN Source Use the Windows Add or Remove Programs feature to uninstall the application. About Image Data Compatible image data specifications are as follows. TWAIN Specifications Image size (max.
Included Scanner Utilities 3 Click the TWAIN Source Connect(s) button. NOTE: Connection may fail if the scanner is currently starting up or in use. If this happens, set TWAIN mode from the scanner and click the Connect(s) button. 4 Set Waiting Scan and click the Scan button. 5 Place the original and press the Start key. 6 The scanned image is sent to the computer. Starting Scanning from the Scanner 1 Set TWAIN mode from the scanner operation panel. 2 Place the originals.
Included Scanner Utilities About the Main Dialog Box The items shown in the TWAIN Source main dialog box are as follows. Item Description Original Image Size Select the standard size for original scanning. The following sizes are available.
Included Scanner Utilities Item Description 2 sided Sets whether to scan both sides of an original with the optional document processor. None: Scan only 1 side of the original. 2 sided (Left/Right): Set to scan left/right binding 2-sided originals. 2 sided (Top): Set to scan top-binding 2-sided originals. Status Field The device status is displayed. Brightness Specify the image exposure. Scan/Connect(s) Button When successfully connected, this button turns into the Scan button.
Included Scanner Utilities Job Accounting Setting If Job Accounting is configured for the device, the Job code must be entered when using the device. When Job Accounting is enabled, the job code sent by the computer is verified by the scanner. Therefore, the Job Accounting code must be configured in TWAIN Source at the computer. Registration method 1 Click the Scan. Setup button on the TWAIN Source main dialog box. The Scanner Setup dialog box is shown. 2 Click the Edit button.
Included Scanner Utilities Maximum image size Depending on available memory, scanning of certain image sizes may not be possible. Color, Grayscale Selection 200 dpi 300 dpi 400 dpi 600 dpi A3 22 MB 50 MB 89 MB 199 MB † A4 11 MB 25 MB 44 MB 100 MB 11 × 17" 21 MB 48 MB 86 MB 193 MB † 8 1/2 × 11" 11 MB 24 MB 43 MB 96 MB † Unable to scan under Windows 95. Black & White 6-48 200 dpi 300 dpi 400 dpi 600 dpi A3 0.9 MB 2.1 MB 3.7 MB 8.3 MB A4 0.5 MB 1.0 MB 1.8 MB 4.
Included Scanner Utilities DB Assistant About DB Assistant DB Assistant is a utility that configures 2 features: PDF Keyword Assist option, to add keywords searchable from a computer to scanned images, and Database Assist option, to create text information CSV files. These features are extremely useful when organizing scanned images or managing databases. After installation, DB Assistant starts automatically when the computer is started.
Included Scanner Utilities Operation Flow The operation flow for using DB Assistant to add text information to scanned images and save to specified folders is as follows. Scanner Save destination computer Administrator 1. Use DB Assistant to add text information From a web browser or scanner, register the administrator PC’s IP address 2. From Scanner File Utility, select whether to link to PDF Keyword Assist option or Database Assist option 3.
Included Scanner Utilities Installing and Uninstalling Installing DB Assistant 1 Click Scanner Utilities from the Software Library CD-ROM main menu. 2 Click on DB Assistant. 3 Follow the wizard to complete the installation. NOTE: During installation, the following component installation screens appear. Select to use the following features with DB Assistant. • PDF Keyword Embedder PDF Keyword Assist option (Adds keywords to scanned images.
Included Scanner Utilities About the Operation Window DB Assistant is launched automatically after installation. To configure PDF Keyword Assist option/Database Assist option, open the setting dialog box. Showing the Setting Dialog Box • When the program is running Double-click the taskbar icon. The DB Assistant start dialog box is displayed. Next, click the start dialog box Configuration button to show the DB Assistant setting dialog box.
Included Scanner Utilities Setting PDF Keyword Assist Option This section explains setting and registering PDF Keyword Assist option (add text data keywords to scanned images) with DB Assistant. First, open the DB Assistant setting dialog box and follow the steps below. NOTE: Refer to the PDF Keyword Assist option setting information to configure Database Assist option (create CSV text data files for scanned images).
Included Scanner Utilities NOTE: Refer to Setting Scanner Functions on page 4-2 for settings item details. These scan default settings can be changed later from the scanner operation panel. From the setting dialog box select Default Settings and right-click to show the Set, RegisterJDefault, Return to default menu. Set: Shows the Scanner Default Settings screen. Default: Saves the current settings as defaults. Return to default Restores settings to their values before saving.
Included Scanner Utilities 10 Enter the keyword in the List Change field. Enter text less than 32 characters long. Click Apply (or press Enter key) to register the keyword to the Keyword. To change an entered keyword, select the keyword you would like to change (reverse display) and click the Edit button. The keyword is displayed in the List Change field and can be again modified. Click the OK button when done editing. They keyword is set and the screen returns to the setting dialog box.
Included Scanner Utilities 6-56 2 To verify the Senders (Users) previously registered in the scanner, click the Browse... button. The Current Sender List dialog box is displayed. 3 Enter the address of the scanner to connect (hostname or IP address) in the Scanner Address field. Click the Download list button to display the list of Senders (Users) registered in the scanner. Select sender you wish to add from this list and click the Add (>>) button.
7 System Menu This chapter explains how to configure various settings using the menus on the machine’s operation panel. The main configurable settings are as follows. • Default Settings...7-2 • Setting MP Tray...7-29 • Registering Non-standard Sizes for Originals...7-30 • User Adjustment...7-31 • Setting Document Management Defaults...7-38 • Hard Disk Management...7-42 • Printing Reports...7-43 • Checking Total Copy Count...7-46 • Character Input Method...
System Menu Default Settings This section explains how to change default settings which are applied when the machine is powered up or the Reset key is pressed. Automatically configured details set in default setting mode are called default settings. Default settings are divided between Default Settings for Copying and Machine Default. These settings may be freely modified to suit your usage patterns. Default Settings for Copying Set the following default copy settings. • Exposure Mode...
System Menu 2 Press [Copy Default]. System Menu / Counter System Menu Copy Default 3 Language Job Accounting Scanner Default Printer Default MP tray Setting BOX Management Machine Default Document Management Register Orig. Size Print Report Use the numeric keys to enter the 4 digit management code. The default setting is 2500 for the 25/25 ppm model, 3200 for the 32/25 and 32/32 ppm models and 4000 for the 40/35 ppm model.
System Menu Original Image Quality Set the original image quality for default settings mode. The setting items are as follows. Item Description Text+Photo Appropriate for mixed text and photo originals. Photo Appropriate for photo originals taken with a camera. Print Appropriate for photo originals from magazines or printed media. Text Appropriate for document originals with large amounts of text. Map Appropriate for map originals.
System Menu Setting EcoPrint Set EcoPrint for default settings mode. The setting items are as follows. Item Description Off Do not enable EcoPrint. On Enable EcoPrint. For more information on EcoPrint, see page 1-43. 1 Referring to Accessing the Copy Default screen on page 7-2, access the Copy Default screen. 2 Press [S] or [T] to select EcoPrint and press [Change #]. 3 Select [Off] or [On]. 4 Press [Close] to save settings or [Back] to cancel settings.
System Menu Paper Type (Auto Color Paper) Select Automatic Paper Selection mode for color copying to limit the paper types. For example, set to [Color] ([Colour]) to select the cassette set the same size paper and set to color paper for the paper type. Set to [Off] to select the cassette with the same size paper regardless of paper type. The following paper types are available.
System Menu 1 Referring to Accessing the Copy Default screen on page 7-2, access the Copy Default screen. 2 Press [S] or [T] to select Default cassette and press [Change #]. 3 Select the cassette to use as the default. 4 Press [Close] to save settings or [Back] to cancel settings. The display returns to the Copy Default screen. Specifying Cassette for Cover Paper Specify the paper source cassette (1 - 4) or MP tray which is loaded with cover paper.
System Menu 1 Referring to Accessing the Copy Default screen on page 7-2, access the Copy Default screen. 2 Press [S] or [T] to select Density Adjustment (Auto) and press [Change #]. 3 Press [Lighter] or [Darker] to adjust the density. 4 Press [Close] to save settings or [Back] to cancel settings. The display returns to the Copy Default screen. Adjusting Manual Exposure Adjusts the overall lightness or darkness when copying in manual exposure mode. The setting items are as follows.
System Menu Selecting Sorting and Offsetting Output Set sorting and offsetting output options in default settings mode. The setting items are as follows. Item Sort Offset Description Off (Sort:Off) Do not enable sort mode. On (Sort:on) Enable sort mode. Off Do not enable offset mode. On (1 set or Output each page) Enable offset mode.
System Menu 3 Press [S], [T], [W] or [X] to set the margin width. 4 Press [Close] to save settings or [Back] to cancel settings. The display returns to the Copy Default screen. Erasing Borders Set the border erase default values. The setting ranges are as follows. Model Type Range Inch models 0 - 2" (1/8" increments) Metric models 0 - 50 mm (1 mm increments) For further details about border erase, refer to page 1-19.
System Menu 4 Under Default, select [Off] or [On]. 5 Press [Close] to save settings or [Back] to cancel settings. The display returns to the Copy Default screen. Showing the Register Key Sets whether to show or hide [Shortcut] ([Register]) used to register/delete register keys. For further details about register keys, refer to page 1-57. 1 Referring to Accessing the Copy Default screen on page 7-2, access the Copy Default screen.
System Menu 3 Current functions are shown in Register Mode and Addition Mode shows available functions that can be substituted for the current functions. Under Addition Mode, press [S] or [T] to select the function to change. Under Register Mode, press [S] or [T] to select the function that is to be added and press [ ] to move the function.
System Menu Machine Default The following items can be set for machine default. • Enabling Auto Cassette Switching...7-14 • Specifying the Paper Size...7-14 • Specifying the Paper Type...7-15 • Registering MP Tray Paper Size...7-15 • Enabling Quick Access to MP Tray Settings...7-16 • Setting Paper Type Properties (Paper Weight)...7-17 • Setting Paper Type Properties (Duplex Mode)...7-18 • Setting Handling for Special Paper Types...7-19 • Auto Detect Originals...
System Menu 3 Use the numeric keys to enter the 4 digit management code. The default setting is 2500 for the 25/25 ppm model, 3200 for the 32/25 and 32/32 ppm models and 4000 for the 40/35 ppm model. If the correct management code has been entered, the Machine Default screen will be displayed. NOTE: For security, it is recommended to change the management code. For further details, refer to Changing Management Code on page 7-25.
System Menu 1 Referring to Accessing the Machine Default Screen on page 7-13, access the Machine Default screen. 2 Press [S] or [T] to select the cassette to configure from Paper size (1st cassette - 4th cassette) and press [Change #]. 3 Select [Auto Detection] or [Standard sizes]. If [Auto Detection] is selected, choose the unit type. If [Standard sizes] is selected, choose the paper type. 4 Press [Close] to save settings or [Back] to cancel settings.
System Menu 3 Press [S] or [T] to select the number to register from Paper size (User reg. 1 - 4) and press [Change #]. 4 Press [On] and press [+] or [–] to set the Height and Width. With the metric models, you may enter the size directly using the numeric keys by pressing [#-Keys]. To specify a paper type, press [Select Paper Type]. Select the paper type and press [Close]. 5 Press [Close] to save settings or [Back] to cancel settings. 6 Press [Close].
System Menu Setting Paper Type Properties (Paper Weight) Set the weight (paper thickness) for each type of paper. The weights that can be configured for paper type are as follows. Paper type to be placed in the Cassette.
System Menu • Normal 1: From 60 g/m2 to 75 g/m2 or less • Normal 2: From 76 g/m2 to 90 g/m2 or less • Normal 3: From 91 g/m2 to 105 g/m2 or less • Heavy 1: From 106 g/m2 to 135 g/m2 or less • Heavy 2: From 136 g/m2 to 170 g/m2 or less • Heavy 3: 171 g/m2 or more • Extra Heavy: OHP transparencies NOTE: When a paper type is configured for the cassette in Specifying the Paper Type (See page 7-15), the weight ([Extra heavy] and [Heavy 1-3]) cannot be selected for the cassette.
System Menu Setting Handling for Special Paper Types When printing on prepunched, preprinted, or letterhead paper, depending on the original placement method or combination of copier functions, the hole positions may not align or images may be printed upside-down. Use this setting to change the direction of the finished output. The setting items are as follows. Item Description Adj. Print Direction Print with aligned finish direction. Speed Priority Releases the [Adj. Print Direction] setting.
System Menu Auto Detect Originals Specify the paper size to select when an original with a similar size is automatically detected. The setting items are as follows. Item Description Cardstock/A6 Select whether to detect the size as Postcard or A6R. B4/Folio Select whether to detect the size as B4 or Folio. 11 × 15" Select whether to automatically detect as 11 × 15". NOTE: This setting is displayed only for metric models.
System Menu Setting Sleep Timer Timeout Set the time until Auto Sleep mode is activated when [On] is selected in Activating Auto Sleep on page 7-26. Specify a value from 1 - 240 minutes (1 minute increments). For further details on Auto Sleep mode, refer to Sleep Mode in Chapter 3 of Operation Guide. NOTE: If the device is used frequently, it is recommended to set Auto Sleep mode to a larger time delay, and to a shorter time delay if the periods of non-use are longer.
System Menu Selecting Output Destination Set the default copy output destination. Paper Output Description Top tray Outputs to the built-in output tray. Job separator Outputs to the optional job separator. Finisher tray Outputs to the optional document finisher tray. Tray A Outputs to Tray A of the optional 3000 sheet document finisher. Tray B Outputs to Tray B of the optional 3000 sheet document finisher. Tray C Outputs to Tray C of the optional 3000 sheet document finisher.
System Menu Select the Main Mode Specify the screen to be first shown after power-on. The setting items are as follows. Item Description Copy Mode Copy mode is set as the first screen to be shown after the power is switched on (the screen shown when the Copier key is pressed). FAX Mode Fax mode is set as the first screen to be shown the power is switched on (the screen shown when the Fax key is pressed). NOTE: This setting is displayed when the optional fax kit is installed.
System Menu Silent Mode Configures the machine to operate more quietly. To decrease the operating noise level, set Silent Mode to [On]. The setting items are as follows. Item Description Off Do not enable Silent Mode. On Enable Silent Mode and reduce the operating noise level. 1 Referring to Accessing the Machine Default Screen on page 7-13, access the Machine Default screen. 2 Press [S] or [T] to select Silent Mode and press [Change #]. 3 Select [Off] or [On].
System Menu Changing Management Code Change the machine’s management code. IMPORTANT: Be sure to record the management code when changing it. If forgotten, contact your Service Representative. NOTE: The default setting is 2500 for the 25/25 ppm model, 3200 for the 32/25 and 32/32 ppm models and 4000 for the 40/35 ppm model. Change the management code to a value between 0000 - 9999. Always set to 4 digits. If the optional security kit has been installed, the management code is 8 digits long.
System Menu Activating Auto Sleep In Auto Sleep mode, the machine automatically switches to Sleep mode if left idle for a preset period. Enable/disable the use of Auto Sleep mode here. For further details on Sleep mode, refer to Sleep Mode in Chapter 3 of Operation Guide. The setting items are as follows. Item Description Off Do not use Auto Sleep mode. On Use Auto Sleep mode. NOTE: If Auto Sleep mode interferes with normal operation, set to disable Auto Sleep mode.
System Menu Prioritizing Copying Over Printing Prioritize copy jobs over printer jobs in the job output queue. The setting items are as follows. Item Description Off Do not prioritize copy jobs in the job output queue. On Prioritize copy jobs in the job output queue and print them before printer jobs. 1 Referring to Accessing the Machine Default Screen on page 7-13, access the Machine Default screen. 2 Press [S] or [T] to select Copy Job Priority and press [Change #]. 3 Select [Off] or [On].
System Menu 7-28 6 Press [Close]. 7 Press [Yes]. The hard disk data is overwritten and the specified encryption key is enabled. The display returns to the Machine Default screen.
System Menu Setting MP Tray Set the paper size and paper type to match paper loaded in the MP tray. Specifying the Paper Size to the MP Tray The MP tray paper size setting method and available paper sizes are as follows. Setting method Unit Paper size Auto Detect Inch 11 × 17", 8 1/2 × 14", 11 × 8 1/2", 8 1/2 × 11", 5 1/2 × 8 1/2" Centimeter A3, B4, A4, A4R, B5, B5R, A5R, B6R, A6R Other Standard Sizes ISO B5, Envelope DL, Envelope C5, Envelope C4, Comm. #10, Comm. #9, Comm.
System Menu Registering Non-standard Sizes for Originals Pre-register 4 types of non-standard original sizes. Registered sizes are shown as custom sizes when selecting the original size. The size range that can be registered is as follows. Model Type Range Inch models Height: 2 - 11 5/8" (1/8" increments) Width: 2 - 17" (1/8" increments) Metric models Height: 50 - 297 mm (1 mm increments) Width: 50 - 432 mm (1 mm increments) 1 Press the System Menu/Counter key. 2 Press [Register Orig. Size].
System Menu User Adjustment Adjust color and image quality related settings. The following items can be set for user adjustment. • Color Calibration...page 7-31 • Auto Gray Adjust...page 7-31 • Color Registration...page 7-33 • Drum Refresh...page 7-36 • Developer Refresh...page 7-36 • Laser Scanner Cleaning...page 7-37 Color Calibration After prolonged use, or from the effects of surrounding temperature or humidity, the hue of printed color output may shift or color drift may occur.
System Menu 2 Press [User Adjustment]. m Menu / Counter End 3 Press [Auto gray adjust]. Language Job Accounting Printer Default MP tray Setting BOX Management Check the counter Document Management Register Orig. Size Print Report User Adjustment System Menu / Counter User adjustment Auto gray adjust Drum refresh Laser Scan Cleaning Color Matching Color Calibrat. Color Regist. Developer refresh System Menu 4 Use the numeric keys to enter the 4 digit management code.
System Menu Color Registration When first installing the machine or moving it to a new location, color drift during printing may occur. Use this function to correct the color position of each of cyan, magenta and yellow to resolve color drift. Normal registration and detailed settings are available for Color Registration. Color drift can be largely corrected through normal registration. However, if it is not resolved or to perform more detailed settings, use the detailed settings.
System Menu 5 Press [PRT Chart]. A chart is printed. On the chart, for each of M (magenta), C (cyan) and Y (yellow), 3 chart types are printed: H-F (left), V (right), H-R (horizontal). Chart Example 6 Find the location on each chart where 2 lines most closely overlap each other. If this is the 0 position, registration for that color is not required. For the illustration, B is the appropriate value. 7 Press [Input Reg. value].
System Menu 10 Press [Completed.] after all values have been entered. Color registration begins. 11 Press [Close] after color registration is complete. 12 Press [Close]. The display is returned to the System Menu screen. Detailed Settings Follow the steps below to perform more detailed correction. 1 Refer to Steps 1-4 of Normal Registration to display the Color Registration screen. 2 Press [Configuration]. 3 Press [PrintChart (Details)]. A chart is printed.
System Menu 6 Press [+] or [–] to enter the value for H-1 from the chart for each of M (magenta), C (cyan) and Y (yellow). PrintPosAdjust (Details) Refer to the printed chart, and enter each value from where the black and colored lines seem straight. Press [+] to increase the value from 0 to 9. To decrease, press [-]. By pressing [-], the value changes from 0 to alphabetic letters, going from A to I. To move in the reverse direction, press [+].
System Menu 3 Press [Developer refresh]. m Menu / Counter nt Close Drum refresh Color Calibrat. Color Regist. Developer refresh Color Matching 4 Use the numeric keys to enter the 4 digit management code. The default setting is 2500 for the 25/25 ppm model, 3200 for the 32/25 and 32/32 ppm models and 4000 for the 40/35 ppm model. If the correct code has been entered, the Developer refresh screen will be displayed. NOTE: For security, it is recommended to change the management code.
System Menu Setting Document Management Defaults Set the Shared Data Box and Synergy Print Box to be used by the document management function. The following settings may be specified here. • Print Document List...7-39 • Resetting a Document Box...7-40 • Setting Box Names and Box Passwords...7-40 • Deleting All Documents in Box...7-41 • Specifying Period to Store Documents...
System Menu Print Document List Print the Document list for the Shared Data Box and Synergy Print Box. Document List (Shared Data Box) Document List (Synergy Print Box) NOTE: Before list printing, verify that either 11 × 8 1/2" or A4 paper is loaded into a cassette.
System Menu 1 Referring to Accessing the Document management screen on page 7-38, access the Document management screen. 2 From Shared Data Box or Synergy Print Box, press [Print the list] for the box for which you would like to print the list. Document management Document management Shared Data Box Synergy Print Box Print the list Print the list Box Editing Reset Box Reset Box Document save term System Menu 3 Printing of the list begins.
System Menu 8 Press [Close]. To set another box, repeat steps 3 - 8. 9 Press [Cancel] ([Job cancel]). Document management is displayed. Deleting All Documents in Box Delete all documents in each Synergy Print Box. 1 Referring to Accessing the Document management screen on page 7-38, access the Document management screen. 2 Press [Box Editing] under Synergy Print Box. 3 Select the box to delete all documents.
System Menu Hard Disk Management Verify available hard disk space and delete invalid data from the Hard Disk Management screen. Perform the following steps. 1 Press the System Menu/Counter key. 2 Press [BOX Management] ([Hard Disk Management]). m Menu / Counter End 3 Language Job Accounting Printer Default MP tray Setting BOX Management Check the counter Document Management Register Orig. Size Print Report User Adjustment Use the numeric keys to enter the 4 digit management code.
System Menu Printing Reports You can print the following reports from the operation panel.
System Menu Toner Coverage Report The toner coverage report includes for each paper size details about the number of sheets printed and black coverage ratio. You can print the following 4 report types. • Total toner coverage report • Copy toner coverage report • Printer toner coverage report • Fax toner coverage report The number of pages output according to details of the toner coverage report does not exactly match the number of guaranteed print pages for the toner container.
System Menu 3 Use the numeric keys to enter the 4 digit management code. The default setting is 2500 for the 25/25 ppm model, 3200 for the 32/25 and 32/32 ppm models and 4000 for the 40/35 ppm model. If the correct management code has been entered, the Print Report Menu is displayed. NOTE: For security, it is recommended to change the management code. For further details, refer to Changing Management Code on page 7-25. If the optional security kit has been installed, the management code is 8 digits long.
System Menu Checking Total Copy Count Check the total copy count from the operation panel. You can check the following values. • Number of copies for each color mode, number of prints, number of faxes, and total of all of these • Number of original pages scanned for copy mode, scanner mode, and fax send mode, and total of all of these You can also print this information as a counter report.
System Menu Character Input Method Characters may be input using one of the 2 input methods: Input Type A or Input Type B. The input method changes depending on the function being used. Input Type A This input method is used in the following functions.
System Menu Capital keyboard Stop Name to display End Char.Limit:32 letters including # AllDel. Capital Letter Num./Sym. Del. prev Space Numeral/Symbol keyboard Stop Name to display End Char.Limit:32 letters including # AllDel. Capital Letter Num./Sym. Del. prev Space Metric Models Keyboard 1 7 8 10 Stop Name to display 11 End Char.Limit: 32 letters inc. # key AllDel. Capital 2 Letter 3 Symbol 1 4 Del. prev Symbol 2 5 1 Character display: Displays the characters entered.
System Menu Capital keyboard Stop Name to display End Char.Limit: 32 letters inc. # key AllDel. Capital Letter Del. prev Symbol 2 Symbol 1 Space Symbol 1 keyboard Stop Name to display End Char.Limit: 32 letters inc. # key AllDel. Capital Letter Symbol 1 Del. prev Symbol 2 Space Symbol 2 keyboard Stop Name to display End Char.Limit: 32 letters inc. # key AllDel. Capital Letter Del.
System Menu 3 Press [b], [c], [d] and [e] in order. Stop Name to display Char.Limit:32 letters including # Abcde| AllDel. Capital 4 Letter Num./Sym. Space When entering all characters are complete, press [End]. Input Type B This input method is used in the following functions.
System Menu Entering Characters The following is an example of how to enter ‘abcde’ using the keyboard. 1 Press [Shift] to select lowercase letters. Box name. Char.Limit:16 letters including # Shift Space 2 Press [a], [b], [c], [d] and [e] in this order. The character display field will show abcde. Box name. Char.Limit:16 letters including # Shift Space 3 Press [End].
System Menu 7-52
8 Job Accounting This chapter explains how to manage job accounting to share usage among various departments. • Overview of Job Accounting...8-2 • Managing Accounts...8-4 • Copy Count per Department...8-13 • Activating and Deactivating Job Accounting...8-16 • Job Accounting Default Settings...8-17 • Using Job Accounting...
Job Accounting Overview of Job Accounting You can manage accounting the copy count incurred by individual departments by assigning a unique ID code to each department. Job accounting helps the following activities in business organizations. • Integrated management of copier/printer/scanner functions using the same department ID code. • Manageability of up to 1,000 individual departments. • Availability for department ID codes with as many as eight digits (between 0 and 99999999) for security.
Job Accounting Accessing the Job Accounting Screen Set up Job Accounting from the Job Accounting screen. Follow the steps below to access the Job Accounting screen. 1 Press the System Menu/Counter key. 2 Press [Job Accounting]. System Menu / Counter System Menu Copy Default 3 Language Job Accounting Scanner Default Printer Default MP tray Setting BOX Management Machine Default Document Management Register Orig. Size Print Report Use the numeric keys to enter the 4 digit management code.
Job Accounting Managing Accounts You can add and delete departments and define restrictions to copy count as needed. New Account Adds a new department. The following settings are required. Setting Description Department ID Code Set for department ID codes up to 8 digits long (between 0 and 99999999) for security. Name to display Set the department name using a maximum of 32 alphanumeric characters. Limit in use Set usage limitation for each of the copier/printer/scanner functions.
Job Accounting 10 Specify restrictions on copying as desired. See Restricting Usage for how to set usage restrictions. 11 Press [Registr.] to finalize settings. To make settings on another department, press [Register] and repeat steps 4 to 11. 12 Press [Close]. The touch panel will return to the Job Accounting screen. Restricting Usage Set usage restrictions to restrict copier/printer/scanner functions to specific departments or set page count limitations.
Job Accounting 2 Press [S] or [T] to select Copy and press [Change #]. 3 Select [Permitted] or [Is not permitted] ([Is not permited]). 4 Press [Close] to save settings or [Back] to cancel settings. The touch panel will return to the usage restriction screen. Restricting Printing Specify whether to allow printing. The setting items are as follows. Item Description Permitted Allows printing. Is not permitted (Is not permited) Prevents printing.
Job Accounting Limitation (Full Color) Set the usage total usage limit for full color copying and full color printing. The setting items are as follows. Item Description No limit Do not limit the page count for full color copying and full color printing. Counter limit Limit the total number of pages used by the full color copier and full color printer functions to between 1-999,999 pages (1 page increments). Is not permitted (Is not permited) Disable full color copying and full color printing.
Job Accounting Restricting FAX Usage Set limitations for sending faxes when the optional fax kit has been installed. The setting items are as follows. Item Description No limit Do not limit the number of pages transmitted by fax Counter limit Limit the total number of pages sent by fax to between 1-999,999 pages (1 page increments). Is not permitted (Is not permited) Prevents fax transmission. NOTE: This setting is displayed when the optional fax kit is installed.
Job Accounting Restricting Copy Usage (Full-Color) Set the number of sheets to copy for full-color. The setting items are as follows. Item Description No limit Do not limit the number of pages copied for full color. Counter limit Limit the total number of pages copied for full color to between 1-999,999 pages (1 page increments). Is not permitted (Is not permited) Prevents full color copying.
Job Accounting Restricting Printer Usage (Full Color) Set the number of sheets to print for full-color. The setting items are as follows. Item Description No limit Do not limit the number of pages printed for full color. Counter limit Limit the total number of pages printed for full color to between 1-999,999 pages (1 page increments). Is not permitted (Is not permited) Prevents full color printing.
Job Accounting Editing Department Information Changes the name and ID code registered for the department. 1 Referring to Accessing the Job Accounting Screen on page 8-3, access the Job Accounting screen. 2 Press [Management Edit]. 3 Select the department ID code to modify and press [Mgt. Inf. Correction]. Management Edit ID-Code NOTE: You can change the department display order. Press [Order of indication] and select from [Sort by Code] ([1J9] and [9J1]) and [Sort by Name] ([AJZ] and [ZJA]).
Job Accounting 3 Select the department ID code to modify and press [Limit in use]. Close dit Up NOTE: You can change the department display order. Press [Order of indication] and select from [Sort by Code] ([1J9] and [9J1]) and [Sort by Name] ([AJZ] and [ZJA]). 11 22 1st sales division 2nd sales division ETC Order of indication Mgt. Inf. Correction Limit in use Delete Down Register - Job 8-12 4 Select the usage restriction as desired.
Job Accounting Copy Count per Department You can read the overall usage count or the usage per individual department. You can also clear the usage count for a period of time and begin again counting usage. Management Total Calculate the total usage count for all departments. You can print the total in the form of Job Accounting reports. The total usage count can be reset as necessary. NOTE: Before printing the Job Accounting report, verify that either 11 × 8 1/2" or A4 paper is loaded into a cassette.
Job Accounting By function: copying and printing managed separately ([Each] is selected) By paper size NOTE: Change the type of form to be printed from the Job Accounting default settings in Copy/Printer Output Management(see page 8-19). 4 To reset the usage count, press [Counter clear]. 5 Press [Yes]. 6 Press [Close]. The touch panel will return to the Job Accounting screen. Copy Count per Department Tracks the copy count per individual department.
Job Accounting 3 Select the ID-code of the department and press [Total]. Close ent Total Order of indication Up 11 1st sales division 22 2nd sales division 33 3rd sales division ETC Total Down - Job NOTE: In the list, ---ETC indicates the number of printouts delivered without entering an ID-code.
Job Accounting Activating and Deactivating Job Accounting Turn job accounting on or off as necessary. The setting items are as follows. Setting Description Off Job accounting is deactivated. On Job accounting is activated. 1 Referring to Accessing the Job Accounting Screen on page 8-3, access the Job Accounting screen. 2 Select [On] or [Off]. Close g Register/Sett. Each Mgt. Total Management Edit Job Accountg Job Accntg Def. Set. Off On 3 Press [Close]. 4 Press [End].
Job Accounting Job Accounting Default Settings Changes the defaults for Job Accounting. The following items can be configured for Job Accounting default settings. • Copy Job Accounting...8-17 • Printer Job Accounting...8-17 • Printer Error Report...8-18 • Printing from Unregistered Sources (Printer)...8-18 • Copy/Printer Output Management...8-19 • Scanner Job Accounting...8-19 • Fax Job Accounting...8-20 • Response to Unauthorized Requests...8-20 • Default Counter Limit Value...
Job Accounting 2 Press [Job Accntg Def. Set.]. 3 Press [S] or [T] to select Print. Job Accounting and press [Change #]. 4 Select [On] or [Off]. 5 Press [Close] to save settings or [Back] to cancel settings. 6 Press [Close]. The touch panel will return to the Job Accounting screen. Printer Error Report When you use Job Accounting to manage printing, you can specify whether an error report is printed in case that the user attempts to print using the incorrect department code.
Job Accounting 5 Press [Close] to save settings or [Back] to cancel settings. 6 Press [Close]. The touch panel will return to the Job Accounting screen. Copy/Printer Output Management You can choose whether copying and printing are managed together or separately. The setting items are as follows. Setting Description All Manage copier and printer output count together. Each Manage copier and printer output count individually.
Job Accounting Fax Job Accounting Activate or deactivate job accounting when the optional fax function is used. The setting items are as follows. Setting Description Off Fax Job Accounting is deactivated. On Fax Job Accounting is activated. NOTE: This setting is displayed when the optional fax kit is installed. 1 Referring to Accessing the Job Accounting Screen on page 8-3, access the Job Accounting screen. 2 Press [Job Accntg Def. Set.].
Job Accounting 4 Use the numeric keys to enter the counter limit default value. 5 Press [Close] to save settings or [Back] to cancel settings. 6 Press [Close]. The touch panel will return to the Job Accounting screen. Total Count by Size, 1-5 You can register specific paper sizes to monitor so that you can check the copy count. You can also register types of paper. NOTE: Up to five different paper sizes can be registered for keeping track of the copy count.
Job Accounting Using Job Accounting Copying When Job Accounting is activated, users must enter their department ID-code on the numeric keys to perform copying. IMPORTANT: After copying, be sure to press the Job Accounting key to display the initial screen so that the next user is prompted to enter the department ID-code. 1 Use the numeric keys to enter the department ID code and press [Enter]. [Basic] screen is displayed. D. Each Mgt.
Job Accounting 3 The department ID entry screen is displayed. Use the numeric keys to enter the department ID and press [Enter]. The screen for the each function is displayed. D. Each Mgt. Total Clear Enter NOTE: If you enter the code incorrectly, press [Clear] to reenter the correct code. Entering an invalid department ID-code will trigger an error alarm. Use the numeric keys to enter the correct code. You can review the department’s copy count by pressing [Each Mgt.
Job Accounting 8-24
9 Troubleshooting This chapter explains how to solve problems when they occur. • Solving Malfunctions...9-2 • Responding to Error Messages...
Troubleshooting Solving Malfunctions The table below provides general guidelines for problem solving. If a problem occurs with your machine, check the checkpoints and perform procedures indicated on the following pages. If the problem persists, contact your Service Representative. Symptom Checkpoints Corrective Actions Reference Page The operation panel does Is the machine plugged in? not respond when the machine is switched on ( | position). Plug the power cord into an AC outlet.
Troubleshooting Symptom Checkpoints Corrective Actions Reference Page Printing is too light. Is Auto Exposure mode set? Set the correct exposure level for auto exposure. page 7-7 Is Manual Exposure mode set? Use the exposure adjustment key to set Refer to the correct exposure level. Operation Guide, Chapter 3 When changing the default exposure page 7-8 level, adjust the exposure manually and choose the desired level.
Troubleshooting Symptom Checkpoints Corrective Actions Reference Page Printer output is fuzzy. Is the printer in a high humidity environment? Perform a drum refresh. page 7-36 Is the copy paper damp? Replace the copy paper with new paper. Refer to Operation Guide, Chapter 2 Is special color copy paper being used? Use special color copy paper. Printing is skewed. Paper jams frequently occur.
Troubleshooting Symptom Checkpoints Corrective Actions Reference Page Printing is wrinkled. Is the separator dirty? Clean the separator. Refer to Operation Guide, Chapter 5 Is the copy paper damp? Replace the copy paper with new paper. Refer to Operation Guide, Chapter 2 Is special color copy paper being used? Use special color copy paper. — Is the paper set in a proper orientation? Change the orientation in which the paper is positioned.
Troubleshooting Responding to Error Messages If the touch panel displays any of these messages, follow the corresponding procedure. Copy Error Messages If the Copy mode touch panel displays any of these messages, follow the corresponding procedure. Display Checkpoints Corrective Actions Reference Page Close ### cover. Is the indicated cover open? Close all covers securely. — Check the cover. Are any covers open? Close all covers securely.
Troubleshooting Display Checkpoints Corrective Actions Change the size of MP tray. Is the specified size paper loaded in Reconfigure the size of the MP tray. Refer to the MP tray? Operation Guide, Chapter 2 Check paper size. Is the specified size paper loaded? Load paper of a size that can be used. — Reposition original. Is the orientation of the specified paper different from that of the original? Change the orientation of the original.
Troubleshooting Display Checkpoints Corrective Actions Cannot staple this size. Is stapling available for the size of the loaded paper? For further details, see the optional document finisher or 3000 sheet document finisher Operation Guide. Change the paper size. — Is punching available for the size of Change the paper size. the loaded paper? For further (Cannot punch this paper size.) details, refer to the optional 3000 sheet document finisher Operation Guide. — Cannot staple.
Troubleshooting Display Checkpoints Corrective Actions Reference Page Paper capacity is over the limit, unable to copy. Change preset of color or B&W selection. Does the number of copies set for Color/B&W selection exceed the maximum limit set in Job Accounting? Set so the total of color and B&W copies does not exceed the maximum limit for copying as specified in Job Accounting. page 1-53 Is the key counter inserted correctly? Insert the key counter securely and completely.
Troubleshooting Display Clean the slit glass for original fed from DP. Checkpoints — Corrective Actions Reference Page Rub the slit glass with the included dry cleaning cloth. Refer to Operation Guide, Chapter 5 (Clean the slit glass for original fed.) Check the waste punch box. Is the optional 3000 sheet document Refer to the optional 3000 sheet finisher waste punch box securely document finisher Operation Guide fastened? to securely fasten the waste punch box. — Empty waste punch box.
Troubleshooting Display Checkpoints Corrective Actions Reference Page HDD error. Is it re-displayed after opening and A hard disk error has occurred. Cannot activate Job Accounting closing the front cover, turning off Contact your Service Representative mode. and on the main power switch, and or Authorized Service Center. plugging out and plugging in the power plug in the power outlet? — Please wait. Remote edit. — Is Job account editing being done from a network connected computer? (Please wait.
Troubleshooting Display Checkpoints Corrective Actions Reference Page Exceeded print quantity limit. Is the maximum limit for printing as To perform printing, reconfigure Job page 8-4 specified in Job Accounting mode Accounting for the machine. exceeded? Error has occurred. Change to printer screen and check. — Shown when a printer error has occurred when other modes are currently being displayed. Press the Printer key to switch to the printer screen and display the specific error message.
Troubleshooting Display Checkpoints Corrective Actions Reference Page Warning image adapt. — Printing not possible at currently set resolution due to insufficient memory. Add memory to the printer or change the print resolution. — Print overrun Press GO. — Overrun has occurred due to insufficient memory. — Press the Printer key to switch to printer mode. Press [GO] to continue printing. Press [Cancel] to cancel printing.
Troubleshooting Memory Device Error Messages RAM Disk Error If RAM disk error Press GO is displayed, verify the error code (numeric) and refer to the following table. Code Detail Contents 01 Format error. Cycle the system power. 02 Ram disk mode is set to [Off]. Set RAM Disk mode to [On]. 03 A write error has occurred. Write protect is enabled. Disable write protect. 04 Insufficient RAM disk space to complete this operation. Move or delete data stored in the RAM disk to increase available space.
Troubleshooting Scanner Error Messages If the Scanner mode touch panel displays any of these messages after pressing the Scanner key, follow the corresponding procedure. Display Checkpoints Corrective Actions Reference Page Unable to use scanner. Is the network cable connected properly? Confirm the network cable is properly connected. If the scanner has just been started, try again later (approximately 2 minutes). Refer to Operation Guide, Chapter 2 Unable to find destination PC. Check the PC.
Troubleshooting Display Checkpoints Corrective Actions Communication error. Scan to PC: Sending computer status. Try retransmitting. — E-Mail Send: Is the SMTP server running? Contact your system administrator. — Database Connection: Save destination computer status. An unsupported response was received from DB Assistant. Check the computer running DB Assistant. — Destination PC’s system error. Destination PC computer status. Try retransmitting. — The file was not saved.
Troubleshooting Display Checkpoints Corrective Actions Reference Page DB Assistant Server error. Contact administrator. — An error has occurred with DB Assistant or the computer running DB Assistant. Communication cannot continue. Check the computer running DB Assistant. — DB Assistant Server is in use. Try again later. — DB Assistant currently connected to another scanner. Try connecting again later. — Unable to find FTP server. Contact administrator.
Troubleshooting Scanner Error Codes Below is a list of scanner send log error codes and their corrective actions. Error Code Detail Contents Corrective Actions Reference Page E001 User initiated cancel during send. E010 Connection to destination PC lost during • data transmission (an error greater than E011 has occurred that cannot be further categorized). Or, connection to the • computer running Address Book for Scanner (Private Address Book) has been lost.
Troubleshooting Error Code Detail Contents Corrective Actions E036 During scanned image compression, compressed data overran available memory. Decrease data size as follows and try again. E039 E059 Invalid command received from computer during Scan to PC. An unexpected condition has occurred on the destination PC. • Decrease resolution. • Set image quality to OCR. • Decrease number of pages scanned in one operation.
Troubleshooting 9-20
Appendix This chapter covers the following topics. • Paper...Appendix-2 • Intercompatibility of Functions...Appendix-8 • Glossary...
Appendix Paper Basic Paper Specifications This machine is designed to print on standard printing paper as used in regular (‘dry’) copiers and page printers such as laser printers. It also supports a variety of other types of paper that conform to the specifications given in this appendix. Be careful when choosing paper. Paper unsuitable for the machine may cause jams or paper wrinkling. Use the MP tray for transparencies, labels, envelopes, and similar types of paper.
Appendix Choosing the Appropriate Paper This section describes guidelines for choosing paper. Paper Condition Avoid using paper with bent corners or paper that is curled, dirty, or torn. Do not use paper that has a rough surface or paper fiber lint, or that is especially delicate. Use of paper in any of these conditions will not only deliver poor copies but may also cause paper jams and shorten the useful life of the machine.
Appendix Smoothness The paper surface should be smooth, but it must be uncoated. With paper that is too smooth and slippery, several sheets may accidentally be supplied at once, causing jams. Basis Weight In countries that use the metric system, basis weight is the weight in grams of one sheet of paper one square meter in area. In the United States, basis weight is the weight in pounds of one ream (500 sheets) of paper cut to the standard size (or trade size) for a specific grade of paper.
Appendix Other Paper Specifications Porosity: The density of the paper fibers. Stiffness: Paper must be stiff enough or it may buckle in the machine, causing jams. Curl: Most paper naturally tends to curl in one direction after the package is opened. When paper passes through the fixing unit, it curls upward slightly. To deliver flat printouts, load the paper so that the curl faces towards the bottom of the paper tray.
Appendix Choosing Special Paper Although special paper that meets the following requirements can be used with the machine, copy quality will vary considerably due to differences in the construction and quality of special paper. Thus, special paper is more likely than regular paper to cause printing problems. Before purchasing special paper in volume, try testing a sample to ensure the printing quality is satisfactory. General precautions when copying onto special paper are given below.
Appendix Envelopes Always use the MP tray for envelopes. Due to the structure of envelopes, in some instances, printing evenly over the entire surface may not be possible. Thin envelopes in particular may be wrinkled by the machine in some cases as they pass through it. Before purchasing envelopes in volume, try testing a sample to ensure the printing quality. Storing envelopes for a long period may cause them to become wrinkled. Thus, keep the package sealed until you are ready to use them.
Appendix Intercompatibility of Functions Combine the various functions to provide even greater usage efficiency. Intercompatibility of Copier Functions Refer to the following charts for a list of functions that may be used in combination.
Appendix Secondary Functions Tray C Tray 1 - 7 Sharpness Adjust Stapling Punching Bind & Fold Image Repeat Copy Interrupt Mode Y Y Y Y Y Y Y Y Y Y Y Y Y Y Y Y Y Y Y Y Y Y Y Y Y Y Y Y Y Y Y Y Y Y Y Y Y Y Y Y Y Y Y Y Y Y Y Y Y Y Y Y Y Y Y Y Y Y 9 Y 9 Y Y Y Y Y Y Y Y Y Y Y Y Y Y Y Y Y Y Y Y Y Y Y Y Y Y Y Y 9 Y Y Y 9 34 N1 Y N1 N1 N1 N1 N1 Y 13 13 13 Y Y Y Y Y Y Y Y Y N1 Y Y Y Y Y Y Y Y Y Y Y Y Y Y Y 35 Y Y Y Y Y Y 25 13 13 Y Y Y Y Y Y Y Y Y Y Y Y Y Y Y Y Y Y Y Y Y Y Y Y Y Y Y Y Y Y Y Y Y Y Y Y Y Y
Appendix Auto color Full-color Black/White Color Balance Adjust Hue Adjust One touch Image Adjust Color/B&W selection MonoColor Copy Selection of Paper One-sided to Two-sided Two-sided to Two-sided Book to Two-sided Two-sided to One-sided Book to One-sided Standard/Other Standard Size Input size Auto Detect Custom size Combine Mode Auto Exposure mode Manual Exposure mode Background Exposure Adjust Equal size (100%) XY zoom Auto zoom Manual zoom Auto Selection mode copying (mixed o
Appendix Secondary Functions Y Y Y Y Y Y Y Y Y Y Y Y N N N N Y N N N Y 42 Y Y Y Y Y Y Y N N N N N Y N N 68 Y Y N N Y Y Y N N N Y 42 Y Y Y Y Y Y Y N N N N N Y N N 68 Y Y N N Y Y Y N N N N N N Y Y Y 68 Y Y N N Y Y Y N N N N N Y N Y 68 Y Y N N Y Y Y N N N N Y N N 68 Y Y N N Y Y Y N N N Y 42 Y Y Y Y Y Y Y N N N N N Y N Y 68 Y Y N N Y Y Y N N N Y Y Y 45 Y Y Y Y Y Y Y Y Y Y Y Y Y Y Y Y Y Y N N Y Y N N Y 29 Y Y Y Y Y Y Y 57 57 Y 57 57 57 Y Y N 47 Y N N Y Y Y N N N Y 29 Y Y Y Y Y Y Y 58 58 Y Y 58 58 Y Y
Appendix 22 Combine mode and booklet mode may not be combined. 23 Cover mode is not available when the original size is selected via user entry. 24 Cover mode and combine mode may not be combined. 25 Cover mode is not available with inverted copying. 26 The secondary function takes priority and the primary function is released. 27 OHP backing sheet mode are not available with inverted copying. 28 OHP backing sheet mode are not available when the original size is selected via user entry.
Appendix 62 May not be combined with Image Repeat Copy Set original area. 63 May not be combined with Image Repeat Copy Set original area. (switches to manual exposure mode) 64 Changes to Full Color. 65 When selecting original size (B6, B6R, A6R, 11 × 15", Postcard), a message prompt is displayed to change the setting. 66 Status changes to [Sort:Off]. 67 The secondary function takes priority and status is set to Folding Tray.
Appendix Intercompatibility of Scanner Functions Refer to the following charts for a list of scanner functions that may be used in combination.
Appendix Y: May be combined. N: May not be combined. N1: Primary function takes precedence. Secondary function cannot be selected. N2: Primary function takes precedence. Secondary function cannot be selected. (When original size selection is 11 × 15", 11 × 8 1/2", 8 1/2 × 14", 5 1/2 × 8 1/2", 8 1/2 × 5 1/2", 8 1/2 × 13 1/2", 8 1/2 × 13", A4, A5, B5, B6R, B6, Folio, 16KR, 16K) N3: Primary function takes precedence. Secondary function cannot be selected.
Appendix Dual Access Chart Two operations can be performed in parallel from the copy, print and scan functions. Intercompatible features are given in the following charts.
Appendix Glossary Additional Memory Increase the memory available to the printer. Additional memory enables printing more complex data. An additional 128 MB, 256 MB or 512 MB may be added. Contact your product service representative to find out about memory that can be used in this machine. AppleTalk A standard network function provided in the Mac OS from the Apple Corporation. Also used to refer to the protocol family used in AppleTalk network functionality.
Appendix FTP (File Transfer Protocol) A protocol used to transfer files on TCP/IP networks such as the Internet or private intranets. Like SMTP/POP, a protocol in common use on the Internet today. Grayscale A method of representing colors on a computer. Images are expressed in only shades of brightness from black to white, including no color information, or 'monochrome.' The number of gray levels that can be expressed is determined by the number of bits.
Appendix Printer Driver Software used to convert application data for printing. The printer driver is stored on the included CD-ROM. Install onto computers connected to this machine/printer. Send E-mail A function to send scanned images to preset e-mail addresses or e-mail addresses entered by key input. SMTP (Simple Mail Transfer Protocol) A protocol to deliver electronic mail over the Intranet or private intranets.
Appendix Appendix-20
Index Index Numerics 2-in-1 mode 1-14 3000 sheet document finisher 1-42, 3-25, 7-22 4-in-1 Mode 1-15 A Additional memory Appendix-17 Address Book for Scanner 6-32 Description 6-32 Installing and uninstalling 6-32 Operation method 6-33 Address Editor 6-13 Description 6-13 Installing and uninstalling 6-13 Operation method 6-13 Adjusting auto exposure Copy 7-7 Scanner 4-13 Adjusting date/time 7-24 Adjusting manual exposure Copy 7-8 Scanner 4-13 AppleTalk Appendix-17 Auto cassette switching 7-14 Auto clear En
Index Preset limit 7-10 Copy/Printer output management 8-19 Cover 1-25 Cassette for cover paper 7-7 CR (Carriage Return) action 3-20 Customize (basic screen) 7-11 Customize (user choice) 7-11 D DB Assistant 6-49 Description 6-49 Installing and uninstalling 6-51 Operation method 6-52 Default counter limit value 8-20 Default gateway Appendix-17 Default settings Default settings for copying 7-2 Document management functions 7-38 Job accounting 8-17 Machine default 7-13 Scanner function 4-12 Developer refresh
Index Network interface 3-6 Parallel interface mode 3-5 Serial interface mode 3-6 Inverted copying 1-44 IP address Appendix-18 J Job accounting Activating and deactivating 8-16 Copy 8-17 Default settings 8-17 Delete 8-10 Description 8-2 Editing department information 8-11 Fax 8-20 Limit in use 8-5 New account 8-4 Operation during setting 8-22 Printer 8-17 Scanner 8-19 Total 8-13 Job build 1-58 Procedure 1-58 Setting functions 1-62 Job separator 1-42, 3-25, 7-22 Job storage 3-35 K KPDL Appendix-18 L Laser
Index Envelope Appendix-7 Overhead transparency Appendix-6 Postcard Appendix-6 Preprinted Appendix-7 Recycled Appendix-7 Size x Special paper Appendix-5 Thick paper Appendix-7 Paper source Copy 1-2 Printer 3-23 Parallel interface mode 3-5 Parallel port interface Appendix-18 PDF encryption function 4-9 POP3 Appendix-18 Poster 1-22 PostScript Appendix-18 PPM Appendix-18 Print quantity 3-17 Printer Included printer utilities viii Printer driver Appendix-19 Printer error report 8-18 Printer settings 3-1 Printin
Index Reviewing 2-4 Sharpness adjust Copy 1-33 Sample iii Scanner 4-7 Silent mode 7-24 Skip Sender (User) Select 4-18 SMTP Appendix-19 Solving malfunctions 9-2 Specifying the paper size 7-14 Specifying the paper type 7-15 Stapling 1-10 Status page Appendix-19 Details 3-3 Print 3-2 Subnet mask Appendix-19 Synergy print box Batch printing 2-7 Box name 7-40 Box password 2-9, 7-40 Combining and printing 2-6 Deleting 2-8 Deleting all documents 2-9, 7-41 Print document list 7-39 Registering 2-5 Renaming 2-7 Reset
Index Index-6
For best results and machine performance, we recommend that you use only our original supplies for your products.
©2007 is a trademark of Kyocera Corporation
2007.2 Rev.1.