Appendix • • • • • • • • Optional Equipment ......................................... Appendix-2 Character Entry Method .................................. Appendix-7 Paper ............................................................. Appendix-11 Color balance adjustment.............................. Appendix-20 Sharpness adjustment................................... Appendix-21 Color saturation adjustment........................... Appendix-21 Specifications.................................................
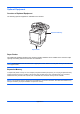
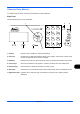
Optional Equipment Overview of Optional Equipment The following optional equipment is available for the machine. Expansion Memory Paper Feeder Paper Feeder Two additional cassettes identical to the machine’s double cassettes can be installed in the machine. Paper capacity and loading method are the same as Cassettes 1. NOTE: To allow paper to be removed when a paper jam occurs, there is a cover (rear cover) on the rear side of the paper feeder.
Precautions for Handling the Memory Module Correct Incorrect To protect electronic parts, discharge static electricity from your body by touching a water pipe (faucet) or other large metal object before handling the memory module. Or, wear an antistatic wrist strap, if possible, when you install the memory module. Installing the Memory Module 1 Turn off the machine and disconnect the power cord and interface cable. 2 Remove the right cover with a piece of metal similar to coin.
5 Aligning the cutouts of the memory module with the matching keys of the socket, carefully plug the memory module into the memory socket until it clicks in place. Then, push down the memory module to secure. CAUTION: Before inserting a memory module in the machine, make sure that the machine is switched off. 6 Push down the memory module to secure. 7 Reinstall the right cover. Removing the Memory Module To remove a memory module, remove the right cover and the memory slot cover from the machine.
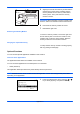
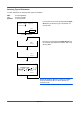
When you are performing user management and have not logged in, a login screen will appear. Then, enter the user ID and password to log in, and press [Login] (the Right Select key). Login User Name: L b ******************* Login Password: [ Login ] System: a b 1 Network Setting ********************* 2 I/F Block Set. 3 Security Level [ Exit ] Op Function: a b 1 IC-Card g ********************* 2 UG33 T [ Menu 2 The System menu appears. 3 Press the U or V key to select [Op Function].
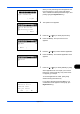
8 Licensed. is displayed and the screen returns to the Op Function menu. Checking Application Details Use the procedure below to check the details of an application. Sys. Menu/Count.:a b 1 Report 2 Counter 3 System ********************* [ Exit ] 1 When you are performing user management and have not logged in, a login screen will appear. Then, enter the user ID and password to log in, and press [Login] (the Right Select key).
Character Entry Method In character entry screens, use the procedure below to enter characters. Keys Used Use the following keys to enter characters. 1 7 2 3 4 6 5 1. OK Key Press this key to finalize the entered character(s). 2. Clear Key Press this key to delete the character at the cursor position. If the cursor is at the end of the line, the character to the left of it is deleted. 3. Back Key Press this key to return to the screen from which you invoked the character entry screen. 4.
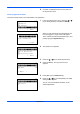
Selecting Type of Characters To enter characters, the following three types are available: ABC 123 Symbols To enter alphabets. To enter numerals. To enter symbols. In a character entry screen, press [Text] (the Right Select key) to select the type of characters you want to enter. File name input: OsakaSD3* [ 123 Text ] Current character type [ ABC Text ] [ 123 Text ] Each time you press [Text] (the Right Select key), the character type switches as follows: ABC, 123, Symbol, ABC ...
Entering Characters After selecting a character type, use the procedure below to enter characters. Entering Alphabets and Numerals Referring to the table below, press the key corresponding to the character you want to enter until it is displayed. Key * Entry mode Available characters Alphabetic/Symbol .
Characters associated with different keys can be entered consecutively. To enter a character associated with the same key after another, use cursor keys to move the cursor to the next entry position before entering it. If you use cursor keys to move the cursor to an entry position apart from the end of the line and enter a character there, spaces are automatically entered in between.
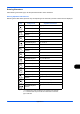
Paper This section explains the paper sizes and types that can be used in the paper source. Cassette Supported types Supported paper sizes Plain, Preprinted, Bond, Recycled, Letterhead, Color (Colour), Prepunched, High Quality, Custom 1 to 8 A4, JIS B5, A5, Folio, Legal, Letter, Oficio II, Statement, Executive, A6, B6, ISO B5, Envelope C5, 16K, Custom (105 x 148 to 216 x 356mm (4-1/8 x 5-13/16 to 8-1/2 x 14 inches) No.
Supported types Envelopes Supported paper sizes ISO B5, Envelope #10, Envelope #9, Envelope #6, Envelope Monarch, Envelope DL, Envelope C5, Hagaki, Oufuku Hagaki, Youkei 4, Youkei 2 No. of sheets 5 Other sizes: Portrait-2.76 to 8.50" or 70 to 216 mm Landscape-5.83 to 14.
Basic Paper Specifications This machine is designed to print on standard copy paper as used in regular ('dry') copiers and page printers such as laser printers. It also supports a variety of other types of paper that conform to the specifications given in this appendix. Be careful when choosing paper. Paper unsuitable for the machine may cause jams or may be wrinkled. Supported Paper Use standard copy paper for regular copiers or laser printers. The printing quality will be affected by the quality of paper.
Choosing the Appropriate Paper This section describes guidelines for choosing paper. Condition Avoid using paper with bent corners or that is curled, dirty, or torn. Do not use paper that has a rough surface or paper fiber lint, or that is especially delicate. Use of paper in any of these conditions will not only deliver poor copies but may also cause jams and shorten the useful life of the machine.
Smoothness The paper surface should be smooth, but it must be uncoated. With paper that is too smooth and slippery, several sheets may accidentally be supplied at once, causing jams. Basis Weight In countries that use the metric system, basis weight is the weight in grams of one sheet of paper one square meter in area. In the United States, basis weight is the weight in pounds of one ream (500 sheets) of paper cut to the standard size (or trade size) for a specific grade of paper.
Curl: Most paper naturally tends to curl after the package is opened. When paper passes through the fixing unit, it curls upward slightly. To deliver flat printouts, load the paper so that the curl faces towards the bottom of the paper tray. Static electricity: During printing, paper is electrostatically charged so that the toner adheres. Choose paper that can be discharged quickly so that copies do not cling together. Whiteness: Paper whiteness affects print contrast.
Choosing Special Paper Although special paper that meets the following requirements can be used with the machine, print quality will vary considerably due to differences in the construction and quality of special paper. Thus, special paper is more likely than regular paper to cause printing problems. Before purchasing special paper in volume, try testing a sample to ensure the print quality is satisfactory. General precautions when printing onto special paper are given below.
Envelopes Use the multi purpose tray for envelopes. Due to the structure of envelopes, printing evenly over the entire surface may not be possible in some cases. Thin envelopes in particular may be wrinkled by the machine in some cases as they pass through. Before purchasing envelopes in volume, try testing a sample to ensure the print quality. Storing envelopes for a long period may cause them to become wrinkled. Thus, keep the package sealed until you are ready to use them.
Some label paper has large margins on the top sheet. When using such paper, do not peel these margins from the carrier sheet before completing output. Allowed Not allowed Top sheet Carrier sheet Use label paper that conforms to the following specifications. Item Specifications Top sheet weight 44 to 74 g/m² Basis weight (overall paper weight) 104 to 151 g/m² Top sheet thickness 0.086 to 0.107 mm Overall paper thickness 0.115 to 0.
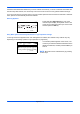
Color balance adjustment Adjust the strength of cyan, magenta, yellow, and black to make fine hue adjustments.
Sharpness adjustment Adjust the sharpness of image outlines. (Refer to the Operation Guide for configuration details) Less Sharp Original More Sharp Color saturation adjustment The color saturation of the image can be adjusted. Color can be emphasized, or color can be made paler and closer to a monotone.
Specifications NOTE: Specifications are subject to change without notice.
Description Item FS-C2026MFP FS-C2126MFP Warm-up Time (22°C/ 71.
Description Item FS-C2026MFP Options FS-C2126MFP Paper feeder (up to 2 units) Printer Item Description Printing Speed Same as Copying Speed. First Print Time (A4, feed from Cassette) Black & White: 9.0 seconds or less Color: 10.
Scanner Item Description Operating System Windows 2000 (Service Pack 4), Windows XP, Windows Vista, Windows 7, Windows Server 2003, Windows Server 2008 System requirements IBM PC/AT compatible CPU: Celeron 600Mhz or higher RAM: 128MB or more HDD free space: 20MB or more Interface: Ethernet Resolution 600 dpi, 400 dpi, 300 dpi, 200 dpi File Format JPEG, TIFF, PDF, XPS Scanning Speed *1 1-sided: B/W 25 Images/min Color 13 Images/min 2-sided: B/W 13 Images/min Color 7 Images/min (A4 landscape, 600 d
Document Processor Item Description Original Feed Method Automatic feed Supported Original Types Sheet originals Paper Size Maximum: Legal/A4 Minimum: Statement/A5 Paper Weight 50 to 120 g/m2 Loading Capacity 50 sheets (50 to 80 g/m2) maximum Dimensions (W) × (D) × (H) 19 19/64 × 21 × 4 3/32" 490 × 338 × 104 mm Weight 3 kg or less Environmental Specifications Description Item FS-C2026MFP Time to Sleep mode (default setting) 1 minutes Recovery time from Sleep mode 20 seconds or less Duple
Glossary Accessibility The machine is designed featuring good accessibility even for the elderly and those who are physically challenged or visually impaired. AppleTalk AppleTalk, which comes with Apple Computer's Mac OS, is a network protocol. AppleTalk enables file/printer sharing and also enables you to utilize application software that is on another computer on the same AppleTalk network.
EcoPrint Mode A printing mode that helps save toner. Copies made in this mode are thus lighter than normal. Emulation The function to interpret and execute other printers' page description languages. The machine emulates operation of PCL6, KC-GL, KPDL, and KPDL (automatic). FTP(File Transfer Protocol) A protocol to transfer files on the TCP/IP network, whether the Internet or an intranet. Along with HTTP and SMTP/POP, FTP is now frequently used on the Internet. Grayscale A computer color expression.
POP3 (Post Office Protocol 3) A standard protocol to receive E-mail from the server in which the mail is stored on the Internet or an intranet. PostScript A page description language developed by Adobe Systems. It enables flexible font functions and highlyfunctional graphics, allowing higher quality printing. The first version called Level 1 was launched in 1985, followed by Level 2 that enabled color printing and two-byte languages (e.g. Japanese) in 1990.
TCP/IP (Transmission Control Protocol/Internet Protocol) TCP/IP is a suite of protocols designed to define the way computers and other devices communicate with each other over a network. TCP/IP (IPv6) TCP/IP (IPv6) is based on the current Internet protocol, TCP/IP (IPv4).
Index Index Numerics 1-sided/2-sided Selection 5-8 A Accessibility Appendix-27 Adjusting Density 5-16 Auto 3-8 Manual 3-8 Adjustment/Maintenance 8-100 Copy Density Adjustment 8-100 Correcting Fine Black Lines 8-110 Developer Refresh 8-111 Send/Box Density 8-101, 8-102, 8-103 AppleTalk Appendix-27 Setup 8-149 Auto Paper Selection Appendix-27 Auto Sleep 2-9, Appendix-27 B Bonjour Appendix-27 Bundled Items 2-2 Buzzer 8-6 C Cassette Loading Paper 2-27 Paper Size and Media Type 8-13 CD-ROM 2-2 Changing Langu
Index Time Zone 8-116 Default 8-30 Collate/Offset 8-43 Color Selection (Copy) 8-34 Continuous Scan 8-31 Density 8-38 EcoPrint 8-44 E-mail Subject/Body 8-41 File Format 8-37 File Name 8-40 Original Image 8-32 Original Orientation 8-30 Scan Resolution 8-33 TIFF Print 8-45 XPS FitTo Page 8-46, 8-47 Zoom 8-39 Default Gateway Appendix-27 Default Screen 8-5 Density Adjustment Copy 3-8 Send 5-16 Destination 8-129 Adding 8-129 Adding a Group 8-135 Choosing by One-Touch Key 3-41 Choosing from the Address Book 3-39
Index Available Status 7-2 Canceling 3-45, 7-19 Checking History 7-8 Checking Status 7-2 Pause and Resumption 7-19 Sending the Job Log History 7-13 Job Accounting 11-13 Managing the Copier/Printer Counts 1119 Restricting the Use of the Machine 1120 Job Finish Notice 5-28 Copy 4-15 Send 5-28 K KPDL Appendix-28 L Label Appendix-18 LAN Cable Connecting 2-5 Legal Information xxx Login 3-2, 11-5 Logout 3-2, 11-5 Low Power Mode 2-9 M Management 11-1 Job Accounting 11-13 User Login Administration 11-2 Monotype
Index Copy 4-2 Custom 8-8 Setup 8-8 Size Selection 4-2, 5-2 P Paper Appropriate Paper Appendix-14 Auto Selection 8-23 Before Loading 2-26 Cassette 8-13 Custom 8-11 Default Paper Source 8-22 Loading Envelopes 2-31 Loading in the Cassettes 2-27 Loading in the Multi Purpose Tray 2-29 Multi Purpose Tray 8-15 Setup 8-8 Size and Media 2-35, Appendix-11 Special Paper 8-24, Appendix-16 Specifications Appendix-13 Weight 8-17 Paper Feeder Appendix-2 Paper Jam 10-11 Document Processor 10-15 Paper Selection 4-4 Casse
Index Sending Settings 8-69 Quick Setup Registration 8-69 Sending Size Selection 5-4 Sending to Different Types of Destinations (Multi Sending) 3-42 Separator Cleaning 9-4, 9-6 Setting Date and Time 2-11 Setup AppleTalk 8-149 Copy 8-61 Date/Timer 8-113 NetWare 8-147 Network 8-145 Printer 8-78 Send 8-69 Sharpness adjustment Appendix-21 Sleep 2-9 Slit Glass Cleaning 9-3 SMTP Appendix-29 Solving Malfunctions 10-2 Specifications Document Processor Appendix-26 Environmental Specifications Appendix-26 Machine Ap
Index Index-6
A2
Rev. 1.0 2010.