FS-C2026MFP/FS-C2126MFP OPERATION GUIDE
Introduction Thank you for your purchase of FS-C2026MFP/FS-C2126MFP. This Operation Guide is intended to help you operate the machine correctly, perform routine maintenance and take a simple troubleshooting action as necessary, so that you can always use the machine in good condition. Please read this Operation Guide before you start using the machine. We recommend the use of our own brand supplies. We will not be liable for any damage caused by the use of third party supplies in this machine.
Safety Conventions in This Guide The sections of this guide and parts of the machine marked with symbols are safety warnings meant to protect the user, other individuals and surrounding objects, and ensure correct and safe usage of the machine. The symbols and their meanings are indicated below. WARNING: Indicates that serious injury or even death may result from insufficient attention to or incorrect compliance with the related points.
Contents Contents Quick Guide . . . . . . . . . . . . . . . . . . . . . . . . . . . . . . . . . . . . . . . . . . . . . . . . . . . . . . . . . . . . . . . . . . v Menu Map. . . . . . . . . . . . . . . . . . . . . . . . . . . . . . . . . . . . . . . . . . . . . . . . . . . . . . . . . . . . . . . . . . -viii Environment . . . . . . . . . . . . . . . . . . . . . . . . . . . . . . . . . . . . . . . . . . . . . . . . . . . . . . . . . . . . . . . . . xx Laser Safety (Europe) . . . . . . . . . . . . . . . . .
Contents Job Finish Notice . . . . . . . . . . . . . . . . . . . . . . . . . . . . . . . . . . . . . . . . . . . . . . . . . . . . . . . . . . . File Name Entry . . . . . . . . . . . . . . . . . . . . . . . . . . . . . . . . . . . . . . . . . . . . . . . . . . . . . . . . . . . . Print Override . . . . . . . . . . . . . . . . . . . . . . . . . . . . . . . . . . . . . . . . . . . . . . . . . . . . . . . . . . . . . . Color Selection . . . . . . . . . . . . . . . . . . . . . . . . . . . . . . . . . . . . . .
Contents Date/Timer . . . . . . . . . . . . . . . . . . . . . . . . . . . . . . . . . . . . . . . . . . . . . . . . . . . . . . . . . . . . . . . Editing Destination (Address Book/Adding One-Touch Keys) . . . . . . . . . . . . . . . . . . . . . . . . Restarting the System . . . . . . . . . . . . . . . . . . . . . . . . . . . . . . . . . . . . . . . . . . . . . . . . . . . . . . Network Setup . . . . . . . . . . . . . . . . . . . . . . . . . . . . . . . . . . . . . . . . . . . . . . . . . . . . . . . . . . .
Quick Guide Be sure to read Legal and Safety Information before using this machine. Administrator tasks To make copies It copies. To print Simply press the Start key to make copies. You can also fine tune the copy settings by changing the paper size, adjusting the density, etc. What you want to do Copying with specific settings It prints. You can print via a network or print a PDF file directly from USB memory.
Administrator tasks To send documents It sends. You can send scanned images via a network. Or, you can also store scanned images in USB memory. What you want to do Send to Folder (SMB) Send as E-mail Saving Documents to USB Memory Connecting Cables Plug the USB memory Network Setup (LAN Cable Connection) Create a shared folder on the destination computer. ...3-28 Setup Editing Destination (Address Book/Adding One-Touch Keys)...8-129 Place the originals on the platen Operation Sending ...
Administrator tasks To send a FAX (Only on products with the fax function installed) As well as sending a FAX via the telephone lines, you can also send a FAX via a network. It faxes. NOTE: For more information on setting up and sending a FAX, refer to the FAX Operation Guide. What you want to do Send a FAX FAX directly from a computer Connect the modular cord for the telephone line to this machine.
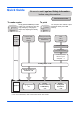
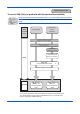
Menu Map Copy key Send key Function Menu key Function Menu key Paper Selection (page 4-4) Collate (page 3-17) Duplex (page 3-14) Zoom (page 3-11) Combine (page 4-11) Original Size (page 4-2) Orig.
Document Box key Document Box key Subject Entry (page 5-22) JobFinish Notice (page 5-28) FAX Resolution (FAX OPERATION GUIDE) FAX Delayed TX (FAX OPERATION GUIDE) FAX Direct TX (FAX OPERATION GUIDE) FAX RX Polling (FAX OPERATION GUIDE) Density (page 5-16) Duplex (page 5-8) FTP Encrypted TX (page 5-30) File Separation (page 5-14) Sharpness (page 5-23) Backgrnd Density (page 5-24) Sub Address Box (FAX OPERATION GUIDE) Polling Box (FAX OPERATION GUIDE) Job Box (page 6-8) USB Mem
Function Menu key Other than USB printing JPEG/TIFF Print (page 6-3) XPS FitTo Page (page 6-4) File Name Entry (page 4-17) JobFinish Notice (page 4-15) Print Override (page 4-18) Del. after Print Function Menu key Scan to Polling Box Function Menu key Scan to USB Memory Original Size (FAX OPERATION GUIDE) Original Image (FAX OPERATION GUIDE) FAX Resolution (FAX OPERATION GUIDE) Orig.
Status/Job Cancel key System Menu/Counter key JobFinish Notice (page 5-28) Density (page 5-16) Duplex (page 5-8) Sharpness (page 5-23) Backgrnd Density (page 5-24) Print Job Status (page 7-2) Send Job Status (page 7-2) Store Job Status (page 7-2) Scheduled Job (page 7-8) Print Job Log (page 7-8) Send Job Log (page 7-8) Store Job Log (page 7-8) Scanner (page 7-20) Printer (page 7-20) FAX (page 7-21) Toner Status (page 3-46) Paper Status (page 3-46) USB Memory (page 7-21)
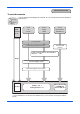
FAX (page 8-98) CancelBefore Send (page 8-98) FAX RX Result JobFinish Notice (FAX OPERATION GUIDE) Do Not Attach Attach SendImage Job Log History Auto Sending (page 7-13) Send History (page 7-13) Destination (page 7-13) Subject (page 7-13) SSFC Log Subject Counter Printed Pages by Function by Paper Size (page 11-33) Full Color (page 11-33) Black & White (page 11-33) Scanned Pages System Network Setting (page 11-33) TCP/IP Settings (page 8-145) IPv4 Setting (page 8-146) IPv6 Setti
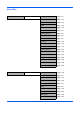
IPP Security (page 8-157) HTTP Security (page 8-158) LDAP Security (page 8-160) Host Name I/F Block Set. User/Job Account LAN Interface (page 8-145) USB Host (page 8-164) USB Device (page 8-165) Option I/F 1 (page 8-167) Option I/F 2 (page 8-167) Security Level (page 8-169) Restart (page 8-144) Op Functions (page 8-170) User Login Set. User Login (page 11-3) Local User List (page 11-3) IC Card Settings Key Login Password Login Job Account.Set. Group Auth.
(FAX OPERATION GUIDE) Counter Reset (page 11-27) Each Job Account (page 11-28) Account.
Custom PaperSize Cassette 2 Set. Cassette 3 Set. MP Tray Set. Cassette 1 Size (page 8-13) Cassette 1 Type (page 8-13) Cassette 2 Size (page 8-13) Cassette 2 Type (page 8-13) Cassette 3 Size (page 8-13) Cassette 3 Type (page 8-13) MP Tray Size (page 8-15) MP Tray Type (page 8-15) Media Type Set. Media for Auto (page 8-17) Full Color (page 8-23) Black & White (page 8-23) Def. PaperSource (page 8-22) SpcialPaper Act.
Sleep Timer Sleep Level Function Default xvi (page 8-121) Quick Recovery (page 8-122) Energy Saver (page 8-122) PanelReset Timer (page 8-125) Auto Err. Clear (page 8-118) Auto Panel Reset (page 8-124) Unusable Time (page 8-126) Color Selection (page 8-34) Scan Resolution (page 8-33) FAX Resolution (FAX OPERATION GUIDE) Original Image (page 8-32) Density (page 8-38) Zoom (page 8-39) Collate (page 8-43) Orig.
XPS FitTo Page Detail Setting Copy 2 in 1 Layout (page 8-48) 4 in 1 Layout (page 8-49) Border Line (page 8-51) Orig. Binding (page 8-52) Finish. Binding (page 8-54) Image Quality (page 8-55) Color TIFF Comp. (page 8-56) PDF/A (page 8-57) Login Operation (page 8-59) RAM Disk Setting (page 8-60) Photo Processing (page 8-61) Paper Selection (page 8-62) AutoPaperSe lect. (page 8-63) Auto % Priority (page 8-64) DP Read Action (page 8-65) Select Key Set.
Send Duplex (page 8-83) Copies (page 8-84) Orientation (page 8-86) Gloss Mode (page 8-87) Wide A4 (page 8-88) FormFeed TimeOut (page 8-88) LF Action (page 8-89) CR Action (page 8-90) Print Offset (page 8-91) Paper Feed Mode (page 8-92) Select Key Set. Destination Check Left (page 8-69) Right (page 8-69) Check beforeSend (page 8-71) Check New Dest.
Adjust/Maint. Copy Denst. Adj. Send/Box Density Auto (page 8-100) Manual (page 8-100) Auto (page 8-101) Manual (page 8-101) AutoColor Correct (page 8-102) Color Calibration (page 8-103) Color Regist. Normal Detail Correct.
Environment The service environmental conditions are as follows: • Temperature: 50 to 90.5 °F (10 to 32.5 °C) • Humidity: 15 to 80 % However, adverse environmental conditions may affect the image quality. Avoid the following locations when selecting a site for the machine. • Avoid locations near a window or with exposure to direct sunlight. • Avoid locations with vibrations. • Avoid locations with drastic temperature fluctuations. • Avoid locations with direct exposure to hot or cold air.
Cautions when handling consumables CAUTION Do not attempt to incinerate the toner container or the waste toner box. Dangerous sparks may cause burns. Keep the toner container and the waste toner box out of the reach of children. If toner happens to spill from the toner container or the waste toner box, avoid inhalation and ingestion, as well as contact with your eyes and skin. • If you do happen to inhale toner, move to a place with fresh air and gargle thoroughly with a large amount of water.
Other precautions Return the exhausted toner container and waste toner box to your dealer or service representative. The collected toner container and waste toner box will be recycled or disposed in accordance with the relevant regulations. Store the machine while avoiding exposure to direct sunlight. Store the machine in a place where the temperature stays below 40ºC while avoiding sharp changes of temperature and humidity.
Laser Safety (Europe) Laser radiation could be hazardous to the human body. For this reason, laser radiation emitted inside this machine is hermetically sealed within the protective housing and external cover. In the normal operation of the product by user, no radiation can leak from the machine. This machine is classified as Class 1 laser product under IEC 60825. Caution: Performance of procedures other than those specified in this manual may result in hazardous radiation exposure.
SAFETY OF LASER BEAM (USA) 1. Safety of laser beam This machine has been certified by the manufacturer to Class 1 level under the radiation performance standards established by the U.S.DHHS (Department of Health and Human Services) in 1968. This indicates that the product is safe to use during normal operation and maintenance. The laser optical system, enclosed in a protective housing and sealed within the external covers, never permits the laser beam to escape. 2.
3. Optical unit When checking the optical unit, avoid direct exposure to the laser beam, which is invisible. Shown at below is the label located on the cover of the optical unit. 仮 仮 4. Maintenance For safety of the service personnel, follow the maintenance instructions in the other section of this manual.
Safety Instructions Regarding the Disconnection of Power (USA) Caution: The power plug is the main isolation device! Other switches on the equipment are only functional switches and are not suitable for isolating the equipment from the power source. Attention: Le débranchement de la fiche secteur est le seul moyen de mettre l’appareil hors tension. Les interrupteurs sur l’appareil ne sont que des interrupteurs de fonctionnement: ils ne mettent pas l’appareil hors tension.
Warranty (USA) FS-C2026MFP/FS-C2126MFP MULTIFUNCTIONAL PRODUCT LIMITED WARRANTY Kyocera Mita America, Inc. and Kyocera Mita Canada, Ltd. (both referred to as “Kyocera”) warrant the Customer’s new Multifunctional Product (referred to as “MFP”), and the new accessories installed with the initial installation of the MFP, against any defects in material and workmanship for a period of one (1) year, or 100,000 copies/prints from date of installation, whichever first occurs.
Legal Restriction on Copying/Scanning • It may be prohibited to copy/scan copyrighted material without permission of the copyright owner. • Copying/Scanning the following items is prohibited and may be penalized by low. It may not be limited to these items. Do not knowingly copy/scan the items that are not to be copied/ scanned. Paper money Bank note Securities Stamp Passport Certificate • Local laws and regulations may prohibit or restrict copying/scanning of other items not mentioned above.
Legal and Safety Information Please read this information before using your machine. This chapter provides information on the following topics. • • • • • • • • Legal Information..........................................................xxx Regarding Trade Names ............................................. xxxi Energy Saving Control Function................................. xxxv Automatic 2-Sided Copy Function .............................. xxxv Paper Recycling ..............................................
Legal Information Copying or other reproduction of all or part of this guide without the prior written consent of Kyocera Mita Corporation is prohibited.
Regarding Trade Names • PRESCRIBE and ECOSYS are trademarks of Kyocera Corporation. • KPDL is a trademark of Kyocera Corporation. • Microsoft, MS-DOS, Windows and Internet Explorer are registered trademarks of Microsoft Corporation in the U.S.A. and/or other countries. • Windows Me, Windows XP, Windows Vista and Windows 7 are trademarks of Microsoft Corporation. • PCL is a trademark of Hewlett-Packard Company.
GPL Firmware of this machine is using in part the GPL applied codes (www.fsf.org/copyleft/gpl.html). Please access “http://www.kyoceramita.com/gpl” for more information on how to make GPL applied codes available. Open SSLeay License Copyright (c) 1998-2006 The OpenSSL Project. All rights reserved.
Original SSLeay License Copyright (C) 1995-1998 Eric Young (eay@cryptsoft.com) All rights reserved. This package is an SSL implementation written by Eric Young (eay@cryptsoft.com). The implementation was written so as to conform with Netscapes SSL. This library is free for commercial and non-commercial use as long as the following conditions are aheared to. The following conditions apply to all code found in this distribution, be it the RC4, RSA, lhash, DES, etc., code; not just the SSL code.
Monotype Imaging License Agreement 1 Software shall mean the digitally encoded, machine readable, scalable outline data as encoded in a special format as well as the UFST Software. 2 You agree to accept a non-exclusive license to use the Software to reproduce and display weights, styles and versions of letters, numerals, characters and symbols (Typefaces) solely for your own customary business or personal purposes at the address stated on the registration card you return to Monotype Imaging.
Energy Saving Control Function The device comes equipped with a Sleep Mode where copier, printer and fax functions remain in a waiting state but power consumption is still reduced to a minimum when there is no activity with the device within a set amount of time. Sleep The device automatically enters Sleep when 1 minute has passed since the device was last used. Automatic authentication does not take place in sleep mode or energy saver mode.
About this Operation Guide This Operation Guide contains the following chapters. Chapter 1 - Part Names Identifies machine parts and operation panel keys. Chapter 2 - Preparation before Use Explains adding paper, placing originals, connecting the machine, and necessary configurations before first use. Chapter 3 - Basic Operation Describes the procedures for basic copying, printing and scanning. Chapter 4 - Copying Functions Describes the functions you can use when copying.
Conventions in This Guide The following conventions are used depending on the nature of the description. Convention Description Example Bold Indicates the operation panel keys or a computer screen. Press the Start key. [Regular] Indicates a selection item on the Message Display. Select [System]. Italic Indicates a message displayed on the Message Display. Ready to copy is displayed. Used to emphasize a key word, phrase or references to additional information.
xxxviii
1 Part Names This chapter identifies the machine parts and operation panel keys. • • Operation Panel............................................................ 1-2 Machine ........................................................................
Part Names Operation Panel Displays the System Menu/Counter menu screen, where you can check the system settings and counters. Displays the Document Box screen, where you can operate the document box and USB memory. Displays the Status screen, where you can check the status, print a status report, and pause or cancel the job in process. Displays the Address Book screen, where you can add, edit and delete destinations. Calls the previous destination. Also used to enter a pause when entering a FAX number.
Part Names 1 Clears entered numbers and characters. Resets settings and displays the basic screen. Used to select a menu item, move the cursor when entering characters, change a value, etc. Turns the machine on/off. Also used to put it into or recover it from sleep mode. Selects the chosen item or finalizes the entered value. Lit when the machine's main power is on. Displays the function menu for copy, print, transmission and document box. Ends operation (logs out) on the Administration screen.
Part Names Machine 1 2 3 6 4 5 7 1 Operation Panel 2 Top Cover (Top Tray) 3 Paper Stopper 4 MP (Multi-Purpose) Tray 5 Paper Cassette 6 USB Memory Slot 7 Main Power Switch 8 9 10 11 12 13 8 Black Toner Container (K) 9 Magenta Toner Container (M) 10 Cyan Toner Container (C) 11 Yellow Toner Container (Y) 12 Waste Toner Cover 13 Waste Toner Box 1-4
Part Names 1 14 15 16 14 Paper Transfer Unit 15 Paper Ramp 16 Duplex Unit 25 17 18 19 20 21 22 26 23 24 17 LINE connector* 18 TEL connector* 19 Network Interface Connector 20 Network Indicators 21 Network Interface Connector * Only on products with the fax function installed 1-5
Part Names 22 USB Memory Slot 23 Right Cover 24 Power Cord Connector 25 Rear Cover 26 Rear Cover Lever 27 28 30 29 31 32 33 35 34 27 Original Width Guides 28 Document Processor Cover 29 Opening Handle 30 Original Table 31 Original Stopper 32 Original Eject Table 33 Top Cover Lever 34 Handles for moving 35 Platen 1-6
2 Preparation before Use This chapter explains the preparations before using this equipment for the first time as well as the procedures for loading papers and originals. • • • • • • • • • • • • • • Check bundled items .................................................... 2-2 Determining the Connection Method and Preparing Cables ...... 2-3 Connecting Cables ....................................................... 2-5 Power On/Off................................................................
Preparation before Use Check bundled items Check that the following items have been bundled. • Quick Installation Guide • CD-ROM (Product Library) • CD-ROM (TWAIN compatible application) Documents Contained in the Included CD-ROM The following documents are contained in the included CD-ROM (Product Library). Refer to them as necessary.
Preparation before Use Determining the Connection Method and Preparing Cables Check the method to connect the equipment to a PC or network, and prepare the necessary cables. 2 Connection Example Determine the method to connect the equipment to a PC or network by referring to the illustration below.
Preparation before Use Preparing Necessary Cables The following interfaces are available to connect the equipment to a PC. Prepare the necessary cables according to the interface you use. Available Standard Interfaces Function Interface Necessary Cable Printer/Scanner /Network FAX* Network interface LAN (10Base-T or 100Base-TX, Shielded) Printer/TWAIN Scanning/WIA Scanning USB interface USB2.0 compatible cable (Hi-Speed USB compliant, Max. 5.
Preparation before Use Connecting Cables Follow the steps below to connect cables to the machine. 1 If the machine power is on, press the power key on the operation panel and make sure that the message displayed and memory light are off. Then, press the main power switch to turn off the power. 2 Connect the machine to the PC or your network device. When using the network interface, remove the cap. 3 Remove the Power Cord Connector Cover.
Preparation before Use 4 Connect one end of the supplied power cable to the machine and the other end to a power outlet. IMPORTANT: Only use the power cable that comes with the machine. 5 Replace the Power Cord Connector Cover. 6 Turn the main power switch on. The machine begins to warm up. 7 When connecting the network cable, configure the network. For details, refer to Network Setup (LAN Cable Connection) on page 2-14.
Preparation before Use Power On/Off Power On 2 When the main power indicator is lit... Press the Power key. When the main power indicator is off... Turn the main power switch on. Off On IMPORTANT: When turning off the main power switch, do not turn on the main power switch again immediately. Wait more than 5 seconds, and then turn on the main power switch. Power Off Before turning off the main power switch, press the Power key on the operation panel to off.
Preparation before Use In case of not using the machine for a extended period of time CAUTION: If this machine will be left unused for an extended period (e.g. overnight), turn it off at the main power switch. If the machine will not be used for an even longer period of time (e.g. vacation), remove the power plug from the outlet as a safety precaution. If using the products equipped with the fax function, note that turning the machine off at the main power switch disables fax transmission and reception.
Preparation before Use Sleep and Auto Sleep Sleep To enter Sleep, press the Power key. Message Display and all indicators on the operation panel will go out to save a maximum amount of power except the Main Power indicator. This status is referred to as Sleep. If print data is received during Sleep, the print job is performed while the Message Display remains unlit. If you are using the products equipped with the fax function, received fax data is printed out while the operation panel also remains unlit.
Preparation before Use Switching the Language for Display [Language] Select the language displayed on the Message Display. Use the procedure below to select the language. 1 Press the System Menu/Counter key on the main unit operation panel. When you are performing user management and have not logged in, a login screen will appear. Then, enter the user ID and password to log in. Login User Name: L b ******************** Login Password: NOTE: Refer to Character Entry Method on [ Login ] Sys.
Preparation before Use Setting Date and Time Follow the steps below to set the local date and time at the place of installation. When you send an E-mail using the transmission function, the date and time as set here will be printed in the header of the E-mail message. Set the date, time and time difference from GMT of the region where the machine is used. NOTE: Be sure to set the time difference before setting the date and time. 1 Turn on the main power switch.
Preparation before Use Login User Name: L b ******************** Login Password: [ Menu ] [ Login 6 A login screen will appear. Then, enter the user ID and password to log in. 7 Press the OK key. The Date Setting menu appears. 8 Press the U or V key to select [Time Zone]. 9 Press the OK key. Time Zone appears.
Preparation before Use Date Setting: a b 1 Date/Time ********************* 2 Date Format 3 Time Zone [ Exit ] Date/Time: a b Year Month Day 01 01 2010 (Time Zone:Tokyo ) 14 Press the U or V key to select [Date/Time]. 2 15 Press the OK key. Date/Time appears. 16 Press the Y or Z key to move the cursor position, press the U or V key to enter year, month and day, and then press the OK key. Date/Time: a b Hour Min.
Preparation before Use Network Setup (LAN Cable Connection) The machine is equipped with network interface, which is compatible with network protocols such as TCP/IP (IPv4), TCP/IP (IPv6), IPX/SPX, NetBEUI, IPSec, and AppleTalk. It enables network printing on the Windows, Macintosh, UNIX, NetWare and other platforms. This section explains the TCP/IP (IPv4) Setup procedures. For other network settings, refer to Network Setup on page 8-145.
Preparation before Use System: a b 1 Network Setting ********************* 2 I/F Block Set. 3 Security Level [ Exit ] Network Setting: a b 1 TCP/IP Settings ********************* 2 NetWare 3 AppleTalk [ Exit ] TCP/IP Settings: a b 1 TCP/IP ********************* 2 IPv4 Setting 3 IPv6 Setting [ Exit ] TCP/IP: a b 1 Off 2 *On ********************* 3 In the System menu, press the U or V key to select [Network Setting]. 2 4 Press the OK key. The Network Setting menu appears.
Preparation before Use IPv4 Setting: a b 1 DHCP ********************* 2 Bonjour 3 Auto-IP [ Exit ] 11 Press the OK key. The IPv4 Setting menu appears. 12 Press the U or V key to select [DHCP]. a b DHCP: 1 Off 2 *On ********************* 13 Press the OK key. DHCP appears. 14 Press the U or V key to select [On] and then press the OK key. Completed. is displayed and the screen returns to the IPv4 Setting menu.
Preparation before Use Use the procedure below to setup the TCP/IP (IPv4) setting. 1 Press the System Menu/Counter key on the main unit operation panel. 2 When you are performing user management and have not logged in, a login screen will appear. Then, enter the user ID and password to log in. Login User Name: L b ******************** Login Password: NOTE: Refer to Character Entry Method on [ Login ] Sys. Menu/Count.: a b 1 Report 2 Counter 3 System ********************* [ Exit ] Administrator only.
Preparation before Use TCP/IP Settings: a b 1 TCP/IP ********************* 2 IPv4 Setting 3 IPv6 Setting [ Exit ] a b TCP/IP: 1 Off 2 *On ********************* 6 Press the OK key. The TCP/IP Settings menu appears. 7 Press the U or V key to select [TCP/IP]. 8 Press the OK key. TCP/IP appears. 9 Press the U or V key to select [On] and then press the OK key. Completed. is displayed and the screen returns to the TCP/IP Settings menu.
Preparation before Use Completed. is displayed and the screen returns to the IPv4 Setting menu. IPv4 Setting: a b 1 DHCP 2 Bonjour ********************* 3 Auto-IP [ Exit ] a b Bonjour: 1 *Off ********************* 2 On 15 Press the U or V key to select [Bonjour]. 2 16 Press the OK key. Bonjour appears. 17 Press the U or V key to select [Off] and then press the OK key. Completed. is displayed and the screen returns to the IPv4 Setting menu.
Preparation before Use IP Address: a b 22 Press the OK key. IP Address appears. 123.145.167.189 23 Use the arrow keys to enter the IP address. Press the Y or Z key to move the cursor position horizontally. Press the U or V key or the numeric keys to enter the IP Address. Each 3 digits can be set between 000 and 255. b IP Address: 123.145.167.189 IMPORTANT: When the DHCP Setting (page 2-14) is [On], the current IP address is displayed and cannot be changed.
Preparation before Use IMPORTANT: When the DHCP Setting (page 2-14) is [On], the current Subnet Mask is displayed and cannot be changed. When setting an Subnet Mask, set the DHCP Setting (page 2-14) to Off. 28 Press the OK key. Completed. is displayed and the screen returns to the IPv4 Setting menu. IPv4 Setting: a b 3 IP Address 4 Subnet Mask 5 Default Gateway ********************* [ Exit ] Default Gateway: a b 29 Press the U or V key to select [Default Gateway]. 30 Press the OK key.
Preparation before Use Installing Software Install appropriate software on your PC from the included Product Library CD-ROM (Product Library) if you want to use the printer function of this machine or perform TWAIN / WIA transmission or FAX transmission from your PC. NOTE: Installation on Windows XP, Windows 2000, Server 2003, Windows Vista and Windows 7 must be done by a user logged on with administrator privileges. Plug and Play is disabled on this device when in Sleep Mode.
Preparation before Use COMMAND CENTER (Settings for E-mail) COMMAND CENTER is a tool used for tasks such as verifying the operating status of the machine and changing the settings for security, network printing, E-mail transmission and advanced networking. NOTE: Here, information on the FAX settings has been omitted. For more information on using the FAX, refer to the FAX Operation Guide. FAX functions available only on products with the fax function installed.
Preparation before Use Sending E-mail Specifying the SMTP settings allows you to send images loaded onto this machine as E-mail attachments. To use this function, this machine must be connected to a mail server using the SMTP protocol. Before sending images loaded onto this machine as E-mail attachments, check the following: • • • • The network environment used to connect this machine to the mail server A full-time connection via a LAN is recommended.
Preparation before Use 2 Enter the correct settings in each field. The settings to be specified in the SMTP settings screen are shown below. Item SMTP Protocol Enables or disables SMTP protocol. To use E-mail, this protocol must be enabled. SMTP Port Number Set the SMTP Port Number or use the SMTP default port 25. SMTP Server Name Enter the SMTP server IP address or its name. The maximum length of the SMTP server name and IP address is 64 characters.
Preparation before Use Loading Paper Paper can be loaded standardly in the cassette and the multi purpose tray. A paper feeder is also available as an option (refer to Optional Equipment on Appendix-2). Before Loading Paper When you open a new package of paper, fan the sheets to separate them slightly prior to loading in the following steps. 1 Bend the whole set of sheets to swell them in the middle. 2 Hold the stack at both ends and stretch it while keeping the entire stack swelled.
Preparation before Use Loading Paper in the Cassettes The standard cassette will each hold plain paper, recycled paper or color paper. The standard cassette holds up to 250 sheets of A4 or smaller plain paper (80 g/m2). The following paper sizes are supported: Legal, Oficio II, Letter, Executive, Statement, A4, B5, A5, A6, Folio, 16K and Envelope C5. IMPORTANT: • You should not use inkjet printer paper or any paper with a special surface coating. (Such papers may cause paper jams or other faults.
Preparation before Use NOTE: Paper sizes are marked on the cassette. 4 Adjust the paper length guide to the paper size required. 5 Load the paper in the cassette. Ensure the side to be printed is facing up and the paper is not folded, curled, or damaged. IMPORTANT: Do not load paper above the triangle mark located on the width guide. • Before loading the paper, be sure that it is not curled or folded. Paper that is curled or folded may cause paper jams.
Preparation before Use 6 Insert the paper cassette into the slot in the machine. Push it straight in as far as it will go. 2 There is a paper gauge on the right side of the front of the paper cassette to indicate the remaining paper supply. When paper is exhausted, the pointer will go down to the level of (empty). NOTE: If the machine will not be used for a prolonged period, protect all paper from humidity by removing it from the cassettes and sealing it in the paper storage bag.
Preparation before Use 1 Pull the MP tray towards you until it stops. 2 Pull out the subtray. 3 Adjust the position of the paper guides on the MP tray. Standard paper sizes are marked on the MP tray or Manual Feed tray. For standard paper sizes, slide the paper guides to the corresponding mark. 4 Align the paper with the paper guides and insert as far as it will go. IMPORTANT: Keep the side that was closest the package seal facing up. Curled paper must be uncurled before use.
Preparation before Use 2 ○ × Loading Envelopes or Hagaki 5 envelopes may be loaded in the multi purpose tray. Acceptable envelope and Hagaki sizes are as follows.
Preparation before Use 1 Pull the MP tray towards you until it stops. 2 Pull out the subtray. 3 Adjust the position of the paper guides on the MP tray. Standard paper sizes are marked on the MP tray or Manual Feed tray. For standard paper sizes, slide the paper guides to the corresponding mark. 4 Align the paper with the paper guides and insert as far as it will go. 5 For landscape form envelopes, close the flap.
Preparation before Use When you load envelopes or cardstock in the multi purpose tray Load envelope with the print side facing up. 2 Close the flap. Cardstock (Hagaki) Portrait Landscape Return postcard form form (Oufuku Hagaki) envelopes envelopes NOTE: Use unfolded return postcard (Oufuku Hagaki). IMPORTANT: How to load envelopes (orientation and facing) will differ depending on the type of envelope.
Preparation before Use Paper stopper Align the paper stopper to the desired paper size. • For A4 or Letter size paper : Align with position c. • For A4 or Letter size paper : Align with position d.
Preparation before Use Specifying Paper Size and Media The default paper size setting for cassette, for multi purpose tray and for the optional paper feeder (cassettes 2 and 3) is [Letter], and the default media type setting is [Plain]. If the paper used in the cassette will be fixed and the paper is a standard size, set the Paper Size Dial as explained in Loading Paper in the Cassettes on page 2-27, and set the paper type as explained in Specifying Paper Size and Media Type for the Cassettes on page 2-35.
Preparation before Use Sys. Menu/Count.: a b 5 User Property 6 Common Settings ********************* 7 Copy [ Exit ] Common Settings: a b 1 Language ********************* 2 Default Screen 3 Sound [ Exit ] Orig./Paper Set.: a b 1 Custom Orig.Size ********************* 2 Def. Orig. Size 3 Custom PaperSize [ Exit ] 2 In the Sys. Menu/Count. menu, press the U or V key to select [Common Settings]. 3 Press the OK key. The Common Settings menu appears. 4 Press the U or V key to select [Orig./Paper Set.].
Preparation before Use Cassette 1 Size: a b 1 *Lettera ********************* 2 Legala 3 Statementa 9 Press the OK key. Cassette 1 Size appears. 2 10 Press the U or V key to select the desired paper size and then press the OK key. Completed. is displayed and the screen returns to the Cassette 1 Set. menu. Cassette 1 Set.: a b 1 Cassette 1 Size 2 Cassette 1 Type ********************* [ Exit 11 Press the U or V key to select [Cassette 1 Type].
Preparation before Use Specifying Paper Size and Media Type for the Multi Purpose Tray To fix the type of paper to be used in the multi purpose tray, specify the paper size.When using other than a plain paper, specify the media type. Item Paper Size Standard Sizes Select from the standard sizes. Selectable paper sizes are as follows.
Preparation before Use Sys. Menu/Count.: a b 5 User Property 6 Common Settings ********************* 7 Copy [ Exit ] Common Settings: a b 1 Language ********************* 2 Default Screen 3 Sound [ Exit ] Orig./Paper Set.: a b 1 Custom Orig.Size ********************* 2 Def. Orig. Size 3 Custom PaperSize [ Exit ] MP Tray Set.: a b 1 MP Tray Size ********************* 2 MP Tray Type [ Exit 2 In the Sys. Menu/Count. menu, press the U or V key to select [Common Settings]. 2 3 Press the OK key.
Preparation before Use If you select [Size Entry], use the numeric keys to enter the Y (vertical) size and press the OK key, and then enter the X (horizontal) size and press the OK key. Size Entry(Y): D b (5.83 - 14.02) x ***11.49*" Completed. is displayed and the screen returns to the MP Tray Set. menu. MP Tray Set.: a b 1 MP Tray Size 2 MP Tray Type ********************* [ Exit 11 Press the U or V key to select [MP Tray Type].
Preparation before Use Loading Originals Follow the steps below to load originals for copying, sending or storing. 2 Placing Originals on the Platen You may place books or magazines on the platen in addition to ordinary sheet originals. 1 Open the document processor. NOTE: Before opening the document processor, be sure that there are no originals left on the original table or on the original eject table.
Preparation before Use Loading Originals in the Document Processor The document processor automatically scans each sheet of multiple originals. Both sides of two-sided originals are scanned. Part Names of the Document Processor (1) (2) (3) (4) (5) (1) Document processor cover (2) Original width guides (3) Original table (4) Original eject table (5) Original stopper (6) Opening handle (6) Originals Supported by the Document Processor The document processor supports the following types of originals.
Preparation before Use How to Load Originals IMPORTANT: Before loading originals, be sure that there are no originals left on the original eject table. Originals left on the original eject table may cause the new originals to jam. 1 Adjust the original width guides to fit the originals. 2 Place the originals. Put the side to be scanned (or the first side of two-sided originals) face-up. Slide the leading edge into the document processor as far as it will go.
Preparation before Use Installing Printer Driver Ensure the machine is plugged in and connected to the PC before installing the printer driver from the CD-ROM. Installing Printer Driver in Windows If you are connecting this machine to a Windows PC, follow the next steps to install the printer driver. The example shows you how to connect your machine to a Windows 7 PC. NOTE: In Windows 7, Windows Vista, Windows XP and Windows 2000, you must be logged on with administrator privileges.
Preparation before Use 4 Click Install Software. The software install wizard starts up. From this point, the procedure differs depending on your version of Windows and your connection method. Proceed to the correct procedure for your connection type. • • Express Mode Custom Mode Express Mode In Express Mode, the installer automatically detects the machine when it is turned on. Use Express Mode for standard connection methods. 1 In the installation method selection window, select Express Mode.
Preparation before Use 4 A window appears in which you can check the settings. Check the settings carefully and then click Install. NOTE: If the Windows security window appears, click Install this driver software anyway. 5 A message appears saying that the printer has been installed successfully. Click Finish to exit the printer installation wizard and return the CD-ROM main menu.
Preparation before Use Installing Printer Driver in Macintosh 1 Turn on the machne and the Macintosh. 2 Insert the included CD-ROM (Product Library) into the CD-ROM drive. 3 Double-click the CD-ROM icon. 4 Double-click either OS X 10.2 and 10.3 Only, OS X 10.4 Only or OS X 10.4 or higher depending on your Mac OS version. 5 Double-click Kyocera OS X vx.x. 6 The printer driver installation program starts up.
Preparation before Use 7 Choose Select Destination, Installation Type and then install the printer driver as directed by the instructions in the installation software. In addition to Easy Install, the Installation Type options include Custom Install, which allows you to specify the components to be installed. IMPORTANT: In the Authenticate screen, enter the name and password used to log in to the operating system. This completes the printer driver installation. Next, specify the print settings.
Preparation before Use 10 Click the IP icon for an IP connection or the AppleTalk icon for an AppleTalk connection and then enter the IP address and printer name. 2 11 Select the options available for the machine and click Continue 12 The selected machine is added. This completes the printer setup procedure.
Preparation before Use Setting TWAIN Driver Register this machine to the TWAIN Driver. 1 Select Start button of the Windows display, All Programs, Kyocera and then TWAIN Driver Setting. NOTE: You can also add the machine to a PC when selecting Start of the Windows display, Control Panel and then Kyocera TWAIN. 2 Click Add. 3 Enter the machine name in the Name field. 4 Click T next to the Model field and select this machine from the list.
Preparation before Use 6 Click User Authentication Settings. If user login administration is invalid, go to Step 8. 7 Select the checkbox beside Authentication, enter Login User Name (up to 64 characters) and Password (up to 64 characters) and then click OK. 8 Click OK. 9 The machine is registered to the PC and the machine name and model name are displayed in the Scanner List field. NOTE: Click Delete to delete the added machine. Click Edit to change names.
Preparation before Use 2 Select the same name as this machine from WIA Drivers, and press the Properties. NOTE: If Windows Security and User Account Control are displayed, no trouble should be found with operation after installing the driver and software we have provided. Continue installation. 3 Select the checkbox beside Authentication, enter Login User Name (up to 64 characters) and Password (up to 64 characters) and then click OK. If user login administration is invalid, go to Step 4.