3 Basic Operation This chapter explains the following operations. • • • • • • • • • • • • Login/Logout................................................................. 3-2 One-Touch Keys and Program Keys ............................ 3-3 Message Display .......................................................... 3-5 Copying ........................................................................ 3-6 Printing - Printing from Applications ........................... 3-19 Sending ...............................
Basic Operation Login/Logout If user login administration is enabled, it is necessary to enter the login user name and password to use the machine. NOTE: You will be unable to log in if you forget your login user name or login password. In this event, log in with administrator privileges and change your login user name or login password. By default, one of each default user with machine administrator rights and administrator privileges is already stored. The following are the default user's properties.
Basic Operation One-Touch Keys and Program Keys The one-touch keys and program keys on the operation panel are described below. One-Touch Key Register destinations to one-touch keys, and you can enter the desired destination by pressing the applicable one-touch key. For registering a destination to a one-touch key, refer to Adding a Destination on One-touch Key on page 8-141.
Basic Operation Registering Settings After making settings, press and hold the one of the Program 1 to 4 keys where you want to register the settings for 3 seconds. The current settings are registered to the selected program key. Registered. z Program 1 Changing and Deleting Settings Menu: a b 1 Overwrite ********************* 2 Delete 1 Press and hold the one of the Program 1 to 4 keys where the settings you want to change/delete are registered for 3 seconds. Menu appears.
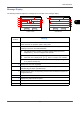
Basic Operation Message Display The following examples explain the messages and icons used on the message display. 1 Ready to copy. Copies: 1 A4q sA A4a 100% [ Zoom ] [ ] 2 3 4 5 1 6 7 Copier Screen Ready to send. Dest.: 1 p :sally@kyoceramitaN 1-sided [ Duplex ] [ ] Send Screen Reference number Meaning 1 Indicates the current status of the machine. Also displays the title of the current menu whenever the operation panel is being used.
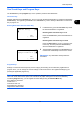
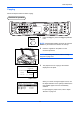
Basic Operation Copying Follow the steps as below for basic copying. Part that is operated 1 Press the Copy key when the Copy key/indicator is off. NOTE: If the Message Display is turned off, press the Power key and wait for the machine to warm up. 2 Place the originals on the platen or in the document processor. NOTE: For loading instructions, refer to Loading Originals on page 2-41. 3 Ready to copy.
Basic Operation 4 Press the Auto Color key, Full Color key or Black& White key to select the color mode. NOTE: The setting of each key (color mode) is as follows. Auto Color key: Automatically detects whether the original is color or black & white and scans accordingly. Full Color key: Scans all documents in full color. Black& White key: Scans all documents in black & white. 5 Use the numeric keys to enter the copy quantity. Specify the desired number up to 999.
Basic Operation Adjusting Density Use this procedure to adjust the density when copying. Density Adjustment Option Description Manual Adjust density using 7 levels. Auto Optimum density is selected according to the density of the original. Part that is operated NOTE: You may choose Auto mode as the default setting (refer to Density on page 8-38). The procedure for adjusting the density of copies is explained below.
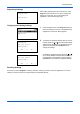
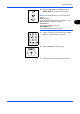
Basic Operation Manual: a b 1 u Lighter -3 ********************* 2 v Lighter -2 3 w Lighter -1 5 Press the OK key. When [Manual] is selected, Manual appears. Press the U or V key to select your desired density and then press the OK key. Completed. is displayed and the screen returns to the basic screen. 6 Press the Start key. Copying begins. Selecting Image Quality Select image quality suited to the type of original. Part that is operated The table below shows the quality options.
Basic Operation Original Image: a b 1 *Text+Photo ********************* 2 Photo 3 Text 3 Press the OK key. Original Image appears. 4 Press the U or V key to select the image quality suited to the type of original. 5 Press the OK key. Completed. is displayed and the screen returns to the basic screen. 6 Press the Start key. Copying begins.
Basic Operation Zoom Copying Adjust the magnification to reduce or enlarge the original image. The following zoom options are available. Part that is operated 3 Auto Zoom Legal: 129 % Automatically reduces or enlarges the original image suitably to the selected paper size. Letter-R A5 A4: 141 % Statement-R: 64 % A6: 70 % Zoom Entry Manually reduces or enlarges the original image in 1% increments between 25% and 400%. 25 % 400 % Standard Zoom Reduces or enlarges at preset magnifications.
Basic Operation The following magnifications are available. Model Inch Models Metric Models Metric Models (Asia Pacific) Zoom Level (OriginalCopy) Standard 100%, 400% (Max.), 200%, 129% (Statement >> Letter), 78% (Legal >> Letter), 64% (Letter >> Statement), 50%, 25% (Min.) Other 141% (A5 >> A4), 115% (B5 >> A4), 90% (Folio >> A4), 86% (A4 >> B5), 70% (A4 >> A5) Standard 100%, 400% (Max.), 200%, 141% (A5 >> A4), 115% (B5 >> A4), 86% (A4 >> B5), 70% (A4 >> A5), 50%, 25% (Min.
Basic Operation To use fixed magnifications, select [Standard Zoom] and press the OK key. Standard Zoom appears. Press the U or V key to select the desired magnification. If you select [Other] and press the OK key, you can select from additional magnifications. Standard Zoom: a b 1 400% ********************* 2 200% 3 141% A5 >> A4 Zoom Entry: (25 - 400) *****200% To enter a magnification, select [Zoom Entry] and press the OK key. Zoom Entry appears. Use the numeric keys to enter the any magnification.
Basic Operation Duplex Copying Produce two-sided copies. The following duplex options are available. You can also create single-sided copies from two-sided originals or originals with facing pages such as books. The following modes are available. Part that is operated One-sided to Two-sided 5 4 5 Produces two-sided copies from one-sided originals. In case of an odd number of originals, the back side of the last copy will be blank.
Basic Operation • • Binding Left/Right: Images on the second sides are not rotated. Binding Top: Images on the second sides are rotated 180°. Two-sided to Two-sided 5 5 3 3 Produces two-sided copies from two-sided originals. The optional document processor is required. 4 4 1 1 2 2 Original Copy NOTE: The paper sizes supported in Two-sided to Two-sided are Legal, Letter, Oficio II, Executive, A4, B5, A5 and Folio. The procedure for using two-sided/duplex copying is explained below.
Basic Operation After pressing the OK key, select the binding edge of the finished copies and the original setting orientation. Orig.Orientation: a b 1 *c Top Edge Top ********************* 2 d Top Edge left If you select [2-sided>>1-sided], press [Detail] (the Right Select key) and you can select the binding edge of the original and the original setting orientation. Orig.
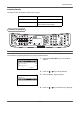
Basic Operation 6 Press the Start key. Copying begins. Scanning... Job No.: Page(s): [ Cancel ] If the original is placed on the platen, replace it with the next one before pressing the Start key. 9999 1 If there is no next original, press [End Scan] (the Right Select key). Copying begins. Set original and press Start key. Job No.: 9999 Page(s): 3 [ Cancel ] [End Scan] Collate Copying Part that is operated The machine can collate at the same time as it copies.
Basic Operation The procedure for using collate copying is explained below. Function Menu: a b 1 Paper Selection g ********************* 2 Collate T 3 Duplex T [ Exit ] Collate: a b 1 Off 2 *On ********************* 1 Press the Function Menu key. Function Menu appears. 2 Press the U or V key to select [Collate]. 3 Press the OK key. Collate appears. 4 Press the U or V key to select [Off] or [On]. 5 Press the OK key. Completed. is displayed and the screen returns to the basic screen.
Basic Operation Printing - Printing from Applications Follow the steps below to print documents from applications. NOTE: To print the document from applications, install the printer driver on your computer from the supplied CD-ROM (Product Library). 1 Create a document using an application. 2 Click File and select Print in the application. The Print dialog box appears. 3 Click the T button next to the Name field and select this machine from the list.
Basic Operation 6 Select the Basic tab and click Page Size button to select the paper size. To print on the special paper such as thick paper or transparency, click the Media Type menu and select the media type. 7 Click Source and select the paper source. NOTE: If you choose Auto Select, papers are supplied automatically from the paper source loaded with paper of optimum size and type. To print on special paper such as envelope or thick paper, place it on the multi purpose tray and select MP Tray.
Basic Operation Sending This machine can send a scanned image as an attachment to an E-mail message or to a PC linked to the network. In order to do this, it is necessary to register the sender and destination (recipient) address on the network. A network environment which enables the machine to connect to a mail server is required. It is recommended that a Local Area Network (LAN) be used to assist with transmission speed and security issues.
Basic Operation Send as E-mail Sends a scanned original image as an E-mail attachment. Part that is operated NOTE: • You must have a network environment in which this machine can connect to a mail server. It is recommended that the machine be used in an environment in which it can connect to the mail server at any time over a LAN. • Access the COMMAND CENTER beforehand and specify the settings required for sending e-mail. For details, see COMMAND CENTER (Settings for E-mail) on page 2-23.
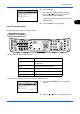
Basic Operation 4 Enter the destination e-mail address. NOTE: Destination can be specified using the Address Book or the One-touch keys. Refer to Specifying Destination on page 3-39. 5 Ready to send. Dest.: 1 p :sally@kyoceramitaN 1-sided 300x300dpi [ Duplex ] [ScanRes.] Press the OK key. Completed. is displayed and the screen returns to the basic screen.
Basic Operation Send to Folder (SMB)/Send to Folder (FTP) Stores a scanned original image file in the specified shared folder of any PC. Stores a scanned original image in a folder of an FTP server. Part that is operated NOTE: • Refer to Help of your operating system for details on how to share a folder. • Be sure that SMB Protocol or FTP in the COMMAND CENTER is On. For details, refer to the KYOCERA COMMAND CENTER Operation Guide.
Basic Operation Host Name(SMB): Osaka SD* [ ABC Text A b ] Host Name(FTP): Osaka SD* ABC Text ABC Text Login User Name: Maury* [ ABC Text Login Password: OOOOOOOOOOO* [ 4 Enter the host name. NOTE: Destination can be specified using the A b ] A b Path: SD3\report* [ Press the OK key. Host Name(SMB) or Host Name(FTP) appears. Address Book or the One-touch keys. Refer to Specifying Destination on page 3-39. or [ 3 ABC Text 5 Press the OK key. Path appears. 6 Enter the path name.
Basic Operation NOTE: If the screen for confirming the entry of a new destination (page 8-73) is set to [On], screens to confirm the entered host name and path name appear. Enter the same host name and path name again and press the OK key on their respective screens. Data to be entered are as follows. NOTE: You will be unable to send the data if you forget your login user name or login password. Contact your administrator and check your login user name or login password.
Basic Operation Dest. Confirm.: a b p Morgan@kyoceramitaN b 0667640000 ********************* b 0667741234 [ Exit ] 12 Press [Yes] (the Left Select key). This makes a connection with the entered destination. 3 If the connection is successful, Connected. is displayed on the screen. Press [OK] (the Right Select key). Completed. is displayed and the screen returns to the basic screen. If the connection failed, Cannot connect. is displayed. Press [OK] (the Right Select key).
Basic Operation Preparation for sending a document to a PC Check the information that needs to be set on the machine and create a folder to receive the document on your computer. Screens of Windows 7 are used in the following explanation. The details of the screens will vary in other versions of Windows. NOTE: Log on to Windows with administrator privileges. Checking what to enter for [Host Name] Check the name of the destination computer.
Basic Operation 2 At the Command Prompt, enter "net config workstation" and then click Enter. Screen example: user name "james.smith" and domain name "ABCDNET" 3 Creating a Shared Folder Create a shared folder to receive the document in the destination computer. NOTE: If there is a workgroup in System Properties, configure the settings below to limit folder access to a specific user or group. 1 From the Start menu, select Control Panel, Appearance and Personalization, and then Folder Options.
Basic Operation 1 Create a folder on the local disk (C). NOTE: For example, create a folder with the name "scannerdata" on the local disk (C). 2 Right-click the scannerdata folder and click Share and Advanced sharing. Click the Advanced Sharing button. The scannerdata Properties dialog box appears. In Windows XP, right-click the scannerdata folder and select Sharing and Security... (or Sharing). 3 Select the Share this folder checkbox and click the Permissions button.
Basic Operation 5 Enter the user name in the text box and click the OK button. 3 6 Select the entered user, select the Change and Read permissions, and click the OK button. In Windows XP, go to step 8. NOTE: "Everyone" gives sharing permission to everyone on the network. To strengthen security, it is recommended that you select Everyone and remove the Read permission checkmark. 7 Click the OK button in the Advanced Sharing screen to close the screen.
Basic Operation 9 Proceed in the same way as in step 5 to add a user to Group or user names. 10 Select the added user, select the Modify and Read & execute permissions, and then click the OK button. Checking the [Path] Check the share name of the shared folder that will be the destination for the document. 1 Enter "\\pc4050" in "Program and File Search" in the Start menu. The Search Results screen opens.
Basic Operation the right of the third backslash (\) should be entered in Path. (Example: scannerdata) NOTE: You can also specify a subfolder in the shared folder as the location where data is to be sent. In this case, "share name\name of folder in the shared folder" should be entered for the Path. In the example window above, "scannerdata\projectA" is the Path. Configuring Windows Firewall (for Windows 7) Permit sharing of files and printers and set the port used for SMB transmission.
Basic Operation Adding a port 1 From the Start menu, select Control Panel, System and Security, and Check firewall status. 2 Click Advanced settings. 3 Click Inbound Rules. 4 Click New Rule. 5 Select Port and click Next.
Basic Operation 6 Select TCP, select Specific local ports, enter "139", and click Next. 3 7 Select Allow the connection and click Next. 8 Make sure all checkboxes are selected and click Next.
Basic Operation 9 Enter "Scan to SMB" in "Name" and click Finish. NOTE: In Windows XP or Windows Vista, follow the procedure below to set the port. 1 From the Start menu, select Control Panel, System and Security (or Security Center), and then Check Firewall Status) (or Windows Firewall). If the User Account Control dialog box appears, click the Continue button. 2 Click the Exceptions tab and then the Add port... button. 3 Specify Add a Port settings. Enter any name in "Name" (example: Scan to SMB).
Basic Operation Confirm Destination Screen If the screen for confirming the destination before transmission (page 8-73) is set to [On], Check through the all destination and press [Next]. appears when the Start key is pressed. Part that is operated 3 Use the procedure below to operate the Confirm Destination screen. Destination List: a b p Morgan@kyoceramitaN ********************* b 0667640000 b 0667741234 [ Cancel ] [ Next ] 1 Press the U or V key to check all destinations.
Basic Operation 3 3-38 Place the original on the platen or in the document processor, and press the Start key. Transmission starts.
Basic Operation Specifying Destination When specifying destination, choose from the Address Book or use the One-touch keys. Part that is operated 3 Choosing from the Address Book Select a destination registered in the Address Book. Select Addr Book: a b t Address Book ********************* t Ext Address Book 1 In the basic screen for sending, press the Address Book key. The Select Addr Book menu appears. NOTE: If extended address book is not registered, [Ext Address Book] is not displayed.
Basic Operation Destination Search Destinations registered in the Address Book can be searched. The procedures for using the different search modes are explained below. Search in Address Book Menu: a b 1 Select ********************* 2 Detail 3 Search(Name) Address Book: a b k Design ********************* l Fiala l Maury [ Menu ] A b Search(Name): ma* S [ ABC Text 1 In Address Book, press [Menu] (the Right Select key). Menu appears.
Basic Operation Menu: a b 1 Select 2 Detail 3 Search ********************* Search(Name): ma* S [ Menu ] [ A b ABC Text 2 Press the U or V key to select [Search] and then press the OK key. A search screen appears. 3 Enter the characters you want to search. If you press [Menu] (the Right Select key) and then the OK key, Search by appears where you can specify the search key and match condition. Select the desired item for each and then press the OK key.
Basic Operation Sending to Different Types of Destinations (Multi Sending) You can specify destinations that combine e-mail addresses, folders (SMB or FTP) and fax numbers (Only on products with the fax function installed). This is referred to as Multi Sending. This is useful for sending to different types of destination (e-mail addresses, folders, etc.) in a single operation. No.
Basic Operation Scanning document data Scan the document data stored in the Custom Box of the machine. The following procedure is an example for scan operation using the TWAIN Driver. Operate the WIA Drivers in the same manner. 1 Activate the TWAIN compatible application. 2 Select the machine using the application and display the TWAIN dialog box. NOTE: For selecting the machine, see the Operation Guide or Help for each application software.
Basic Operation 6 Select the document data to be scanned from Document List. Enter the document data name in the Search [Name] to find the data having the same document data name or the document data name with the same beginning. 仮 7 Click the Detail button to display the selected document data. When the document data includes multiple pages, select the checkbox beside the pages you want to scan. The selected pages will be scanned.
Basic Operation Canceling Jobs Follow the steps below to cancel any print or send job being executed. Canceling Jobs You can also cancel jobs by pressing the Stop key.
Basic Operation Checking Remaining Toner and Paper You can check the remaining amount of toner and that of paper in each feeder cassette. Checking Remaining Toner Status: a b 1 Print Job Status ********************* 2 Send Job Status 3 Store Job Status [ Pause ] Toner Status: b 1 Press the Status/Job Cancel key. The Status menu appears. 2 Press the U or V key to select [Toner Status]. 3 Press the OK key. Toner Status appears. The remaining amount of toner is displayed in one of 10 levels.