
User's Manual
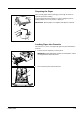
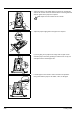
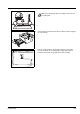


Table Of Contents
- Included Guides
- 1 Machine Parts
- 2 Loading Paper
- 3 Connecting and Printing
- 4 Maintenance
- 5 Troubleshooting
- 6 Option
- 7 Appendix

3-4 Connecting and Printing
Printing from Application Software
The steps required to print a document created with an application are
explained below. You can select the printing paper size.
1 Load the paper required into the paper cassette.
2 From the application File menu, select Print. The Print dialog box
appears.
3 Click the drop-down list of printer names. All the installed printers are
listed. Click the name of the printer.
4 Use Number of copies to enter the number of copies required. Up to
999 copies can be printed.For Microsoft Word, we recommend that
you click Options and specify Use printer settings for the Default
tray.
5 To start printing, click OK.
Manual Duplex (For FS-1100 only)
Use Manual Duplex if you require printing on both sides of the paper.
The even pages are printed first and then reloaded to print the odd
pages. An instruction sheet is available to assist with loading the sheets
in the correct orientation and order.
1 Ensure Cassette 1 is selected as the Source in the Print Properties
dialog box.
2 Select Print on Both Sides (Manual Duplex).
Select Gutter Settings on Layout tab and enter the value required for
each edge. Gutter width range is 5.00 to 25.4mm (0.20 to 1.00 inch).
Select Reduce Image to fit as required.
Select Print on both side (manual duplex), and use the Duplex
Details option to select Flip on Long Edge for binding on the long
edge or Flip on Short Edge for binding on the short edge. Select
Print manual duplex instructions to receive the reloading
instructions.
Note You can also select the various settings by clicking
Properties to open the Properties dialog box.
Note Ensure Print Instructions is selected to receive the
instruction sheet. Continue to use the sheet until you are familiar
with this feature.