Tablet User Manual For Mac OS X 10.
ENGLISH I. General Information 1. Overview Welcome to the world of tablet and digital pen! You will be able to discover how easy it is to control your MAC using a wireless digital pen instead of a mouse. The function of the digital pen is able to draw a line very thin, thick, and light or dark (called pressure sensitivity).
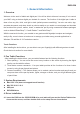
ENGLISH 4.2: Follow the on-screen instructions for driver installation. 4.3: Insert the user name and password to proceed. 4.4: After completing the driver installation, restart your MAC.
ENGLISH 5. Hardware Installation Connect the tablet USB interface to your MAC after you have finished the driver installation and restarted the system: Install the driver first before plugging the tablet into your MAC. 6. Verifying Hardware and Driver Functions Follow these steps to verify the tablet is installed properly: The LED light on the tablet is the main indicator for hardware operation and depending on your pen tablet model may be located at a different place than shown in the above diagram.
ENGLISH 6.6. When you put your fingertip(s) on the working area of tablet, the LED will stay on. The tablet will automatically detect your fingertip(s) or the digital pen, you can only use one method while working. The digital pen is set as the priority input tool when the gesture function is enabled. 7. Usage Tips 7.1. Wake up the digital mouse from standby mode If the digital mouse does not react after you do not use it for a while, press the left button to “wake” it up from the standby mode. 7.2.
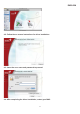
ENGLISH 1.2. Double Click the˰Genius˱folder, and you will find the folder ˰ioTablet˱inside. 1.3. Click ˰ioCentre˱, then you are able to see the Info tab show on the screen, you are ready to edit and setup the functions.
ENGLISH You can also try the following path for setting: 1.4: Find the˰System Preferences˱shown on your desktop. 1.5: After you enter ˰System Preferences˱, find the ˰Genius Tablet˱on the platform, then double click to activate it.
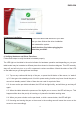
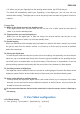
ENGLISH 2. The Info Tab The Info tab displays all the available functions below in six groups. B A Product Name C (A). Device: The device section shows the model name connected to your MAC. When you have different models available, simply choose the model you’re using now from the drop down menu and you are ready to edit and setup that device. (B). Language: You may choose a different language in the language section. (C).
ENGLISH brush functions. Product Name Product Name (3). Mouse: Program your cordless mouse for different applications. (This function only supports “tablet with mouse” model) (4). Mapping: A. This mapping function will sync with your monitor(s) when connected. It also can work with more than two monitors.
ENGLISH B. Define the tablet’s working area and mapping range on your LCD screen. It also supports screen size switching (4:3/16:9) function. Product Name Product Name (5). Pen Test: Test the pen pressure levels. You can choose “Pen Mode” or “Mouse Mode” in this section.
ENGLISH Product Name (6).Function setting: Change the colors and sizes of the text shown on the screen. Product Name Product Name (7). About: Information about the software and driver.
ENGLISH any command to your tablet or pen by clicking this button without worrying about changing any other settings. The “Default” button shown in each section is an independent setting; you can tap on the Default button to return to the default setting without worrying about changing any other settings. 3.
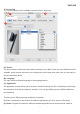
ENGLISH 4. The Tablet Section: Product Name Product Name 4.1: For Hot Cells: All the available hot cells (software keys) are shown on the left side of the menu. Total 29 keys are able to re-assign according your needs. Click any of them to find out the icon and location. You may re-program any software keys from the drop down menu on the right side. The application group including: Default: default function. Click: Use the tablet for single click, double click function.
ENGLISH Software bar: Product Name 5. Cordless mouse (This function only supports “tablet with mouse” model) All the programmable mouse buttons are shown on the left side of the menu. Click on any of them to find out the location and the programmable setting. You may re-program any button from the drop down menu below the tablet picture. You may choose any: Click Group: Click, double click or mode switch, etc. Office Group: Copy, Save, Undo, Zoom in/ Zoom out etc.
ENGLISH Product Name Product Name Product Name 14
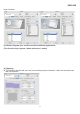
ENGLISH 6. The Mapping Section: 6.1: Monitor mapping area: Product Name If you are using two monitors, there are four modes to define the mapping area. 6.1.1. AlI (Full Area): Select the largest possible mapping area depends on the monitor size. 6.1.2. Part (Programmable Area): Allows you to define the dimensions for top, bottom, left and right. Define the size in each section. 6.1.3. Particular Monitor: Select monitor 1 or 2 for mapping. Click “Apply” to activate these mode changes.
ENGLISH Product Name 6.2: Tablet direction and Area 6.2.1: For setting up a tablet direction according to your design needs, go to ˰Tablet Information˱ →˰Direction˱, then choose the direction from the drop down menu, there are four levels available: 0° / 90° / 180° / 270°. 6.2.2: For working area adjustment, follow the path to choose full working area or part area: ˰Tablet Information˱→˰Area˱. You may also set up the area by typing in the number in Top/ Bottom, Left / Right then click the ˰Set˱button.
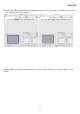
ENGLISH 6.3: Screen Ratio Switch: 6.3.1: To change the mapping ratio according to a different LCD screen, you have three options: Auto: Auto-detection and change the screen ratio 4:3: change the screen ratio from wide screen (16:9) to standard (4:3) 16:9: change from standard (4:3) to wide screen (16:9) 7.
ENGLISH 7.1: Pressure sensitivity test: There is a test area to see the thickness of a line at a certain pressure of the pen tip on the pad. To test the pressure sensitivity of your wireless pen, input any data on the left side of this menu, the pressure levels will show in the pressure area. You can also adjust the levels from soft to heavy according to your design needs. 7.2: Working Mode: The tablet offers Pen and Mouse mode according your design demands. 1.
ENGLISH 9.1: For Hot Cells: All the available hot cells (software keys) are shown on the drop down menu. Some gestures you can re-assign according to your needs. Click any of them to find out the icon and location. You may re-program any software keys or office function keys from the drop down menu on the right side. All the programmable groups include: Default: No function. You can set the gesture to not activate.
ENGLISH III. Storing the Digital pen and changing the Pen Battery & Tip 1. Storing the digital pen properly: To store the digital pen, make sure that the tip does not touch anything, and do not let the pen stand in a cup or penholder with the tip down. It is recommended to place the pen in a pen holder or store it with the pen tip pointing upward, or place it horizontally with the pen tip free of any other objects. 2.
ENGLISH IV. Common Problems and Solutions (1) Why does the cursor not move while moving the digital pen on the tablet after installation? Verify that the hardware functions properly, and check the tablet control panel (the Mac system is in the application of the pen tablet settingÆTablet setting) to verify that the tablet driver has been loaded. If the tablet does not appear, remove and re-install the driver.
ENGLISH You are cautioned that changes or modifications not expressly approved by the party responsible for compliance could void your authority to operate the equipment.