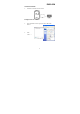
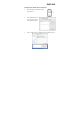
ENGLISH Hardware Installation 1. Install two AAA batteries in the mouse. Pairing Process in Vista and Windows XP SP2 1. Open the Windows control panel, then select “Bluetooth devices”. 2. Click “Add…..
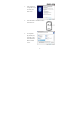
ENGLISH 3. Select “My device is setup and ready to be found”, then click “Next”. 4. Press and hold the “CONNECT” button under the mouse. 5. In “Peripherals (Keyboards, mice, joysticks)”, select Genius Bluetooth Mouse and click “Next”.
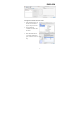
ENGLISH 6. Select “Don’t use a passkey” and click “Next”. 7. Windows will start to connect the Genius Bluetooth Mouse automatically. Press the finish button after the connection process is completed. Once the connection between the Genius Bluetooth Mouse and your computer is established, the connection will be kept permanently. That means the connection will re-establish automatically each time you run Windows.
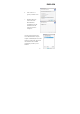
ENGLISH Pairing Process in Windows 7 1. Select the Bluetooth device icon and click the right mouse button to open the function list, then select “Add a Device”. 2. Press and hold the “CONNECT” button under the mouse. 3. Select Genius Bluetooth Mouse, and click “Next”. 4. Windows will start to connect the Genius Bluetooth Mouse automatically. Press the “Close” button after the connection process is completed.
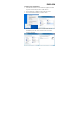
ENGLISH Pairing Process in Mac OS X 10.2.8 or later 1. Press and hold the “CONNECT” button under the mouse. 2. Click the Bluetooth icon on the task bar and select “Setup Bluetooth device”. 3. Click “Continue” when the “Bluetooth Setup Assistant” appears.
ENGLISH 4. Choose “Mouse” and press “Continue” to the next step. 5. When Bluetooth finds the “Genius Bluetooth Mouse”, please press “Continue” to the next step. 6. Click “Continue” when the “Passkey exchange with your mouse” appears. 7. The connection is now successful and you can use your Genius Bluetooth Mouse.
ENGLISH Pairing Process in Mac OS X 10.5 or later 1. Click the Bluetooth icon on the task bar and click the + sign to “Setup new device”. 2. Press and hold the “CONNECT” button under the mouse. 3. When Bluetooth finds the “Genius Bluetooth Mouse”, press “Continue” to the next step.
ENGLISH 4. When Mac connects with the Genius Bluetooth Mouse, press “Quit” and return to the Bluetooth setup screen. 5. The connection is now successful and you can use your Genius Bluetooth Mouse. Now you can use the Genius Bluetooth Mouse wirelessly with a Bluetooth enabled Apple computer. Afterwards, the connection of the Genius Bluetooth mouse will re-establish automatically each time Mac OS X runs. Software Installation (for 4D scrolling only) 1. Make sure the mouse is connected to the computer. 2.
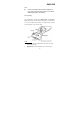
ENGLISH Note: Class 2 Laser Product. The last pointer is dangerous to eyes! Do not stare into the beam, and be sure to avoid any child using the pointer. (IEC 60825-1) Factory Setting Use “Switch Button” to switch from “Mouse mode” and “Presenter mode” for different functions. LED flash will show you which mode you are in now. When LED is “BLUE”, it is in Mouse mode and when LED is in “RED”, it is in Presenter mode. In Mouse mode: 1.
ENGLISH 3. 4. 5. Magic-Roller: Press the “Magic-Roller” to surf the Internet and Windows documents. Horizontal Scroll: Press the roller to the left and the cursor scrolls to the left; press the roller to the right and the cursor scrolls to the right. Switch Button: To switch between Mode-1 (Mouse) and Mode-2 (Presenter) function. LED indicator: If your battery power is low, the LED will brighten. When LED is “BLUE” it is in Mouse mode. In Presenter Mode: 1.
ENGLISH Horizontal Scroll: Press the roller to the right is F5 (like keyboard function) to use PowerPoint in your presentation. Press the roller to the left to ESC. Switch Button: To switch between Mode-1 (Mouse) and Mode-2 (Presenter) function. LED indicator: If your battery power is low, the LED will brighten. When LED is “Red” it is in Presenter mode. 4. 5.
ENGLISH If not in use for 30 minutes or longer, the Bluetooth Mouse will disconnect from your computer. Move or click any button on the Bluetooth Mouse for reconnection, it takes about six seconds for the mouse to start working normally. Note: Changes or modifications not expressly approved by the party responsible for compliance could void the user's authority to operate the equipment. (15.21) This device complies with part 15 of the FCC Rules.