ENGLISH EasyPen M406W User Manual For Windows 7/Vista/XP
ENGLISH *The driver may already be updated to a newer version before/after packaging. If your installation screen does not match the contents of this manual, you may need to download the driver, just refer to your software screen after installation. I. General Information 1.
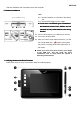
ENGLISH After the installation has completed, reboot the computer. 5. Hardware Installations Installations 5.1. Put the batteries into the back of the wireless tablet: 5.1.1. Put two batteries on each side of the battery slot. 5.1.2. Put the third battery into the middle.. ★ Do not mix or use different types of batteries at the same time such such as LILI-Ion, Alkaline, etc; etc; and remember do not put the batteries in the wrong direction. direction. 5.2. Connect the dongle to your USB port (as shown). 5.
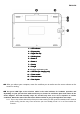
ENGLISH 1 — LED Indicator 2 — Express Key 3 — Digital Pen clip 4 — Working Area 5 — Button 2 6 — Button 1 7 — Pen tip 8 — Dongle Dongle 9 — Dongle and battery slot 10 — USB Port (f (for charging only) 11 — Power switch 12 — Resume button 13 — Pen clip slot 6.1. After you reboot your computer, move the cordless pen to make sure the cursor shown on the screen is moving. 6.2.
ENGLISH 6.2.2. Press any express key on the tablet to “ wake it up” if it has gone into sleep mode. A built-in power saving function may have forced the pen into sleep mode if it is not used after five minutes. 6.2.3. Turn the power on the wireless tablet, the LED will be lit briefly for three seconds, then will stay off, now the wireless tablet is in work mode. 6.2.4. When the wireless tablet detects the presence of the digital pen, the LED will stay on.
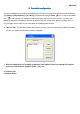
ENGLISH II. Pen tablet configuration You may configure the pen tablet by modifying the functions of the pen tip and the two barrel buttons. Tap [Start] > [All programs] > [io Tablet], and double-tap the [io Tablet ] icon, or tap on the tablet icon ( ) in the system tray, usually located at the lower right corner of the screen.
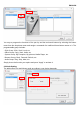
ENGLISH You may re-program the functions of the pen tip and the two-barrel buttons by selecting the button name from the drop down menu and assign a command of a traditional three-button mouse to it. The programmable group includes: - Click Group: Click, Scroll, Lock, etc. - Office Group: Copy, Save, Undo, etc. - System Group: My Computer, My pictures, Media Player, etc. - Browser Group: Back, Forward, Refresh, etc. - Audio Group: Play, Stop, Mute, etc.
ENGLISH 2.2.1. Pen Mode (Absolute mode): Use the pen to draw, point, click and sign as you wish. 2.2.2. Mouse Mode (Relative mode): Use the pen as a traditional mouse. 2.2.2.1 Cursor Speed Adjustment: In Mouse mode, you may move the cursor speed between slow and fast to adjust the speed.
ENGLISH 2.3 Pen Sensitivity Adjustment: The pen has 1024 pressure levels sensitivity for all kinds of shapes and thickness. Under either Pen Mode or Mouse Mode you can adjust pressure sensitivity. Move the slider in the sensitivity bar to adjust the levels. There is a test area to draw a line by pressing the pen tip on the tablet pad. Simply chose the function you require and press “Apply” to activate it. 2.4 Default: Tap on the Default button to return to the manufacturer settings. 3. Tablet 3.
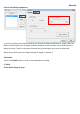
ENGLISH All the available express keys are shown on the left side of the menu. Click on any of them to find out the icon and location. You may re-program any express key from the drop down menu below the tablet picture. 3.2 For Tablet express keys definition: You may choose any: - Click Group: Click Scroll, Lock, etc. - Office Group: Copy, Save, Undo, etc. - System Group: My Computer, My pictures, Media Player, etc. - Browser Group: Back, Forward, Refresh, etc. - Audio Group: Play, Stop, Mute, etc.
ENGLISH 3.4 Tablet working area: There are two modes available to define the working area, click “Apply” to activate it. 3.4.1. AlI (Full Area): Select the largest possible working area depends on the tablet size. 3.4.2. Part (Programmable Area): Allows you to define the dimensions for top, bottom, left and right. Define the size by inputting any numbers in the blank bars. 3.5 Change Screen Ratio: This tablet can be adjusted according to your LCD display.
ENGLISH A. Set the tablet working area the same as the screen size by clicking “Auto Adjust”. B. Switch the screen ratio by selecting 4:3 (Standard) or 16:9 (Wide). Simply chose the function you require and press “Apply” to activate it. 3.6 Default: Tap on the Default button to return to the manufacturer settings. 3.7 Change the length of sleep time: Move the slider in the Sleep Time bar to adjust the length of time, click “Apply” to activate it. 3.
ENGLISH 3.9.2. 50% power 3.9.3.
ENGLISH 3.9.4. Charging the rechargeable batteries 3.10.
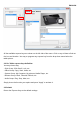
ENGLISH 4. Advance 4.1 Change interface language: You can click any column for the language of your preference. Click “Apply” to activate it.
ENGLISH 4.2 Disable OSD String: You can click on the column not showing the OSD string, click “Apply” to activate it. The OSD string shows the function of any express key or button on the pen barrel, which is normally at the lower middle of the screen.
ENGLISH III. Charging the rechargeable batteries 1. Charging the Wireless Tablet rechargeable batteries Test your wireless stylus pen in the tablet working area, if it doesn't work, use new batteries or charge the rechargeable batteries of the wireless tablet using the micro USB cable and plug it into your PC. When the green LED of the wireless tablet LED is blinking when the pen tip is hovering or in the working area above the tablet, the tablet will be out of power within 30 minutes.
ENGLISH V. Notes on Battery Usage When you use the battery, carefully read and strictly observe the Safety Instructions and the notes described below: Different battery types and surrounding temperatures may affect the battery performance. Avoid using batteries in extremely cold environments as low temperatures can shorten the battery life and reduce wireless device performance.
ENGLISH hardware is OK. If it doesn't work, you need to change the batteries or charge your rechargeable batteries using the micro USB cable and plug it into your PC. 3.2 After you changed new batteries for the tablet or charged your rechargeable batteries of the wireless tablet, if it is still not working, that means the hardware is at fault. ★ Note: DO NOT charge your tablet if you are not using rechargeable batteries, it may cause fire, explosion or burst.
FCC ID: FSUGMZJM FCC Compliance and Advisory Statement This device complies with Part 15 of the FCC rules. Operation is subject to the following two conditions:(1) this device may not cause harmful interference, and (2) this device must accept any interference received, including interference that may cause undesired operation. This equipment has been tested and found to comply with the limits for a Class B digital device, according to Part 15 of the FCC rules.