Preface About this manual This manual is designed to make using the Remote-850 Universal Remote Control as easy as possible. Information in this document has been carefully checked for accuracy and is subject to change without notice. Copyright © Copyright 2007 This document is protected by the international copyright law. No part of this publication may be reproduced by any means without the permission of KYE SYSTEMS CORP. The information provided from KYE SYSTEMS CORP. is believed to be accurate.
Table of Content About the Remote-850 Universal Remote Control.............................................. 3 Safety Notices.............................................................................................. 4 Battery Usage......................................................................................... 4 Device Safety ......................................................................................... 4 Main Features..................................................................
About the Remote-850 Universal Remote Control Designed with built-in pre-programmed codes and Infrared code learning, the Remote-850 is an epoch-making IR/RF universal remote control. The Remote-850 incorporates remote control for 16 devices in one powerfully integrated combination. Using the simple interface, you can control all of your household devices such as TVs, DVDs, VCDs, satellite dishes, and other devices through this single remote control.
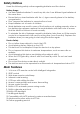
Safety Notices Heed the following safety notices regarding batteries and the device. Battery Usage • Use fresh alkaline batteries. To avoid any risk, don’t use different type batteries at the same time. • Ensure that you insert batteries with the +/- signs correctly place in the battery compartment. • Don’t expose the batteries to excessive fire or heat. • Keep batteries out of reach of children.
Specification Model Remote-850 Battery 1.5V 4 X AAA Alkaline Batteries (SUM-4) Dimensions ( W x H x L) 56 x 26 x 210 mm Weight (without batteries) 4.
Appearance and Functions 1. IR/RF — transmits infrared codes or radio signals. 2. LCD screen — displays soft keys and setup implementation. 3. System function operating area —middle scroll key selects and confirm setup items; left and right function keys provide dynamic display according to current function. 4. Backlight key — illuminates LEDs. 5. Mouse function operating area – directly replaces mouse function, including operation with left and right keys. 6.
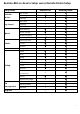
Remote-850 on-device Setup versus RemoteComm Setup Setup Items Activate device Pre-code Learning Debug Add key Key layout Edit key Move key Add Macro Macro Timer Modify Macro Modify Learning Macro Device & Key Delete Code Macro Language Date Time Beep Contrast LCD off Setting Glow Motion Password protection Reset Welcome page File management Upgrade Info Device data Backup Remote-850 RemoteComm - √ √ - √ √ √ √ √ √ √ √ √ √ √ √ √ √ √ √ √ √ √ √ √ √ √ √ √ √ √ √ √ √ √ √ √ √ √ √ √ √ √ √ √ 7
Setting up the Remote-850 This section explains how to set up the Remote-850, how to install the batteries, and how to configure the remote control codes. Installing the Batteries Four AAA size alkaline batteries are needed for the Remote-850. Ensure that you insert the batteries with the correct polarity and the +/- signs of the batteries match the +/- signs in the battery compartment. Close the battery compartment cover before using the Remote-850.
Guide on Major Setup Operations Start Using the Remote-850 Basic set-up: LCD contrast /time/date Main Manu->REMOTE SETUP->Setting-> Contrast: Use the scroll key to adjust the display contrast. Press [Done] to save your setting. Time: Use the scroll key to adjust the time in the format of 12 hrs or 24 hrs. Press [Done] to save your setting. Date: Use the scroll key to adjust the date. Press [Done] to save your setting .
Basic Operations The system function operating area (Scroll key and [Shift keys] ) includes all the general settings. Some functions will need to display a system reminder on screen, which require user’s confirmation. The following sections describe major operation functions and menus. (1) The LCD is controlled by the scroll key Shift keys .
Setup of the menu In the Main Menu, select “REMOTE SETUP” with the scroll key to enter Setup mode. There are four options in Setup mode:「Learning」, 「Delete」, 「Macro/Timer」, and 「Setting」. (1) Learning: enables the Remote-850 to learn remote control codes from the original remote control. (2) Delete: including 「Delete Device/key」, 「Delete Code」, and 「Delete Macro/Timer」.
(3) Macro/Timer: provides continuously functions setting, coupled with timer function, can be set up the delay time between every pre-determined step; besides, the Macro key is included in the Learning mode setup. (4) Setting: enables you to set non-operational functions including the following: 「Date」, 「Time」, 「Beep」, 「Contrast」, 「LCD off」, 「Glow」, 「Motion」, 「Connect」, and 「Reset」.
Setting Up the RF Dongle The RF dongle enables the Remote-850 to plug and play on your computer for quick setup operation. By using it, you only need to plug in the RF dongle into your USB port, the Remote-850 will be able to operate your MCE and control mouse If you are unable to link to your PC, follow the commands below (1) Press the key on the RF dongle. The LED begins flashing. (2) On the Main Remote-850, press 〔REMOTE SETUP〕 Setting Connect to set up the connection and begin matching codes.
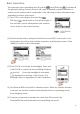
Code Setup This section explains how to use the Remote-850’s learning function to learn the infrared codes of another remote control. Read the following notes before proceeding to use the learning function. Note 1: The Remote-850's learning eye must be kept in a straight line with the transmitter of the original remote control in a distance of 2-4 inches (5-10cm).
(1) Access the Setup menu and select 「Learning」 to begin learning setup. (2) Press the scroll key to select the device you want to learn, then enter the device to learn each single key. Learning process for both soft and hard keys will be done and shown on the screen. Note: A key with “ ” mark means: it’s a hard key. (3) Aim the transceiver of your original remote control at the Learning Eye, keep a distance of 2-4 inch.
(7) Repeat steps (4) to (7) to continue learning codes for other keys. (8) After you have finished assigning codes with the learning function, press [Menu] to exit.
Deleting Items In the Delete menu you will see that the Device/key and Code are separated in content. The menu item Device/key represents the key itself. The menu item Code represents the code loaded in the key. If you delete a key, the code of the key (if any) will be deleted along with it. Deleting a code will remove the code but preserve its key. MCE/XBOX/PS2 is a default by the manufacturer. Therefore, you cannot delete this code/key.
(1) Select a device you wish to delete from the Main Menu. Press [Delete] to display a confirmation page. (2) Select “Yes” to remove this device, and back to Delete menu. Delete a single key (1) Press the scroll key to select the key you wish to delete from the device. (2) An “2“ appears on the right side of the key which means the key is ready to be deleted. (3) If you change your mind, just select the key again to cancel the “2“ sign. (4) Repeat steps (2) and (3) to select all key you want to delete.
Deleting Code Select Delete and then select 「Code」. You may choose to delete all codes for a group of device, or delete a single code for a single key. Delete all codes for a device (1) Select a device you wish to delete from the Main Menu. (2) Press [Delete] to display a confirmation page. Select “Yes” to remove all the codes for the device. Delete a code for a single key (1) Select the device you wish to delete from the Main Menu.
(7) Press [Back] to exit. Deleting Macro/Timer Under Delete function, select the Macro/Timer. Note: In this option you may delete Macro keys. If a Macro key includes a 「Timer」 setting, it will be removed as well. (1) Select「Macro/Timer」 (2) Select unwanted “Macro/Timer” keys. (3) Press [Delete] to delete the unwanted「Macro/Timer」keys (5) To delete other “Macro/Timer” keys, repeat steps (2) to (3).
Multifunctional Macro Key Setup This section describes how to set up Macro keys. About Macro Keys The Macro key function enables you to execute a series of commands with one key. You can replace complex steps by utilizing Macro keys. There are two types of Macro keys for the Remote-850. Their features are as follows: TYPE 1. Remote-850 provides max. 32 Macro keys setting option for you. Every Macro key can store up to 60 commands. Delay time can be set between each command TYPE 2.
TYPE 1.- Adding a Macro Key Note: ensure that all related codes of equipment to be used in the Macro have been successfully loaded before Macro setup. Access “REMOTE SETUP”, follow the steps to select the Macro key. 1.
Step 2: (TV power on) Select Power soft key in TV menu, or the TV Power hard key. Step 3: (TV input) Select Input soft key in TV menu, or the Input hard key, then return to the Main Menu and select the DVD option. Step 4: (DVD power on) Select DVD from the Main Menu. Step 5: (DVD power on & Delay 2 sec) Select Power soft key in DVD menu, or the Power hard key, then select [Delay] to set the delay time. Step 6: (DVD power on & delay 2 sec) Select 2 seconds.
Step 8: Macro setup can be completed by including more than two commands. The [Done] option appears in the lower right hand corner when returning to the Menu. Step 9: Press “Done” to save the settings and go to the timer setting page. Select “No” to go back to Main Macro Menu if no Timer is required. For Macro Timer setting procedure, please view P. 26 TYPE 2.- Learning Macro Key Settings Prepare the original remote control for the equipment before using the Learning Macro function.
Step 1: Go to the “Remote Setup” menu, select 「Macro/Timer」 , and then select 「Learning Macro」. Step 2: Select TV device. Step 3: Assign “L. Macro 01” as the Learning Macro key. Note: Only Soft key can be assigned as a Learning Macro key We suggest you to create a new key as a Learning Macro key. Ex. L. Macro 01. You are able to add keys by using RemoteComm software Step 4: Keep 5-10cm distance away between the original remote control and Remote-850 and put them in a line.
Step 5: Input all commands from every remote control into the “Learning Macro” in order. The default delay time is 1 sec (unchangeable) between two commands. It can store up to 16 commands. Step 6: Press Done to save the setting. After the Learning Macro setup sign appears next to finishes, a the appointed key. Macro Key Timer Settings Macro key timer settings provide you with customized transmission of Macro commands on the specific time and date (in other words, it’s a scheduled transmission function).
Step 2: Select Date to set a specified date. If select “Specific Date”, then set an exact date. Otherwise select specified weekday(s) Note: This Macro will not has timer function if you select OFF Step 3: After setting a specific date, press [Done] to save the setting and then press OK to return to the Macro menu. OR After setting specified weekday(s), press [Next] to save the setting and then press OK to return to the Macro menu.
2. Add a Timer after the Macro is set. Go to 「Macro/Timer」, then select「Set Timer」. Path: Remote Setup Macro/Timer 「Set Timer」 Select the Macro that requires a Timer, and set it according to above steps. : indicates a Macro is already set up. : indicates a Timer is already activated. 3. Turn off the timer after the timer is set. Select the Macro which will not need a Timer. select “Off” on the top to disable the Timer function. Press Next to save setting and then press OK to return to the Set timer page.
General Settings The General Settings menu contains message and function options, including: Time, Beep, Contrast, LCD off, Lit period, Motion, Connect, and Reset. To access the General Settings menu, please select Settings from Remote Setup. (See page 9 for the Date / Time /LCD contrast setup, and page 13 for the Connect setup) (1) Beep: Use the scroll key to adjust the beep volume to one of the following settings: Large (default), Middle, Small, and Off. Press [Done] to save your setting.
(3) Glow: to Use the scroll key adjust the backlight on timeout, from 0 (Off) to 60 sec in one-second intervals. The default value is 8 seconds. Press [Done] to save your setting. (4) Motion: to Use the scroll key enable (On) or disable (Off) the touch sensor function. The default is On. Press [Done] to save your setting. (5) Reset: Select Reset to reset the Remote-850 back to its factory default configuration. A confirmation message will appear. Press “Yes” to confirm the reset.
FEDERAL COMMUNICATIONS COMMISSION INTERFERENCE STATEMENT This equipment has been tested and found to comply with the limits for a Class B digital device, pursuant to Part 15 of the FCC Rules. These limits are designed to provide reasonable protection against harmful interference in a residential installation. This equipment generates, uses and can radiate radio frequency energy and, if not installed and used in accordance with the instructions, may cause harmful interference to radio communications.