MELLON FCC ID: STEEPEN EUT: TABLET KEY SYSTEMS CORP.
Reamed Using the Genius Tablet Software CONTENTS == Windows Software Installation Setup Modifications Tablet Installation Auto Cad /ADI Installation WINDOWS SOFTWARE INSTALLATION 1) Connect the Genius tablet to your computer. 2) Turn on your computer, Windows NT/95/3.x will start. 3) Insert the backup copy of your tablet diskette to floppy drive Select Run under the Start button ( for Windows NT4.x the Program Manager/File Manager ( for Windows NT3.5x or Windows 3. Type ( or ) and click OK.
Reamed 2) files copied to the WIN sub directory: ignitable (ini file 3) Some files about help and reamed copied to the destination directory (ie. 4) Some files necessary for tablet installation are copied to the "destination unidirectional” (ie. Ci\gtab31l\uninst uninstructed (tablet uninstall execute file) =3. Tablet Installation == The uninstall program will remove all tablet driver files. Uninstall tablet from Windows NT3.5x /Windows 3.x Sept 1. Select Genius Tablet group in Program Manager\Startup.
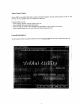
About Genius Tablet Genius Tablet is a graphics tablet used to create or reproduce diagrams, drawings, building layouts, maps, etc. You can then save these graphics into your computer for other uses. Using this tablet, you can: « Trace anything; pictures, drawings, photos, maps, etc.
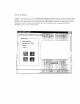
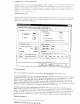
Use the Button Assignment Function The Button Assignment function allows you to change the function of the buttons on your pointing device. Select which pointing devise you are using from the Pointing Device list. This would allow you to change the functions assigned to the different buttons on that device. Simply pick the button in the Assignment area that corresponds to the pointing device button you wish to change and then select from the function list the function you wish to assign to that button.
Pressure For the Wizard Pad, you can use the Pressure folder in the Genius Tablet Control Panel. 1f you want to adjust the pressure, click "Customize in Pressure Mode area”, then you can customize the feel of your pressure-sensitive pen by setting these options. Threshold allows you to define how hard you have to press on the tip of the pen before it "reads" a "chick," and the function assigned to it is executed. The threshold can be set from 0 to 255.
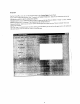
Test Your Buttons you can verity if all of our pointing device buttons are operating properly. Move your pointing device abler and press the buttons {and the pen tip, if using a stylus). You will see the position of the cursor on and the button in this area will flash to respond to the button presses, When your button’s In this are around f the screen in the Model Name earn you move your puck in the test area on the right side , vou will sce trails remain respond movement.
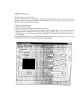
Adjust Working Area The default option is the Whole Tablet. When the Tracking Mode in the Basic folder is Absolute, you can define the racking area as your require. This is especially useful if you have a large tablet and you want to define a smaller active area so vou don't have 1 move the pointing device around so far on the tablet. In order to set the tracking area: 1) Choose the Preserve Aspect. 2) Click on the Define button. then the define area will um Grey.
Changing the Tablet Orientation normal upraising position (with Orientation allows vou ww rotate the Genius Tablet 99 degrees. Landscape is the @belt's inter.
EXHIBIT | FEDERAL COMMUNICATIONS COMMISSION NOTE This equipment has been tested and found to comply with the limits for a Class B digital device, pursuant to Part 15 of the FCC Rules. These limits are designed to provide reasonable protection. This equipment generates, uses and can radiated radio frequency energy and, if not installed and used in accordance with the instructions, may cause harmful interference to radio communications.