
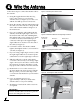
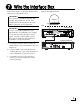
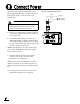
Installation Instructions


8
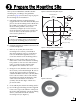
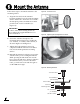
Follow these steps to mount the antenna to the
mounting surface.
a. Align the four holes in the antenna’s
baseplate with the four holes in the mounting
surface. Ensure the “Forward” arrow inside
the baseplate points toward the bow and is
parallel to the vessel’s centerline (see
Figure 14).
b. Secure the antenna’s baseplate to the
mounting surface using four 1/4"-20 bolts,
5/8" washers, 1" washers, and lock nuts, as
shown in Figure 15 and Figure 16.
c. Tighten the bolts until the foam seal is
compressed and the antenna’s four rubber
feet are bottomed against the mounting
surface.
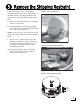
d. Reinstall the antenna’s radome to protect the
antenna while you’re working belowdecks.
While pressing the radome down onto the
base, secure the radome to the base using the
three #10-32 screws you removed earlier.
Later, you will remove the radome again to
set the LNB skew angle.
Figure 14: “Forward” Arrow
Be sure to insert the mounting bolts from
above and use the supplied hardware for a
secure installation.
IMPORTANT!
Figure 15: Tightening the Mounting Bolts from Above
1/4"-20 x 3" Bolt
1/4" Flat Washer
(5/8" diameter)
Antenna Base
Foam Seal
Mounting Surface
1/4" Flat Washer
(1" diameter)
1/4"-20 Lock Nut
Figure 16: Mounting Hardware
Mount the Antenna
6