
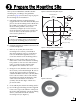
Installation Instructions

6
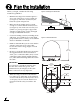
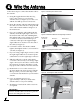
Follow these steps to connect the antenna cable to
the antenna.
a. Using the supplied 3 mm Allen hex key,
remove the connector cover from the
antenna’s base (see Figure 7). Save the cover
and the four M4 cap screws for later use.
b. Route the antenna cable belowdecks through
the cable access hole. Be sure to keep the end
of the cable with the rubber sealing boot at
the antenna site.
c. If you are routing the cable underneath the
antenna, attach the right-angle connector to
the antenna end of the cable. Hand-tighten,
then tighten with a 7/16" wrench for 1/4 turn
to ensure an electrical and weather-proof
connection. Then place the supplied right-
angle rubber boot extension onto the end of
the cable (see Figure 8).
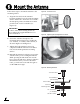
d. Connect the cable to the antenna. Hand-
tighten, then tighten with a 7/16" wrench for
1/4 turn (see Figure 9).
e. If you are using a right-angle connector, slide
the right-angle rubber boot extension up the
cable until it covers the right-angle connector.
f. Slide the rubber boot up the cable until it
covers the connector. If you are using a right-
angle connector, be sure the boot mates with
the extension (see Figure 10). This boot will
help protect the connector from the elements.
g. Reattach the cover over the connector, as
shown in Figure 10. Secure in place with the
M4 cap screws you removed in Step a. The
cover must be attached before you mount the
antenna.
h. Leave an adequate service loop,
approximately 8" (20 cm) of slack, in the
antenna cable for easy serviceability.
i. Weatherproof and seal the cable access hole
as required.
Figure 7: Removing the Connector Cover
Right-Angle
Connector Extension Rubber Boot
Figure 8: Rubber Boot Extension for Right-Angle Connector
Figure 9: Connecting the Antenna Cable
Right-Angle
Boot Extension
(if necessary)
Rubber Boot
Cover
Figure 10: Protecting the Cable Connection
Be sure to seal the cable access hole to prevent
water from leaking into the vessel.
IMPORTANT!
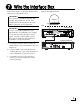
Wire the Antenna
4