
Satellite TV System User Manual


“Programming User-defined Satellites.” After configuring the user-
defined satellites, return to the satellite installation process in
Section 2.4.1, “Installing Your Selected Satellites.”
2.4.1 Installing Your Selected Satellites
When you first connect to the system, it is programmed with the
factory default satellite assignments:
• Europe: Astra 1 (Sat. A) and Hotbird (Sat. B)
• N. America: DSS_101 (Sat. A) and DSS_119 (Sat. B)
Should you wish to track a different satellite (either from the
satellite library or a user-defined satellite), you must instruct the
antenna which satellites will be in the active satellite pair.
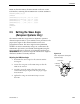
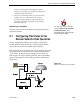
Connecting to the TracVision L3 Maintenance Port
To do so, it is necessary to connect a PC to the terminal
maintenance port on the switchplate. The diagnostics procedure
requires terminal emulation software such as PROCOMM,
Windows Terminal, or Windows 95/98 Hyperterminal. Use the
settings appropriate to your application.
1. Connect one end of the PC data cable to the DB9
connector on the switchplate. Connect the other
end to the serial port on the PC (a 9-pin/25-pin
connector adapter may be needed for some PCs).
2. Open the terminal emulation software and
establish the following settings:
• 9600 baud
• no parity
• 8 data bits
• 1 start bit
• 1 stop bit
• no flow control
3. Apply power to the TracVision L3 system and
allow the system to complete full initialization.
Data should be scrolling on the PC display to
identify any system problems detected. If no data
is seen, recheck your connections and the terminal
software setup.
2-16
A Guide to TracVision L3
The satellite configuration on
your IRD must match the satellite
setting on the TracVision L3
system.
Satellite A on the TracVision L3
must be the same satellite as IRD
Alternative 1 (or A, based on your
IRD) and must be assigned the IRD
DiSEqC 1 setting.
Satellite B on the TracVision L3
must be the same satellite as IRD
Alternative 2 (or B, based on your
IRD) and must be assigned the IRD
DiSEqC 2 setting.
Refer to your IRD user manual for
complete instructions for your IRD.