
Satellite TV System User Manual


2-1
Installation
54-0157 Rev. C
2 Installation
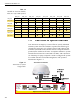
TracVision L3 is designed for simple installation and setup. Just
follow these easy steps:
Step Refer to Section...
1. Choose the hardware locations 2.1
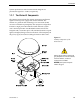
2. Mount the Antenna Unit 2.2
3. Wire system components 2.3
4. Select active satellite 2.4
5. Set the skew angle (Europe only) 2.5
6. Check out system 2.6
7. Configure for remote dish use 2.7
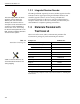
Installation Tools and Materials Required
• Electric drill
•
3
⁄16" (5 mm) and
3
⁄32" (2 mm) drill bits and
1
⁄2" (13 mm) hole saw and auger bit
•
1
⁄
2" (13 mm) socket wrench
• #2 Phillips and #0 flat tip screwdrivers
• Augat Snap ‘n Seal Crimp/Strip Tool (Part
Number IT1000) if using the KVH-provided
F-connector
• Silicone sealant, RTV, or Sikaflex
• Thread locker (as required)
•
7
⁄16" (11 mm) open end wrench
• Wire strippers
• Construction adhesive (e.g., Liquid Nails)
• Rivet gun and
3
⁄
16" (5 mm) rivets (or other fastener
suitable for specific roof construction)
• PC with terminal emulation software such as
PROCOMM, Windows Terminal, or Windows
95/98 Hyperterminal
Plan the entire installation before
proceeding! Take into account
component placement, running
cable distances between units, and
accessibility to the equipment after
installation.
Table 2-1
Installation Process