
Installation Guide

1. Remove fixture from its original package
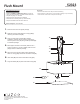
2. Separate mounting plate (1c) from canopy (2a) by
removing decorative nuts (2c)
3. Align mounting plate screws (1d) to desired
orientation, and then attach mounting plate (1c) to
electrical junction box (1a) using screws provided (1e)
in hardware package
4. Make proper electrical connections (black to hot “L”,
white to neutral “N”, ground to “GND”) with wire nuts
(1b) provided in hardware package
5. Align and insert mounting plate screws (1d) through
holes on canopy (2a), secure with decorative nuts (2c)
6. Insert bulb (3b) into socket inside fixture body (3a)
7. Angle the shade (3c) to place inside fixture body (3a)
START FROM HERE
• Make sure POWER is COMPLETELY OFF at the fuse box
• Have your fixture installed by a qualified licensed electrician
• Prepare everything in a clear area
• Wear gloves at all time during this installation
• Read instructions carefully before you start assembly
• Keep this installation sheet for future reference
Technical Support: 1-855-855-8926
Please Note:
• This Kuzco LED fixtures come with pre-wired LED module(s)
• Unless instructed, Do Not touch any part of the LED module(s) as any unnecessary
contact with the module could cause permanent damage
19054 28th Avenue Surrey, BC Canada V3Z 6M3
T: 604 538 7162 TF: 1-855 85 KUZCO F: 604 538 7196
W: kuzcolighting.com
20190806
INSTALLATION SHEET
Flush Mount
52323
1a.
2c.
2a.
3b.
1b.
1c.
1d.
1e.
3a.
3c.