
User Guide
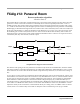
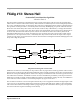
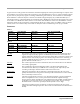
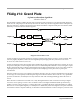

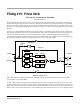
Table Of Contents
- FXAlg #1: MiniVerb • FXAlg #2: Dual MiniVerb
- FXAlg #3: Gated MiniVerb
- FXAlgs #4-11: Classic • TQ • Diffuse • Omni reverb...
- FXAlg #12: Panaural Room
- FXAlg #13: Stereo Hall
- FXAlg #14: Grand Plate
- FXAlg #15: Finite Verb
- FXAlg #130: Complex Echo
- FXAlg #131: 4-Tap Delay • FXAlg #132: 4-Tap Delay ...
- FXAlg #133: 8-Tap Delay • FXAlg #134: 8-Tap Delay ...
- FXAlg #135: Spectral 4-Tap • FXAlg #136: Spectral ...
- FXAlgs #150–153: Choruses
- FXAlg #154: Flanger 1 • FXAlg #155: Flanger 2
- FX Algs #156-160: Phasers
- Combination Algorithms [“+”]
- Configurable Combination Algorithms [“<>”]
- FXAlg #714: Quantize+Flange
- FXAlg #715: Dual MovDelay • FXAlg #716: Quad MovDe...
- FXAlg #720: MonoPitcher+Chor • FXAlg #721: MonoPit...
FXAlg #13: Stereo Hall
Algorithm Reference-26
Lowpass Used to shape the overall reverberation signal's treble content, but does not modify the
decay time. Reduce the treble for a softer, more acoustic sound.
Pre Dly Introducing predelay creates a gap of silence that allows the dry signal to stand out with
greater clarity and intelligibility against the reverberant background. This is especially
helpful with vocal or classical music.
Build Time Similar to predelay, but more complex, larger values of BuildTime slow down the
building up of reverberation and can extend the build up process. Experiment with
BuildTime and BuildEnv and use them to optimize the early details of reverberation. A
BuildTime of 0ms and a BuildEnv of 50% is a good default setting that yields fast
arriving, natural reverberation.
Build Env When BuildTime has been set to greater than about 80ms, BuildEnv begins to have an
audible inßuence on the early unfolding of the reverberation process. For lower-density
reverberation that starts cleanly and impulsively, use a setting of 0%. For the highest-
density reverberation, and for extension of the build-up period, use a setting of 50%. For
an almost reverse reverberation, set BuildEnv to 100%. You can think of BuildEnv as
setting the position of a see-saw. The left end of the see-saw represents the driving of the
reverberation at the earliest time, the pivot point as driving the reverberation at mid-
point in the time sequence, and the right end as the last signal to drive the reverberator.
At settings near 0%, the see-saw is tilted down on the right: the reverberation starts
abruptly and the drive drops with time. Near 50%, the see-saw is level and the
reverberation is repeatedly fed during the entire build time. At settings near 100%, the
see-saw is tilted down on the left, so that the reverberation is hit softly at Þrst, and then
at increasing level until the end of the build time.
LFO Rate
and LFO Depth Within the reverberator, the certain delay values can be put into a time varying
motion to break up patterns and to increase density in the reverb tail. Using the LFO
Rate and Depth controls carefully with longer decay times can be beneÞcial. But beware
of the pitch-shifting artifacts which can accompany randomization when it is used in
greater amounts.
Diffusion Within the reverberator, the Diffusion control can reduce the diffusion provided by some
of the all-pass networks. While the reverb will eventually reach full diffusion regardless
of the Diffusion setting, the early reverb diffusion can be reduced, which sometimes is
useful to help keep the dry signal "in the clear."