
Manual

PAGE
2
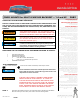
BIKE and HARDWARE PREP:
STEP 2 Remove both saddlebags from the bike; set them on a soft sturdy surface for now.
STEP 3 Put the included Flat Washers on the included 5/16” Screws; set them within arms reach of the
work area.
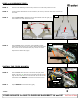
STEP 4 Refer to PICS 1 and 2. Determine the left Fixed Mount from the right; set
them within arms reach of the work area.
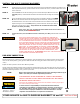
STEP 5 Refer to PIC 3. On the clutch-side (left) saddlebag support,
locate and remove the two Torx screws; lift the insert out of the
slot; set the screws and insert aside, they will not be reused.
Repeat for the brake-side (right).
INSTALL THE FIXED MOUNTS:
STEP 6 Refer to PIC 4. Insert the rear of the clutch-side (left) Fixed
Mount in the slot (
1); slide the front end down into the slot (2);
align the holes and secure it to the bike with two of the Screws
and Washers from
STEP 3. Leave the screws loose for now.
STEP 7 Repeat STEP 5 for the brake-side (right).
FIXED MOUNTS for MULTI-PURPOSE BACKREST‘14 and UP
INSTALLATION
-cont.-
PIC 2
CLUTCH-SIDE (LEFT)
BRAKE-SIDE (RIGHT)
FRONT OF BIKE
PIC 3
CHROME INSERT
REMOVE THE TWO TORX SCREWS
CLUTCH-SIDE (LEFT)
SADDLEBAG SUPPORT
PIC 4
5/16” SCREW
WASHER
CLUTCH-SIDE (LEFT)
FIXED MOUNT
1
2
PIC 1
CLUTCH-SIDE (LEFT)
BRAKE-SIDE (RIGHT)
FRONT FRONT
NOTCHES FACE REARWARD