
User Guide


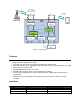
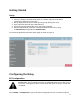
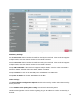
Table Of Contents

9
Getting Started
Setup
1.
Connect a laptop to the KR5 Relay either via a switch or directly to the ETH1
(preferred) or ETH2 port on the relay.
2.
Set the laptop ethernet port to DHCP (this is typically already the case)
3.
Open a browser and enter http://192.168.100.1
4.
Accept the security warning due to the self signed certificate.
5.
Enter the administrator username & password. Default username for relay
is Administrator and password is Administrator
You should be greeted by the Basic Status page as shown in Figure 3.
Figure 3 – KR5 Relay GUI – Top Level Menu
Configuring the Relay
RF Configuration
IMPORTANT: The cancellation modules are calibrated based on the values in the
this screen. Changing the values in these fields will cause the relay to restart and
recalibrate.
Select KUMU -> Configuration to get to the Kumu Configuration screen as shown in Figure 4