DUROMATIC COMFORT GEBRAUCHSANWEISUNG MODE D’EMPLOI INSTRUCTION MANUAL ISTRUZIONI PER L’USO MANUAL DE INSTRUCCIONES
Wir gratulieren Ihnen zu Ihrem Kauf! Mit diesem KUHN RIKON Markenprodukt haben Sie sich für ein Schweizer Produkt von hoher Qualität entschieden. Bestimmt werden Sie an Ihrem neuen Schnellkochtopf lange Freude haben. Nous vous félicitons pour votre achat! Avec ce produit de marque KUHN RIKON, vous vous avez opté pour un produit suisse de haute qualité. Votre nouvel autocuiseur vous donnera certainement beaucoup de plaisir pendant de nombreuses années. We congratulate you on your purchase.
P20816_GA_Duromatic_001_026:RZ GA Duromatic d 01-2007 28.10.2010 11:27 Uhr Seite 1 DUROMATIC Inhaltsverzeichnis 1. Die Vorteile Ihres DUROMATIC Schnellkochtopfes auf einen Blick 2. Bestimmungsgemässe Verwendung 3. Sicherheit 4. Inbetriebnahme Schnellkochtopf 5. Füllen 6. Ventil prüfen 7. Schliessen 8. Kochen unter Druck 9. Abdampfen und Öffnen 10. Reinigungs- und Pflegehinweise zum DUROMATIC 11. Störungshilfen zum DUROMATIC 12. Garantie 13. Reparaturen, Bezugs- und Serviceadressen 14.
P20816_GA_Duromatic_001_026:RZ GA Duromatic d 01-2007 28.10.2010 11:27 Uhr 1. Die Vorteile Ihres DUROMATIC Schnellkochtopfes auf einen Blick • Vitaminschonendes Kochen (für Ihre Gesundheit) • Energie- und Zeitersparnis (Kochzeit unter Druck ca.
P20816_GA_Duromatic_001_026:RZ GA Duromatic d 01-2007 28.10.2010 11:27 Uhr Seite 3 2. Bestimmungsgemässe Verwendung Der Schnellkochtopf ist für das Kochen von Speisen, unter Hinzufügung von Wasser, bestimmt und kann auf allen Herdarten inkl. Induktion im Haushalt eingesetzt werden. Die Schnellkochtöpfe von KUHN RIKON AG sind besonders geeignet für Speisen, die normalerweise eine lange Kochdauer benötigen wie: Suppen Fleisch (z.B. Braten, Gulasch, Voressen usw.) Gemüse Kartoffeln / z.T.
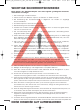
P20816_GA_Duromatic_001_026:RZ GA Duromatic d 01-2007 28.10.2010 11:27 Uhr Seite 4 WICHTIGE SICHERHEITSHINWEISE Beim Einsatz des Schnellkochtopfes sind stets folgende grundlegende Vorsichtsmassnahmen zu befolgen 1. Alle Anweisungen sind durchzulesen. 2. Heisse Flächen nicht berühren. Topf nur am Stiel bzw. an Griffen anfassen. 3. Bei Verwendung des Schnellkochtopfes in Gegenwart von Kindern ist sorgfältige Aufsicht erforderlich. 4. Schnellkochtopf nie in einen heissen Ofen stellen. 5.
P20816_GA_Duromatic_001_026:RZ GA Duromatic d 01-2007 28.10.2010 11:27 Uhr Seite 5 4. Inbetriebnahme Schnellkochtopf Vor dem ersten Gebrauch Topf, Deckel und Gummidichtung mit Spülmittel heiss waschen. Bei Elektroherden sollen Durchmesser der Kochplatte und Bodengrösse des Schnellkochtopfes übereinstimmen. Die Zuordnung ist am Boden aussen markiert. (Siehe Kap.
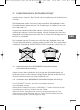
P20816_GA_Duromatic_001_026:RZ GA Duromatic d 01-2007 28.10.2010 11:27 Uhr 5. Füllen Füllen Sie den Topf nie über 2/3 inkl. Flüssigkeitszugabe (siehe Markierung auf der Innenseite des Topfes). Bei Suppen, gewissen Getreidesorten und getrockneten Hülsenfrüchten (siehe Seite 21) sowie gedörrten Bohnen den Topf nie mehr als bis zur Hälfte (Markierung 1/2) füllen. Bei Überfüllung können die Sicherheitselemente beeinträchtigt werden (Verbrühungsgefahr). Flüssigkeitszugabe nicht vergessen (siehe Kap.
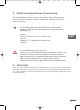
P20816_GA_Duromatic_001_026:RZ GA Duromatic d 01-2007 28.10.2010 11:27 Uhr Seite 7 7. Schliessen Legen Sie die Gummidichtung sorgfältig in den Deckel, so dass sie unter dem Deckelanschlag gut an der Deckelinnenfläche anliegt. GER Prüfen Sie, ob der farbige Sicherheitsstift die Gummidichtung vom Deckelrand wegdrückt.
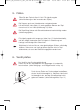
P20816_GA_Duromatic_001_026:RZ GA Duromatic d 01-2007 28.10.2010 11:27 Uhr Seitengriffmodell: Das Positionierungsdreieck auf dem Deckel muss mit der Mitte des Topfseitengriffes übereinstimmen. Deckel im Uhrzeigersinn drehen, bis die Deckelgriffe die Topfgriffe überdecken. Kontrolle: Seitengriffe von Topf und Deckel müssen übereinander liegen. 8. Kochen unter Druck Fassen Sie den heissen Topf nur an den Griffen bzw. am Stiel an.
P20816_GA_Duromatic_001_026:RZ GA Duromatic d 01-2007 28.10.2010 11:27 Uhr Seite 9 Den korrekt verschlossenen Topf auf die zum Bodendurchmesser passende Heizquelle stellen, die Zuordnung ist am Boden aussen markiert (siehe Kap. 13), und Heizquelle auf volle Leistung einschalten. Sobald das Kochgut zu sieden beginnt, entweicht zuerst der Luftsauerstoff durch das Ventil. Danach springt das Ventiköpfchen hoch. Jetzt zeigt der ansteigende Druckanzeiger den zunehmenden Druck im Schnellkochtopf an.
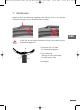
P20816_GA_Duromatic_001_026:RZ GA Duromatic d 01-2007 28.10.2010 11:27 Uhr Im Dämpfeinsatz oder auf dem Siebeinsatz wird Gemüse besonders schonend gegart. Farbe, Aroma, Vitamine und Nährstoffe bleiben so erhalten. 9. Abdampfen und Öffnen Topf niemals gewaltsam öffnen! Bei breiartigen und stark fetthaltigen Speisen muss der Schnellkochtopf vor dem Öffnen des Deckels leicht gerüttelt werden, damit die Speisen beim Öffnen nicht herausspritzen.
P20816_GA_Duromatic_001_026:RZ GA Duromatic d 01-2007 9.3 28.10.2010 11:27 Uhr Seite 11 Rasches Abdampfen Topfrand unter fliessendem kaltem Wasser abkühlen (nur Topfrand, da das Wasser sonst in den Topf gesaugt werden könnte). 9.4 Öffnen des abgedampften Topfes GER Der Topf ist abgedampft, d.h. drucklos, wenn der Druckanzeiger unten bleibt. Schieben Sie nun die Deckelgriffe im Gegenuhrzeigersinn neben die Topfgriffe. In dieser Stellung lässt sich der Deckel leicht vom Topf abheben.
P20816_GA_Duromatic_001_026:RZ GA Duromatic d 01-2007 28.10.2010 11:27 Uhr Abdampfhinweise für bestimmte Speisen: Kochgut mit kurzer Kochzeit: Rasch abdampfen, da dieses sonst verkochen könnte. Gemüse mit langer Kochzeit / Suppen / Fleisch, ganz mit Flüssigkeit bedeckt / Kartoffeln / Getreide / gedörrte Bohnen: Langsam abdampfen.
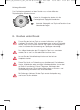
P20816_GA_Duromatic_001_026:RZ GA Duromatic d 01-2007 28.10.2010 11:27 Uhr Seite 13 Das SI-Ventil (erste Sicherheitseinrichtung) muss beim Gebrauch des Schnellkochtopfes immer korrekt im Deckel montiert sein (= Feder im Deckelinnern sichtbar). Dieses Ventil zur Reinigung nie ausbauen! Deckel, Abdeckhaube und Topf nicht in der Geschirrspülmaschine reinigen.
P20816_GA_Duromatic_001_026:RZ GA Duromatic d 01-2007 28.10.2010 11:27 Uhr 10.1 Ventile 10.1.1 Abdeckhaube abnehmen Alle Abdeckhauben mit beiden Händen abnehmen. 10.1.2 Zerlegen des COMFORT-Ventils Zum Zerlegen löst man mit einem Geldstück oder Schraubenzieher die Ventilschraube mit integriertem Druckanzeiger (6) auf der Deckelinnenseite. Ventilköpfchen dabei festhalten.
P20816_GA_Duromatic_001_026:RZ GA Duromatic d 01-2007 28.10.2010 11:27 Uhr Seite 15 10.1.4 Reinigen und Zusammenbau des Ventils 1. Ventil zerlegen und reinigen. Niemals scheuernde Reinigungsmittel verwenden. 2. Beim Zusammenbau darauf achten, dass das Ventilköpfchen auf dem Druckanzeiger fest angezogen ist und die Ventilschraube von Hand vollständig festgezogen ist. 3. Nach Zusammenbau Ventil prüfen. (Siehe Kap. 6) 10.1.
P20816_GA_Duromatic_001_026:RZ GA Duromatic d 01-2007 28.10.2010 11:27 Uhr 10.2 Zusätzliche Reinigungs- und Pflegehinweise zum DUROMATIC mit Antihaft-Beschichtung Neben den allgemeinen Reinigungs- und Pflegehinweisen unter Kapitel 10 sind nachfolgende Hinweise zu beachten. Verwenden Sie zum Reinigen der Titan-Hartgrund-Beschichtung keine scheuernde Reinigungsmittel oder die Reinigungspaste SWISS CLEANER. Waschen Sie sofort nach dem Gebrauch, d.h.
P20816_GA_Duromatic_001_026:RZ GA Duromatic d 01-2007 28.10.2010 11:27 Uhr Seite 17 12. Garantie KUHN RIKON AG gewährt eine Garantie von 10 Jahren (Kassenbeleg) auf Material und Verarbeitung von Kochgeschirr (Titan-Beschichtung 3 Jahre). Ausgenommen sind Überhitzungsschäden, Verschmutzung, Kratzer, Verfärbungen. Normale Abnützung an Beschlägeteilen und Dichtungen fallen nicht unter Garantie. Die Batterie (Lithium-Mangandioxid) darf nicht selbst ausgetauscht werden.
P20816_GA_Duromatic_001_026:RZ GA Duromatic d 01-2007 28.10.2010 11:27 Uhr 14. Umweltschutz/Entsorgung Kochgeschirr, Zubehör, Griffe, Batterie (Lithium-Mangandioxid) und Verpackung sollten einer umweltgerechten Wiederverwertung zugeführt werden. Die landesüblichen und regionalen Vorschriften sind zu beachten. In der Schweiz können ausgediente KUHN RIKON Kochgeschirre (ausreichend frankiert) direkt an eine KUHN RIKON Service-Stelle eingesandt werden. (Adresse siehe Kap.
P20816_GA_Duromatic_001_026:RZ GA Duromatic d 01-2007 28.10.2010 11:27 Uhr Seite 19 15. Kochzeitentabelle Die Kochzeiten in der nachstehenden Kochzeitentabelle können – je nach Produkt, Lagerung und Qualität des Kochgutes – leicht unterschiedlich sein. Speise Kochzeit (Min.
P20816_GA_Duromatic_001_026:RZ GA Duromatic d 01-2007 Speise Lamm Lammbraten Lammvoressen (Gulasch) Kochzeit (Min.) 11:27 Uhr Flüssigkeitszugabe 30 20 2 2 je nach Rezept, mind. 1/2 dl je nach Rezept, mind. 1/2 dl Geflügel Geflügelteile Huhn ganz 8 15 2 2 je nach Rezept, mind. 1/2 dl je nach Rezept, mind. 1/2 dl Wild Hasenbraten Rehbraten Wildpfeffer Wildgeschnetzeltes 30 30 18 20 2 2 2 2 je nach Rezept, mind. 1/2 je nach Rezept, mind. 1/2 je nach Rezept, mind. 1/2 je nach Rezept, mind.
P20816_GA_Duromatic_001_026:RZ GA Duromatic d 01-2007 Speise Kochzeit (Min.) Räben (Kohlrüben) geviertelt Räben (Kohlrüben) gescheibelt Randen (rote Beete) Rosenkohl Rotkraut (Rotkohl) Sauerkraut roh Schwarzwurzeln Sellerieknolle halbiert/gescheibelt Spargeln Tomaten für Saucen (Sugo) Wirsing (Wirz, Kohl) halbiert Kochstufe 12 5 25 2 2 2 4 10 30 12 6/2 5-10 6 8 2 2 2 2 2 2 2 2 28.10.2010 11:27 Uhr Seite 21 Flüssigkeitszugabe bis zum Siebeinsatz, mind. 1 dl bis zum Siebeinsatz, mind.
P20816_GA_Duromatic_001_026:RZ GA Duromatic d 01-2007 Speise Kochzeit (Min.) Frische Früchte (mit Siebeinsatz) Birnen, Äpfel, Pfirsiche, Zwetschgen, Aprikosen sehr reif Zwetschgen, Aprikosen noch hart Quitten Kastanien 2 4 10 12 Tiefgekühltes Gemüse, unaufgetaut (mit Siebeinsatz) Blattspinat (Pack à 500g) 10 6 Blumenkohlröschen 5 Bohnen 5 Broccoliröschen 4 Kefen (Zuckerschoten) Rosenkohl 3 Rotkraut gekocht (500 g Rotkohl) 12 Spinat gehackt (Pack à 500 g) (ohne Siebeinsatz) Kochstufe 28.10.
P20816_GA_Duromatic_001_026:RZ GA Duromatic d 01-2007 28.10.2010 11:27 Uhr Seite 23 16. Accessoires DUROMATIC Artikelbezeichnung Art. Nr.
P20816_GA_Duromatic_001_026:RZ GA Duromatic d 01-2007 28.10.2010 11:27 Uhr 17. Ersatzteile DUROMATIC Wir haben für Sie die wichtigsten Ersatzteile ausgewählt.Weitere Ersatzteile sind über den Fachhandel erhält-lich. Um sicherzustellen, dass Sie die richtigen Ersatzteile erhalten, bitten wir Sie, uns die Artikel-Nummer und das Produktionsdatum Ihres Dampfkochtopfs bekannt zu geben (siehe Kap. 13), oder senden Sie das defekte Teil an eine der Kuhn Rikon ServiceStellen ein. 24 Artikelbezeichnung Art. Nr.
P20816_GA_Duromatic_001_026:RZ GA Duromatic d 01-2007 28.10.2010 11:27 Uhr Seite 1 DUROMATIC Table des matières 1. Les avantages de votre autocuiseur DUROMATIC en un coup d'œil 2. Utilisation de l’autocuiseur conformément aux prescriptions 3. Sécurité 4. Mise en service de l'autocuiseur 5. 6. 7. 8. 9. 10. 11. 12. 13. 14. 15. 16. 17.
P20816_GA_Duromatic_001_026:RZ GA Duromatic d 01-2007 28.10.2010 11:27 Uhr Seite 2 1. Les avantages de votre autocuiseur DUROMATIC en un coup d'œil • Cuisson conservant les vitamines (pour votre santé) • • Economie d’énergie et de temps (temps de cuisson sous pression: 1/3 env.
P20816_GA_Duromatic_001_026:RZ GA Duromatic d 01-2007 28.10.2010 11:27 Uhr Seite 3 2. Utilisation de l’autocuiseur conformément aux prescriptions L’autocuiseur est prévu pour faire cuire des aliments après avoir ajouté de l’eau ; on peut l’utiliser sur tous les types de cuisinière, y compris à induction, tant à la maison que dans le domaine de la restauration.
P20816_GA_Duromatic_001_026:RZ GA Duromatic d 01-2007 28.10.2010 11:27 Uhr Seite 4 IMPORTANTES INDICATIONS DE SECURITE Lors de l’utilisation des autocuiseurs, il faut absolument respecter les mesures essentielles de sécurité suivantes. 1. Lisez toutes les indications. 2. Ne touchez jamais les surfaces chaudes.Ne prenez l’autocuiseur que par le manche ou les poignées. 3. Faites particulièrement attention lorsque vous utilisez l’autocuiseur en présence d’enfants. 4.
P20816_GA_Duromatic_001_026:RZ GA Duromatic d 01-2007 28.10.2010 11:27 Uhr Seite 5 4. Mise en service de l’autocuiseur Avant la première mise en service de l’autocuiseur, lavez soigneusement l’autocuiseur, le couvercle et le joint en caoutchouc à l’eau chaude, avec du liquide vaisselle Lorsque vous utilisez l’autocuiseur sur une cuisinière électrique, veillez à ce que le diamètre de la plaque corresponde à la taille du fond de l’autocuiseur. L’indication figure sous le fond (cf. chap. 13).
P20816_GA_Duromatic_001_026:RZ GA Duromatic d 01-2007 28.10.2010 11:27 Uhr 5. Remplissage Ne remplissez la cuve qu’aux 2/3 maximum, y compris l’addition de liquides (voir indication sur la face intérieure de l’autocuiseur) Pour les soupes, certaines céréales, les légumes secs (voir page 47) ainsi que les haricots secs, veillez à ne remplir la cuve qu’à moitié (indication 1/2). Une surcharge peut porter préjudice aux éléments de sécurité (danger d’ébouillantage).
P20816_GA_Duromatic_001_026:RZ GA Duromatic d 01-2007 28.10.2010 11:27 Uhr Seite 7 7. Fermeture Placez soigneusement le joint en caoutchouc à l’intérieur du couvercle, afin qu’il soit bien positionné contre l´intérieur du couvercle, sous la butée du couvercle. FRE Vérifiez que le boulon de sécurité coloré repousse le joint en caoutchouc du bord de couvercle.
P20816_GA_Duromatic_001_026:RZ GA Duromatic d 01-2007 28.10.2010 11:27 Uhr Modèle avec manche: Placez le couvercle sur la marmite conformément à l’illustration. Le triangle de positionnement situé sur le couvercle doit être ajusté au milieu de la poignée de la marmite. Tournez le couvercle dans le sens des aiguilles d’une montre, jusqu’à ce que la poignée du couvercle soit placée sur la poignée de la marmite.
P20816_GA_Duromatic_001_026:RZ GA Duromatic d 01-2007 28.10.2010 11:27 Uhr Seite 9 Placez l’autocuiseur correctement fermé sur la plaque de cuisson adaptée au diamètre du fond de la marmite. L’indication figure sur le fond (cf. chap. 13). Ouvrez ensuite la source d’énergie à pleine puissance. Dès que les aliments commencent à bouillir, c’est d’abord l’oxygène de l’air qui s’échappe par la soupape. Ensuite, le bouton de retenue s’élève.
P20816_GA_Duromatic_001_026:RZ GA Duromatic d 01-2007 28.10.2010 11:27 Uhr Le panier vapeur et la grille perforée permettent une cuisson particulièrement délicate des légumes, tout en leur conservant couleur, arôme, vitamines et substances nutritives. 9. Echappement de la vapeur et ouverture Ne forcez jamais l’ouverture de l’autocuiseur ! Afin d’éviter toute projection d’aliments très gras ou genre purée, lorsque vous enlevez le couvercle de l’autocuiseur, secouez-le légèrement avant l’ouverture.
P20816_GA_Duromatic_001_026:RZ GA Duromatic d 01-2007 28.10.2010 11:27 Uhr Seite 11 9.3 Echappement rapide de la vapeur Mettre le bord de l’autocuiseur à refroidir en le plaçant sous l’eau froide courante (uniquement le bord de la marmite, afin que l’eau ne pénètre pas à l’intérieur). 9.4 Ouverture de la marmite après échappement de la vapeur FRE Il n’y a plus de vapeur dans la marmite, c.-à-d. que l'autocuiseur est sans pression, lorsque l’indicateur de pression reste en bas.
P20816_GA_Duromatic_001_026:RZ GA Duromatic d 01-2007 28.10.2010 11:27 Uhr Indications relatives à l’échappement de la vapeur pour certains aliments: Aliments avec un temps de cuisson court : faites sortir la vapeur rapidement, sinon les aliments risqueraient d’être trop cuits. Légumes avec un temps de cuisson long / soupes / viande complètement recouverte de liquide/pommes de terre / céréales / haricots secs: faites sortir lentement la vapeur.
P20816_GA_Duromatic_001_026:RZ GA Duromatic d 01-2007 28.10.2010 11:27 Uhr Seite 13 La soupape SI (deuxième dispositif de sécurité) doit toujours être correctement montée sur le couvercle lorsque vous utilisez l’autocuiseur (= ressort visible à l’intérieur du couvercle). Ne jamais démonter cette soupape pour la laver ! Il ne faut jamais mettre le couvercle, la cape protectrice ni la cuve dans le lave-vaisselle.
P20816_GA_Duromatic_001_026:RZ GA Duromatic d 01-2007 28.10.2010 10.1 Les soupapes 10.1.1 Enlever la cape protectrice Enlever toutes les capes protectrices des deux mains. 10.1.2 Démontage de la soupape des modèles COMFORT Pour démonter, retirer la vis de soupape avec l’indicateur de pression (6) intégré à l’intérieur du couvercle avec une pièce de monnaie ou un tournevis. Tenir fermement le bouton de retenue pendant l’opération.
P20816_GA_Duromatic_001_026:RZ GA Duromatic d 01-2007 28.10.2010 11:27 Uhr Seite 15 10.1.4 Nettoyage et montage de la soupape: 1. Démontez et nettoyez la soupape. Ne jamais utiliser des détergents abrasifs. 2. Lors du montage, veiller à ce que le bouton de retenue soit serré à fond sur l’indicateur de pression. 3. Contrôlez la soupape après l’avoir montée (cf. chap. 6). 10.1.
P20816_GA_Duromatic_001_026:RZ GA Duromatic d 01-2007 28.10.2010 11:27 Uhr 10.2 Autres indications d’entretien et de nettoyage du DUROMATIC avec revêtement antiadhésif Mis à part les indications générales d’entretien et de nettoyage (voir chap. 10) veuillez prendre note des indications suivantes. Pour nettoyer la couche du fond dur en titane, n’utilisez ni détergents abrasifs ni la pâte nettoyante SWISS CLEANER. Lavez le revêtement immédiatement après utilisation, c.-à-d.
P20816_GA_Duromatic_001_026:RZ GA Duromatic d 01-2007 28.10.2010 11:27 Uhr Seite 17 12. Garantie KUHN RIKON AG assure une garantie de 10 ans (ticket de caisse) sur le matériau et la fabrication de sa batterie de cuisine (Revêtement en titane 3 ans). En sont exclus les dommages résultants de surchauffe, salissures, rayures, altération de couleur. La garantie ne s’applique pas pour usure normale des poignées, des manches et des joints. 13.
P20816_GA_Duromatic_001_026:RZ GA Duromatic d 01-2007 28.10.2010 11:27 Uhr 14. Protection de l’environnement / élimination La batterie de cuisine, les accessoires et l’emballage doivent être recyclés conformément aux directives régionales et nationales sur la protection de l’environnement. En Suisse, la batterie de cuisine usagée KUHN RIKON peut être retournée (suffisamment affranchie) directement à l’adresse du service après-vente KUHN RIKON (cf. chap. 13).
P20816_GA_Duromatic_001_026:RZ GA Duromatic d 01-2007 28.10.2010 11:27 Uhr Seite 19 15. Tableau des temps de cuisson Les temps de cuisson mentionnés dans le tableau suivant peuvent légèrement varier en fonction du produit, du stockage et de la qualité des aliments. Aliments Temps de cuisson (en min.
P20816_GA_Duromatic_001_026:RZ GA Duromatic d 01-2007 Aliments 11:27 Uhr Temps de Niveau de Quantité de liquide cuisson (en min.
P20816_GA_Duromatic_001_026:RZ GA Duromatic d 01-2007 Aliments 28.10.2010 Temps de Niveau de cuisson (en min.
P20816_GA_Duromatic_001_026:RZ GA Duromatic d 01-2007 Aliments Niveau de Temps de cuisson (en min.
P20816_GA_Duromatic_001_026:RZ GA Duromatic d 01-2007 28.10.2010 11:27 Uhr Seite 23 16. Accessoires DUROMATIC Description d'article Réf.
P20816_GA_Duromatic_001_026:RZ GA Duromatic d 01-2007 28.10.2010 11:27 Uhr 17. Pièces de rechange DUROMATIC Parmi de nombreuses pièces de rechange, nous avons choisi les plus importantes pour vous. Vous pouvez vous procurer les autres pièces de rechange dans les commerces spécialisés. Pour recevoir la bonne pièce de rechange, indiquez le numéro d’article et la date de fabrication de votre autocuiseur (voir le chap. 13) ou envoyez au service aprèsvente KUHN RIKON la partie défectueuse.
P20816_GA_Duromatic_001_026:RZ GA Duromatic d 01-2007 28.10.2010 11:27 Uhr Seite 1 DUROMATIC Contents 1. The advantages of your DUROMATIC pressure cooker at a glance 2. Directions for proper use 3. Safety 4. Using the pressure cooker for the first time 5. 6. 7. 8. 9. 10. 11. 12. 13. 14. 15. 16. 17.
P20816_GA_Duromatic_001_026:RZ GA Duromatic d 01-2007 28.10.2010 11:27 Uhr 1. The advantages of your DUROMATIC pressure cooker at a glance • Preserves vitamins (for your health) • Saves energy and time (approx.
P20816_GA_Duromatic_001_026:RZ GA Duromatic d 01-2007 28.10.2010 11:27 Uhr Seite 3 2. Directions for proper use The pressure cooker is intended for cooking foods to which liquid has been added, and can be used on all cooking ranges including induction hobs in the home. KUHN RIKON Ltd. pressure cookers are particularly suited to foods that normally require a long cooking time, e.g.: Soups Meats (e.g. joints, goulash, stews etc.
P20816_GA_Duromatic_001_026:RZ GA Duromatic d 01-2007 28.10.2010 11:27 Uhr Seite 4 IMPORTANT SAFETY INSTRUCTIONS Always observe the following basic safety precautions when using your pressure cooker 1. Read all the instructions. 2. Never touch hot surfaces. Only hold the pressure cooker by the handle and/or side grips. 3. Close supervision is necessary when the pressure cooker is used near children. 4. Never place the pressure cooker in a heated oven. 5.
P20816_GA_Duromatic_001_026:RZ GA Duromatic d 01-2007 28.10.2010 11:27 Uhr Seite 5 4. Using the pressure cooker for the first time Before using the pressure cooker the first time, wash the pan, lid and gasket with hot, soapy water. On electric cookers, the diameter of the pressure cooker base should match that of the hotplate or ring. The compatible hob diameter is etched into outside of the base of the pan. (See section 13).
P20816_GA_Duromatic_001_026:RZ GA Duromatic d 01-2007 28.10.2010 11:27 Uhr 5. Filling Never fill the pan more than two-thirds full including the liquid you have added (see the markings on the inside of the pan). Never fill the cooker beyond half full (1/2 mark) if you are preparing soup, certain cereals, dried pulses (see page 21) or dried beans.) If overfilled, the safety elements may become impaired (risk of scalding).
P20816_GA_Duromatic_001_026:RZ GA Duromatic d 01-2007 28.10.2010 11:27 Uhr Seite 7 7. Closing Place the gasket carefully into the lid, ensuring that it lies under the rim and under the flanges. ENG Check that the coloured safety bolt is pushing the gasket away from the edge of the lid. 1.
P20816_GA_Duromatic_001_026:RZ GA Duromatic d 01-2007 28.10.2010 11:27 Uhr Side grip model: Place the lid on the pan as shown. The positioning triangle on the lid must be aligned with the centre of the pan’s side grip. Turn the lid in a clockwise direction until the handles of the lid are over the pan grips. Check: the side grips of lid and pan must lie over each other. 8. Cooking under pressure Only hold the hot pressure cooker by its grips or handle.
P20816_GA_Duromatic_001_026:RZ GA Duromatic d 01-2007 28.10.2010 11:27 Uhr Seite 9 Place the properly closed cooker on a heat source commensurate with the size of the pressure cooker base. See outside of cooker base for correct size. (See section 13) Next turn the heat source up to full power. As food begins to boil, firstly any atmospheric oxygen present in the pressure cooker escapes through the valve. The valve cap will then pop up.
P20816_GA_Duromatic_001_026:RZ GA Duromatic d 01-2007 28.10.2010 11:27 Uhr Vegetables are cooked especially gently in the steamer insert or on the trivet. Colour, flavour, vitamins and nutrients are retained. 9. Releasing steam and opening Never use force to open the lid! After cooking foods (like grains or pulses) that become mushy or foods with a high fat content, shake the cooker gently before opening the lid. This will prevent the contents spitting when the lid is opened.
P20816_GA_Duromatic_001_026:RZ GA Duromatic d 01-2007 28.10.2010 11:27 Uhr Seite 11 Rapid pressure reduction Cool the rim of the cooker under cold running water (but wet the rim only to prevent water from being sucked into the cooker). 9.4 Opening the cooker when the steam has been released ENG The steam has been fully released, that is the cooker is now not under pressure, when the pressure indicator remains lowered. Now slide the lid grips counterclockwise next to the pan grips.
P20816_GA_Duromatic_001_026:RZ GA Duromatic d 01-2007 28.10.2010 11:27 Uhr Pressure reduction tips for specific foods: Foods with a short cooking time: Use rapid pressure reduction as otherwise foods can become overcooked. Vegetables with a long cooking time / soups / meats, completely covered by liquid / potatoes / cereals / dried pulses: Use slow pressure reduction.
P20816_GA_Duromatic_001_026:RZ GA Duromatic d 01-2007 28.10.2010 11:27 Uhr Seite 13 The SI valve (main safety device) must always be correctly fitted in the lid when using the pressure cooker (= spring visible on the inside of the lid). Never remove this valve for cleaning! Do not wash the pan, lid, protection cap or gasket in a dishwasher. Never remove stains or burned-on marks with abrasive means such as with knives, steel wool or copper cloths.
P20816_GA_Duromatic_001_026:RZ GA Duromatic d 01-2007 28.10.2010 10.1 Valves 10.1.1 Removing the protection cap Remove all protection caps using both hands. 10.1.2 Dismantling the COMFORT valve To dismantle, undo the valve screw with integral pressure indicator (6) underneath the lid using a coin or screwdriver, whilst holding the valve cap firmly. Hold onto the valve cap while doing so.
P20816_GA_Duromatic_001_026:RZ GA Duromatic d 01-2007 28.10.2010 11:27 Uhr Seite 15 10.1.4 Cleaning and re-assembling the valve 1. 1.Dismantle the valve and clean it. Never use any abrasive cleaners. 2. During re-assembly, ensure that the valve cap is securely fastened on the pressure indicator and that the valve screw has been fully tightened by hand. 3. Check for proper valve operation after assembly. (See section 6) 10.1.
P20816_GA_Duromatic_001_026:RZ GA Duromatic d 01-2007 28.10.2010 11:27 Uhr 10.2 Additional cleaning and care instructions for the DUROMATIC non-stick coating Apart from the general cleaning and care information in section 10, attention is to be paid to the following: Do not use any abrasive cleaning agents or SWISS CLEANER to clean the hard titanium base non-stick coating. Wash the coating immediately after use, i.e.
P20816_GA_Duromatic_001_026:RZ GA Duromatic d 01-2007 28.10.2010 11:27 Uhr Seite 17 12. Guarantee KUHN RIKON Ltd. guarantees its cookware for 10 years (proof of purchase required) against faulty materials and poor workmanship (titanium coating 3 years). This warranty does not include damage due to overheating, soiling, scratches, and discolouration. Normal wear and tear on fittings and seals are not covered by the guarantee. 13.
P20816_GA_Duromatic_001_026:RZ GA Duromatic d 01-2007 28.10.2010 11:27 Uhr 14. Environmental protection / disposal Cookware, accessories and packaging should recycled in an environmentally-friendly manner. Please comply with your national and regional regulations. In Switzerland, worn-out KUHN RIKON cookware can be sent (sufficient postage prepaid please) directly to a KUHN RIKON Service Center. (See section 13 for address).
P20816_GA_Duromatic_001_026:RZ GA Duromatic d 01-2007 28.10.2010 11:27 Uhr Seite 19 15. Table of cooking times The cooking times listed in the following tables may vary slightly according to food type, storage and quality. Food Soups Stock Pea soup Vegetable soup, depending on size of veg.
P20816_GA_Duromatic_001_026:RZ GA Duromatic d 01-2007 Food Cooking time (min.) 11:27 Uhr Liquid added Lamb Lamb joint Lamb stew (goulash) 30 20 2 2 acc. to recipe, at least 50 ml acc. to recipe, at least 50 ml Poultry Jointed poultry Whole chicken 8 15 2 2 acc. to recipe, at least 50 ml acc. to recipe, at least 50 ml Game Hare joint Venison joint Game stew Game "geschnetzeltes" 30 30 18 20 2 2 2 2 acc. to recipe, at least 50 ml acc. to recipe, at least 50 ml acc.
P20816_GA_Duromatic_001_026:RZ GA Duromatic d 01-2007 Food 28.10.2010 Cooking time Cooking level (min.
P20816_GA_Duromatic_001_026:RZ GA Duromatic d 01-2007 Food Cooking time (min.) Fresh Fruit (with trivet) Pears, apples, peaches, plums, apricots, very ripe Plums, apricots, still hard Quinces Chestnuts Frozen vegetables, not thawed (with trivet) Spinach leaves (pack of 500 g) Cauliflower, in florets Beans Broccoli, in florets Sugar peas Brussels sprouts Red cabbage, cooked (500 g red cabbage) Spinach, chopped (500 g pack) (without trivet) 28.10.
P20816_GA_Duromatic_001_026:RZ GA Duromatic d 01-2007 28.10.2010 11:27 Uhr Seite 23 16. DUROMATIC Accessories Description Item no.
P20816_GA_Duromatic_001_026:RZ GA Duromatic d 01-2007 28.10.2010 11:27 Uhr Seite 24 17. DUROMATIC spare parts We have selected the most important spare parts for you. All other spare parts are available via specialist retailers. To ensure you receive the correct spare part, please notify us of the item number and the production date of your pressure cooker (see section 13), or send the defective part to one of the KUHN RIKON Service Centers. Item description Item. no.
P20816_GA_Duromatic_001_026:RZ GA Duromatic d 01-2007 28.10.2010 11:27 Uhr Seite 1 DUROMATIC Indice 1. Colpo d’occhio sui vantaggi della pentola a pressione DUROMATIC 2. Uso appropriato 3. Sicurezza 4. Messa in funzione della pentola a pressione 5. 6. 7. 8. 9. 10. 11. 12. 13. 14. 15. 16. 17.
P20816_GA_Duromatic_001_026:RZ GA Duromatic d 01-2007 28.10.2010 11:27 Uhr Seite 2 1.
P20816_GA_Duromatic_001_026:RZ GA Duromatic d 01-2007 28.10.2010 11:27 Uhr Seite 3 2. Uso appropriato Questa pentola a pressione è concepita per la cottura di cibi con aggiunta d’acqua ed è destinata all’uso domestico su tutti i tipi di fornelli, inclusi quelli ad induzione. Le pentole a pressione della KUHN RIKON SA sono particolarmente adatte per la preparazione di piatti che normalmente richiedono lunghi tempi di cottura, come: Minestre Carni (p. es. arrosti, gulasch, ragù, ecc.
P20816_GA_Duromatic_001_026:RZ GA Duromatic d 01-2007 28.10.2010 11:27 Uhr Seite 4 AVVERTENZE DI SICUREZZA IMPORTANTI L’impiego della pentola a pressione richiede l’assoluta osservazione delle seguenti istruzioni di sicurezza: 1. Leggere attentamente tutte le istruzioni per l’uso. 2. Non toccare le superfici calde. Afferrare la pentola soltanto dal manico lungo o dai manici laterali. 3. Tenere sotto stretta sorveglianza i bambini se la pentola viene usata in loro presenza. 4.
P20816_GA_Duromatic_001_026:RZ GA Duromatic d 01-2007 28.10.2010 11:27 Uhr Seite 5 4. Messa in funzione della pentola a pressione Al primo impiego, lavare la pentola, il coperchio e la guarnizione di gomma in acqua calda con del detersivo. Se la pentola a pressione viene usata su un fornello elettrico, il diametro della piastra deve corrispondere al diametro del fondo della pentola. Le relative misure sono indicate sul lato esterno del fondo (vedi capitolo 13).
P20816_GA_Duromatic_001_026:RZ GA Duromatic d 01-2007 28.10.2010 11:27 Uhr 5. Riempimento Non riempire mai la pentola oltre i 2/3, compreso il liquido aggiunto (vedi marcatura sul lato interno della pentola) In caso di preparazione di minestre, determinati tipi di cereali, legumi secchi (vedi pagina 21) o fagioli secchi, la pentola va riempita solo per metà (marcatura 1/2). In caso di riempimento eccessivo, gli elementi di sicurezza possono subire danni (rischio di ustioni).
P20816_GA_Duromatic_001_026:RZ GA Duromatic d 01-2007 28.10.2010 11:27 Uhr Seite 7 7. Chiusura Inserire la guarnizione con cautela, in modo che sia posizionata correttamente e aderisca all’interno del coperchio sotto il fermo ITA Controllare che la guarnizione di gomma venga spinta via dal bordo del coperchio dalla spina di sicurezza colorata..
P20816_GA_Duromatic_001_026:RZ GA Duromatic d 01-2007 28.10.2010 11:27 Uhr Modello con manici laterali: allineare il triangolo di posizionamento sul coperchio in modo che sia rivolto verso il centro del manico della pentola. Girare il coperchio in senso orario finché i manici laterali del coperchio coprono quelli della pentola. Controllo: i manici laterali della pentola e del coperchio devono sovrapporsi. 8. Cottura a pressione Afferrare la pentola soltanto dai manici lunghi o dai manici laterali.
P20816_GA_Duromatic_001_026:RZ GA Duromatic d 01-2007 28.10.2010 11:27 Uhr Seite 9 Mettere la pentola correttamente chiusa su una fonte di calore adatta al diametro del fondo della pentola. Le relative misure sono indicate sul lato esterno del fondo (vedi capitolo 13). Avviare poi l’apporto di calore impostando la massima potenza. Appena il cibo comincia a bollire, l’ossigeno atmosferico fuoriesce attraverso la valvola. Dopodiché si solleva la testina della valvola.
P20816_GA_Duromatic_001_026:RZ GA Duromatic d 01-2007 28.10.2010 11:27 Uhr Per una cottura particolarmente delicata della verdura, usare l’inserto cuocivapore oppure il multicucina. In questo modo, il colore, l’aroma, le vitamine e le sostanze nutritive dei cibi restano inalterati. 9.
P20816_GA_Duromatic_001_026:RZ GA Duromatic d 01-2007 28.10.2010 11:27 Uhr Seite 11 9.3 Sfogo rapido del vapore Raffreddare il bordo della pentola sotto l’acqua corrente fredda (soltanto il bordo della pentola, perché altrimenti l’acqua può essere aspirata nella pentola). 9.4 Apertura della pentola dopo lo sfogo completo del vapore ITA Quando l’indicatore di pressione resta abbassato, significa che il vapore è fuoriuscito completamente e la pentola non è più sotto pressione.
P20816_GA_Duromatic_001_026:RZ GA Duromatic d 01-2007 28.10.2010 11:27 Uhr Istruzioni di sfogo del vapore per determinati cibi: Cibi con tempo di cottura breve: far fuoriuscire il vapore rapidamente, per evitare che il cibo cuocia eccessivamente. Verdure con tempo di cottura lungo / minestre / carni completamente immerse nel liquido / patate / cereali / fagioli secchi: far fuoriuscire il vapore lentamente, senza tenere la pentola sotto l’acqua (le patate potrebbero spaccarsi).
P20816_GA_Duromatic_001_026:RZ GA Duromatic d 01-2007 28.10.2010 11:27 Uhr Seite 13 Quando si utilizza la pentola a pressione, la valvola SI (primo dispositivo di sicurezza) deve sempre essere montata correttamente sul coperchio (= molla visibile all’interno del coperchio). Non smontare quindi mai questa valvola per pulire la pentola! Non lavare nella lavastoviglie il coperchio, la copertura della valvola né la pentola.
P20816_GA_Duromatic_001_026:RZ GA Duromatic d 01-2007 28.10.2010 10.1 Valvole 10.1.1 Applicare la copertura della valvola Togliere tutte le coperture della valvola usando entrambe le mani. 10.1.2 Smontaggio della valvola COMFORT Per smontarla, allentare la vite della valvola con indicatore di pressione integrato (6) sulla parte interna del coperchio con l’aiuto di una moneta o un cacciavite. Tenere ben ferma la testina della valvola.
P20816_GA_Duromatic_001_026:RZ GA Duromatic d 01-2007 28.10.2010 11:27 Uhr Seite 15 10.1.4 Pulizia e montaggio della valvola 1. Smontare e pulire la valvola. Non utilizzare assolutamente prodotti detergenti abrasivi. 2. Durante il montaggio, verificare che la testina della valvola sia saldamente avvitata sull’indicatore di pressione e che la vite della valvola risulti ben salda. 3. Controllare la valvola dopo il montaggio (vedi capitolo 6). 10.1.
P20816_GA_Duromatic_001_026:RZ GA Duromatic d 01-2007 28.10.2010 11:27 Uhr 10.2 Avvertenze supplementari per la pulizia e la manutenzione del modello DUROMATIC con rivestimento antiaderente Oltre alle istruzioni per la cura e la pulizia al capitolo 11, è importante osservare le seguenti indicazioni: Per la pulizia del rivestimento al titanio duro non usare detergenti abrasivi né la pasta di pulizia SWISS CLEANER.
P20816_GA_Duromatic_001_026:RZ GA Duromatic d 01-2007 28.10.2010 11:27 Uhr Seite 17 12. Garanzia La KUHN RIKON SA offre 10 anni di garanzia (scontrino) su materiale e rifiniture di tutte le pentole (rivestimento al titanio: 3 anni). Sono esclusi danni da surriscaldamento, sporco, graffi e alterazioni di colore. La garanzia non copre la normale usura delle guarnizioni metalliche e delle guarnizioni di gomma. 13.
P20816_GA_Duromatic_001_026:RZ GA Duromatic d 01-2007 28.10.2010 14. Tutela dell’ambiente/smaltimento La pentola, gli accessori e l’imballaggio vanno riciclati e quindi smaltiti nel pieno rispetto dell'ambiente. Si prega di osservare le norme nazionali e regionali in vigore. In Svizzera, è possibile rispedire le pentole KUHN RIKON non più utilizzate (affrancate correttamente) direttamente a un centro d’assistenza Kuhn Rikon (indirizzo vedi capitolo 13).
P20816_GA_Duromatic_001_026:RZ GA Duromatic d 01-2007 28.10.2010 11:27 Uhr Seite 19 15. Tabella dei tempi di cottura I tempi di cottura sotto indicati possono variare leggermente a seconda del prodotto, della conservazione e della qualità del prodotto da cuocere.
P20816_GA_Duromatic_001_026:RZ GA Duromatic d 01-2007 Alimento Tempo di cottura (min) 11:27 Uhr Aggiunta di liquidi Agnello Arrosto d’agnello (Spezzatino d’agnello) 30 20 2 2 a seconda della ricetta, almeno 1/2 dl a seconda della ricetta, almeno 1/2 dl Pollame Pollo in pezzi Pollo intero 8 15 2 2 a seconda della ricetta, almeno 1/2 dl a seconda della ricetta, almeno 1/2 dl Selvaggina Arrosto di lepre Arrosto di capriolo Selvaggina in salmì Sminuzzato di selvaggina 30 30 18 20 2 2 2 2 a secon
P20816_GA_Duromatic_001_026:RZ GA Duromatic d 01-2007 Tempo di Grado di cottura (min)cottura Alimento Navoni tagliati in quarti Navoni tagliati a fette Barbabietole Cavoletti di Bruxelles Cavolo rosso Crauti crudi Scorzonera Sedano rapa tagliato a metà/a fette Asparagi Pomodori per sugo Verza (cavolo verzotto) tagliata a metà 12 5 25 4 10 30 12 6/2 5-10 6 8 2 2 2 2 2 2 2 2 2 2 2 28.10.
P20816_GA_Duromatic_001_026:RZ GA Duromatic d 01-2007 Alimento Frutta fresca (con inserto multicucina) Pere, mele, pesche, prugne, albicocche molto mature Prugne, albicocche ancora dure Cotogne Castagne Tempo di cottura (min) Grado di cottura 2 4 10 12 28.10.
P20816_GA_Duromatic_001_026:RZ GA Duromatic d 01-2007 28.10.2010 11:27 Uhr Seite 23 16. Accessori DUROMATIC Denominazione dell’articolo N. art.
P20816_GA_Duromatic_001_026:RZ GA Duromatic d 01-2007 28.10.2010 11:27 Uhr 17. Pezzi di ricambio per DUROMATIC Abbiamo selezionato i pezzi di ricambio più importanti. Ulteriori pezzi di ricambio sono in vendita presso i rivenditori specializzati. Per poter fornire i pezzi di ricambio corretti, si prega di comunicare il numero d’articolo e la data di produzione della pentola (vedi capitolo 13) oppure di inviare il pezzo difettoso ad uno dei centri d’assistenza Kuhn Rikon. Denominazione dell’articolo N.
P20816_GA_Duromatic_001_026:RZ GA Duromatic d 01-2007 28.10.2010 11:27 Uhr Seite 1 DUROMATIC Indice 1. Las ventajas de su olla a presión DUROMATIC a simple vista 2. Utilización correcta 3. Seguridad 2 3 3 4. Puesta en marcha de la olla a presión DUROMATIC 5 5. Llenado 6 6. Comprobación de la válvula 6 7. Cerrado de la olla 7 8. Cocinar con presión 8 9. Purgado del vapor y apertura de la olla 10 10. Indicaciones para la limpieza y el mantenimiento de la DUROMATIC12 11.
P20816_GA_Duromatic_001_026:RZ GA Duromatic d 01-2007 28.10.2010 11:27 Uhr Seite 2 1. Las ventajas de su olla a presión DUROMATIC, a simple vista • Cocción que preserva las vitaminas (en beneficio de su salud) • Ahorro de energía y tiempo (el tiempo de cocción con presión es de aprox.
P20816_GA_Duromatic_001_026:RZ GA Duromatic d 01-2007 28.10.2010 11:27 Uhr Seite 3 2. Utilización correcta La olla a presión DUROMATIC ha sido concebida para cocinar con agua y puede utilizarse en todo tipo de cocinas, incluso cocinas de inducción en el hogar. Las ollas a presión KUHN RIKON S.A. son especialmente apropiadas para comidas que normalmente requieren largo tiempo de cocción: sopas carnes (p.ej. asados, estofados, guisos, etc.
P20816_GA_Duromatic_001_026:RZ GA Duromatic d 01-2007 28.10.2010 11:27 Uhr Seite 4 ADVERTENCIAS DE SEGURIDAD IMPORTANTES Durante el uso de la olla a presión hay que atenerse siempre a las siguientes medidas básicas de precaución 1. Leer todas las instrucciones. 2. No tocar las superficies calientes. Sujetar la olla solo por el mango o las asas. 3. Si se utiliza la olla a presión en presencia de niños, es necesario vigilarlos muy atentamente. 4. No poner nunca la olla a presión en un horno caliente 5.
P20816_GA_Duromatic_001_026:RZ GA Duromatic d 01-2007 28.10.2010 11:27 Uhr Seite 5 4. Puesta en marcha de la olla a presión DUROMATIC Antes de usarla por primera vez, hay que lavar la olla, la tapa y la junta de goma con agua caliente y detergente. En las cocinas eléctricas, el diámetro de la placa de cocción y el tamaño de la base de la olla a presión deberán ser iguales. Está debidamente señalado en el fondo de la olla, en su parte exterior. (Ver cap.
P20816_GA_Duromatic_001_026:RZ GA Duromatic d 01-2007 28.10.2010 11:27 Uhr 5. Llenado Nunca llene la olla por encima de los 2/3 de su capacidad, contando el líquido que se añada (ver la marca en el interior de la olla). Cuando se preparen sopas, determinados cereales y legumbres secas (ver página 21) o judías secas, no hay que llenar nunca más de la mitad de la olla (marca de 1/2). Si la olla está demasiado llena, pueden dañarse los elementos de seguridad (peligro de escaldamiento).
P20816_GA_Duromatic_001_026:RZ GA Duromatic d 01-2007 28.10.2010 11:27 Uhr Seite 7 7. Cerrar la olla Ponga cuidadosamente la junta de goma en la tapa, asegurándose de que quede bien pegada al interior de la tapa. SPA Compruebe que el pasador de seguridad de color separa la junta de goma del borde de la tapa.
P20816_GA_Duromatic_001_026:RZ GA Duromatic d 01-2007 28.10.2010 11:27 Uhr Modelo con mango lateral: El triángulo de posicionamiento de la tapa debe coincidir con el centro del mango lateral de la tapa. Gire la tapa en el sentido de las agujas del reloj hasta que los mangos de la tapa queden sobre el mango del cuerpo. Control: los mangos laterales de la olla y la tapa deben estar superpuestos. 8. Cocinar a presión Sujete la olla caliente únicamente por las asas o el mango.
P20816_GA_Duromatic_001_026:RZ GA Duromatic d 01-2007 28.10.2010 11:27 Uhr Seite 9 Ponga la olla bien cerrada en la placa del diámetro adecuado para la base de la olla, lo que está debidamente señalado en el fondo de la olla por la parte exterior (ver cap. 13) y suba al máximo el fuego. En cuanto el contenido de la olla comienza a hervir, lo primero que sale por la válvula es el oxígeno del aire. A continuación, el cabezal de la válvula se dispara hacia arriba.
P20816_GA_Duromatic_001_026:RZ GA Duromatic d 01-2007 28.10.2010 11:27 Uhr En el vaporizador o en la rejilla se pueden hervir verduras de forma especialmente suave, preservando su color, su aroma, sus vitaminas y sus propiedades nutritivas. 9. Purgado del vapor y apertura de la olla ¡No abrir jamás la olla a la fuerza! Si se han preparado alimentos pastosos o de gran contenido en grasa, hay que sacudir ligeramente la olla a presión antes de abrir la tapa para evitar que el contenido salpique.
P20816_GA_Duromatic_001_026:RZ GA Duromatic d 01-2007 28.10.2010 11:27 Uhr Seite 11 9.3 Purgado rápido del vapor Enfriar el borde de la olla bajo un chorro de agua fría (solo el borde de la olla ya que, de lo contrario, la olla podría aspirar el agua hacia el interior). 9.4 Apertura de la olla despresurizada SPA La olla estará despresurizada, es decir, sin presión, cuando el indicador de presión permanezca bajado.
P20816_GA_Duromatic_001_026:RZ GA Duromatic d 01-2007 28.10.2010 11:27 Uhr Sugerencias para purgar el vapor con determinados alimentos: Alimentos que requieran un tiempo de cocción corto: Purgar el vapor rápidamente, de lo contrario estos podrían cocerse demasiado. Hortalizas de cocción larga / sopas / carnes completamente sumergidas en líquido / patatas / cereales / judías secas: Purgar el vapor lentamente.
P20816_GA_Duromatic_001_026:RZ GA Duromatic d 01-2007 28.10.2010 11:27 Uhr Seite 13 La válvula de seguridad (primer dispositivo de seguridad) debe estar siempre correctamente colocada en la tapa durante el uso (se debe ver el muelle en el interior de la tapa). ¡No desmonte nunca esta válvula para limpiarla! La tapa, la campana de la válvula y la olla no deben lavarse en el lavavajillas.
P20816_GA_Duromatic_001_026:RZ GA Duromatic d 01-2007 28.10.2010 10.1 Válvulas 10.1.1 Quitar la campana de la válvula Sacar todas las campanas de la válvula con ambas manos. 10.1.2 Desmontaje de la válvula COMFORT Aflojar el tornillo de la válvula con indicador de presión integrado (6) en la parte interior de la tapa con un destornillador o una moneda.
P20816_GA_Duromatic_001_026:RZ GA Duromatic d 01-2007 28.10.2010 11:27 Uhr Seite 15 10.1.4 Limpieza y montaje de la válvula 1. 1. Desmontar y limpiar la válvula. No usar nunca productos de limpieza agresivos o abrasivos. 2. Cuando se proceda a montarla de nuevo, prestar atención a que el cabezal de la válvula esté bien sujeto en el indicador de presión y apretar a mano el tornillo de la válvula. 3. 3. Después del montaje, comprobar la válvula. (Ver cap. 6) 10.1.
P20816_GA_Duromatic_001_026:RZ GA Duromatic d 01-2007 28.10.2010 11:27 Uhr 10.2 Instrucciones adicionales de limpieza y cuidado para la DUROMATIC con recubrimiento antiadherente Además de las instrucciones generales de cuidados y limpieza del capítulo 10, respete las siguientes indicaciones. No limpie el recubrimiento antiadherente de titanio con productos abrasivos ni con la pasta de limpieza SWISS CLEANER.
P20816_GA_Duromatic_001_026:RZ GA Duromatic d 01-2007 28.10.2010 11:27 Uhr Seite 17 12. Garantía KUHN RIKON AG garantiza el presente producto durante 10 años (presentar el comprobante de compra) por defecto de material o fabricación (3 años para el recubrimiento de titanio). Esta garantía no incluye daños causados por recalentamiento, exceso de suciedad, arañazos, decoloración. Quedan excluidas las piezas recambiables tales como las piezas de guarnición, las juntas de goma. 13.
P20816_GA_Duromatic_001_026:RZ GA Duromatic d 01-2007 28.10.2010 11:27 Uhr 14. Protección del medio ambiente/eliminación de la olla La olla, los accesorios y el embalaje deben entregarse a un centro reciclaje ecológico. Deben cumplirse las normas habituales del país y de la región. En Suiza, las ollas KUHN RIKON inservibles pueden enviarse (correctamente franqueadas) directamente a un Centro de Servicio Técnico KUHN RIKON. (Direcciones en el cap.
P20816_GA_Duromatic_001_026:RZ GA Duromatic d 01-2007 28.10.2010 11:27 Uhr Seite 19 15. Tabla de tiempos de cocción Los tiempos de cocción detallados en la siguiente tabla pueden variar ligeramente según el producto, el almacenamiento y la calidad del alimento. Alimento Tiempo de cocción (min.
P20816_GA_Duromatic_001_026:RZ GA Duromatic d 01-2007 Alimento Tiempo de cocción (min.) 11:27 Uhr Añadido de líquidos Cordero Asado de cordero Estofado de cordero (gulash) 30 20 2 2 según receta, mín. 1/2 dl según receta, mín. 1/2 dl Aves Ave troceada Ave entera 8 15 2 2 según receta, mín. 1/2 dl según receta, mín. 1/2 dl Caza Asado de liebre Asado de corzo Guiso picante de caza Ragú de caza 30 30 18 20 2 2 2 2 según receta, mín. según receta, mín. según receta, mín. según receta, mín.
P20816_GA_Duromatic_001_026:RZ GA Duromatic d 01-2007 Alimento Tiempo de Nivel de cocción (min.) cocción Navoni tagliati in quarti Navoni tagliati a fette Barbabietole Cavoletti di Bruxelles Cavolo rosso Crauti crudi Scorzonera Sedano rapa tagliato a metà/a fette Asparagi Pomodori per sugo Verza (cavolo verzotto) tagliata a metà 12 5 25 4 10 30 12 6/2 5-10 6 8 2 2 2 2 2 2 2 2 2 2 2 28.10.2010 11:27 Uhr Seite 21 Añadido de líquidos hasta la altura de la rejilla, mín.
P20816_GA_Duromatic_001_026:RZ GA Duromatic d 01-2007 Alimento Tiempo de cocción (min.
P20816_GA_Duromatic_001_026:RZ GA Duromatic d 01-2007 28.10.2010 11:27 Uhr Seite 23 16. Accesorios DUROMATIC Denominación del artículo N. art.
P20816_GA_Duromatic_001_026:RZ GA Duromatic d 01-2007 28.10.2010 11:27 Uhr 17. Repuestos DUROMATIC Hemos seleccionado para usted los repuestos más importantes. El resto está disponible en los establecimientos especializados. Para garantizar que Ud. recibe el repuesto correcto, apunte el número de referencia y la fecha de producción (ver cap. 13) o envíe el articulo defectuoso a su Servicio Técnico KUHN RIKON. Denominación del artículo N.º art.
WORLDWIDE UNITED KINGDOM GERMANY Kuhn Rikon AG Neschwilerstrasse 4 CH-8486 Rikon Tel. +41 52 396 01 01 Fax +41 52 396 02 02 kuhnrikon@kuhnrikon.ch www.kuhnrikon.ch Kuhn Rikon (UK) Ltd. Landport Road Wolverhampton WV2 2QJ Great Britain Tel. 01902 458 410 Fax 01902 458 160 sales@kuhnrikon.co.uk www.kuhnrikon.co.uk Kuhn Rikon AG Stephan Höss D-89407 Dillingen Tel. +49 177 707 03 73 stephan.hoess@kuhnrikon.ch www.kuhnrikon.
Art. 40674 03/15 www.kuhnrikon.